The Best “Push Pull Legs Routine” For Growth
One of the most effective workout routines you can use to build muscle is the push pull legs split, in which your major muscle groups are split into three different workouts. Continue reading to learn how you can incorporate it into your training.
Here's an introduction to how the push pull legs workout works:
- In the push workout, you train all of your upper body pushing muscles. So. your chest, shoulders, and triceps.
- In the pull workout, you train all of your upper body pulling muscles. So. your back, biceps, and rear delts.
- And finally, in the legs workout, you train your entire lower body. That's your quads, hamstrings, and calves.
These workouts are then typically performed for a total of 6 days per week with a rest day in between every 3 consecutive days. But do note that the push-pull leg split can also easily be adjusted in a variety of ways to best fit your schedule.
Now, the reason why this split is so effective for muscle growth is that it:
- Trains each major muscle group at the training frequency of 2x/week. As we know, this is most effective for growth
- Allows plenty of recovery time for each muscle
- Can be easily tailored to fit different schedules, goals, and your level of training experience
In this article, I’ll show you how to get started with the push pull legs routine by going through exactly how to optimally set up one of your push workouts and one of your pull workouts for the week by using scientific literature and our anatomical understanding of the various pushing muscles.
Of course, you should apply up-to-date training science to your push-pull-leg routine. Every aspect of your training will benefit if you take the time to really understand the anatomy of your muscles (including small ones, like the serratus). That's why every single one of my programs walks you through the science behind every programmed exercise - and why you're doing what you do. Interested?
Click the button below to take my analysis quiz to discover the best program for you:
↓
Push Pull Legs Routine: The Push Workout
Exercise 1: Incline Barbell Bench Press
The first exercise we’re going to cover in a typical push workout for mass is the incline barbell bench press. This exercise is used to target the clavicular head of the pecs, which makes up the mass of the upper chest. The clavicular head of the pecs is often a weak point for most people. And yet, is key to achieving a well-developed chest.
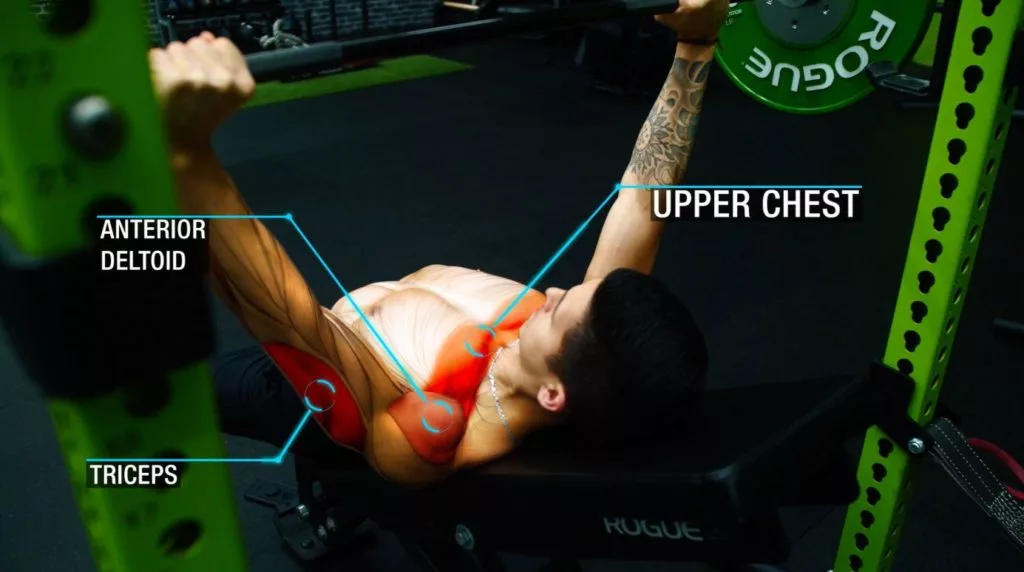
The Incline Barbell Bench Press Best Activates The Upper body pushing muscles
And there are a couple of reasons as to why this exercise is a must in your push pull legs routine:
First off, we know that the bench press is highly effective at growing the chest. That's because recent papers (here, here) have shown a strong positive correlation between bench press strength and chest size.
This is probably not only due to the high amount of chest activation we see with the bench press. But also because barbell presses, in general, are typically the most effective to incrementally add weight to. And progressively overload over time to continuously drive growth as you get stronger.
Secondly, by implementing an incline bench angle, we’ll be adding slightly more shoulder flexion to the bench press. Which will as a result emphasize the upper chest to a greater degree. That's because shoulder flexion is one of the upper chest's main movement functions.
The Appropriate Incline Angle Is Key
That said, research (here, here) has indicated that setting the appropriate incline angle is key when it comes to maximizing the effectiveness of this exercise for upper chest growth. And is therefore vital that you do so correctly.
Although the optimal bench angle does vary between studies, research generally shows a trend where we see increased upper chest activation when going from a bench angle of 0 degrees to 30 degrees. And then another slight activation boost when bumped up to a 45 degree angle.
However, at the same time, we also see a compensatory increase in anterior deltoid activity during each successive increase in bench angle. With 45 degrees eliciting the highest activation.
Therefore, in order to maximize the activation of the upper chest and prevent the front delts from taking over, it does seem that an angle of 30 degrees is optimal. Which is typically 2 notches above the bottom position for most gym benches.
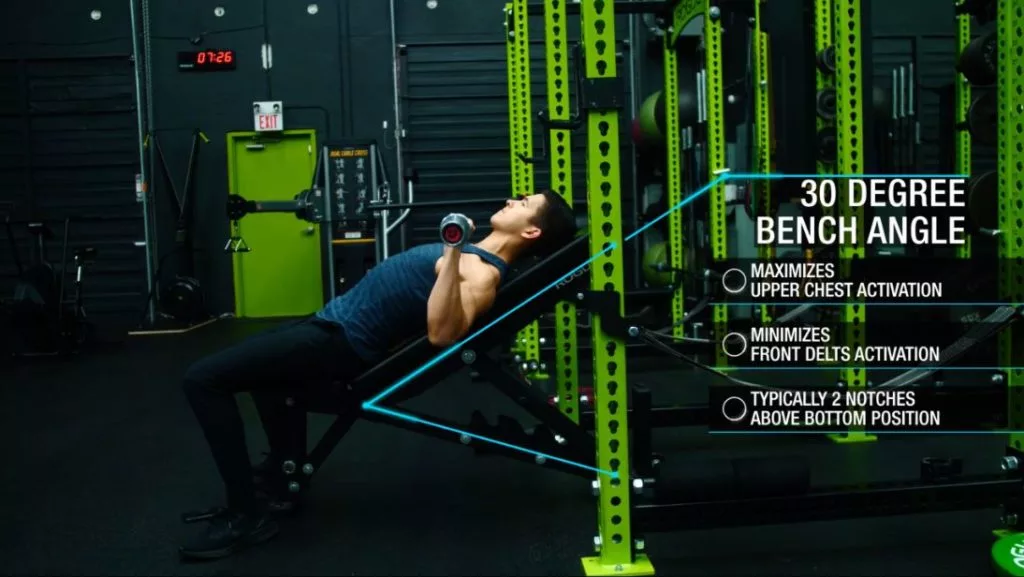
However, I urge you to experiment with lower and higher bench angles to see what best activates your upper chest as it will vary for many individuals.
A Slightly Narrower Grip May Be Beneficial
I would also recommend experimenting with a slightly narrower grip during this movement. One paper from the Journal of Strength and Conditioning Research found that this not only boosted upper chest activation but also decreased the compensatory activation seen with the front delts during the movement.
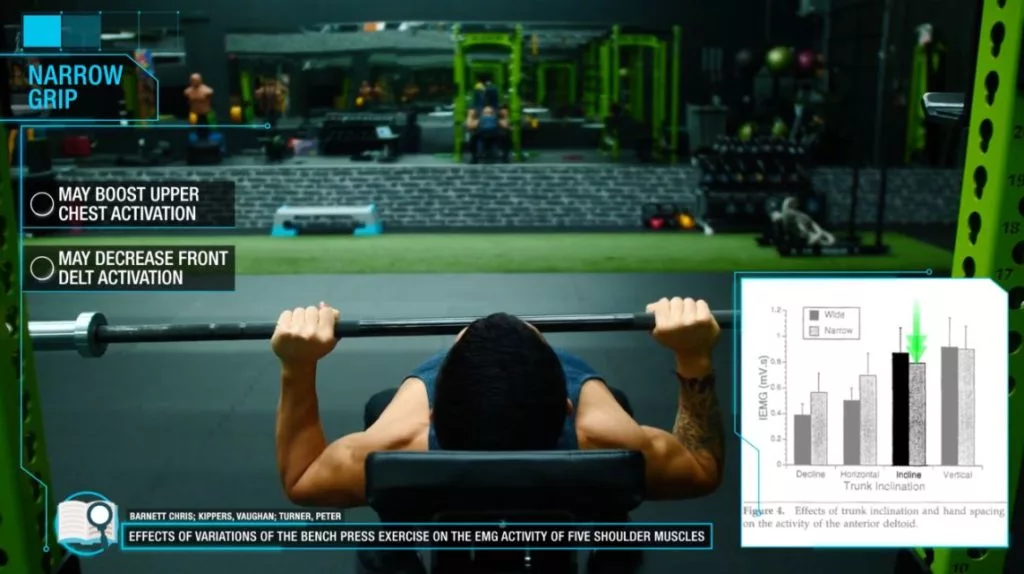
But when implementing this, ensure that your forearms remain stacked vertically at the bottom position. You can do so by adjusting your elbow angle during the press accordingly.
Aside from that, we’ll use a full range of motion here coming all the way down to the upper region of your chest. And a rep range of 6-8 reps with relatively heavier weight.
Exercise 2: Standing Dumbbell Shoulder Press
Next, we’ll be moving onto the standing dumbbell shoulder press. This exercise is used to target the shoulders. But with most of the emphasis being placed on the front and lateral regions.
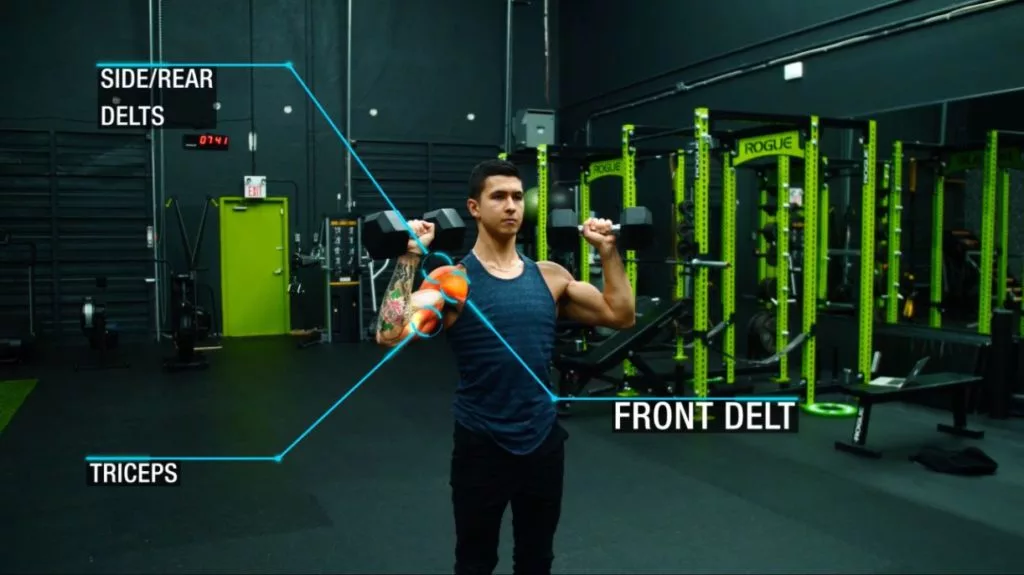
And the reason for using the standing dumbbell press as opposed to its barbell or seated counterparts is based on the findings of a 2013 EMG analysis. Researchers found that the standing dumbbell press elicited significantly greater front, side, and rear delt activation when compared to the other 3 shoulder pressing options.
Why? Well, that's likely due to the greater stability requirements of this movement.
The only downsides with this exercise though are that:
- Overloading it with heavier weight overtime be much more difficult due to getting the dumbbells up in position
- As indicated by the paper, you’ll also have to lift around 10% less weight than the other versions
However, given that with exercise 1 we’ve already utilized a heavy compound movement that also stresses the front delts, it just makes sense to utilize the standing dumbbell press to focus a little more on activating the side and rear delts. To still ensure you’re adequately working the shoulders despite having to use a lighter weight, we’ll slightly bump up the rep range for this exercise. So, you should aim for a relatively higher 10-15 reps per set.
Exercise 3: Paused Flat Dumbbell Press
Next, we’ll be using the flat dumbbell press to now emphasize the sternocostal head of the pecs. More specifically, the mid-chest. Which is important since we'd already prioritized the upper chest by using an incline earlier on in the recommended push pull legs workout.
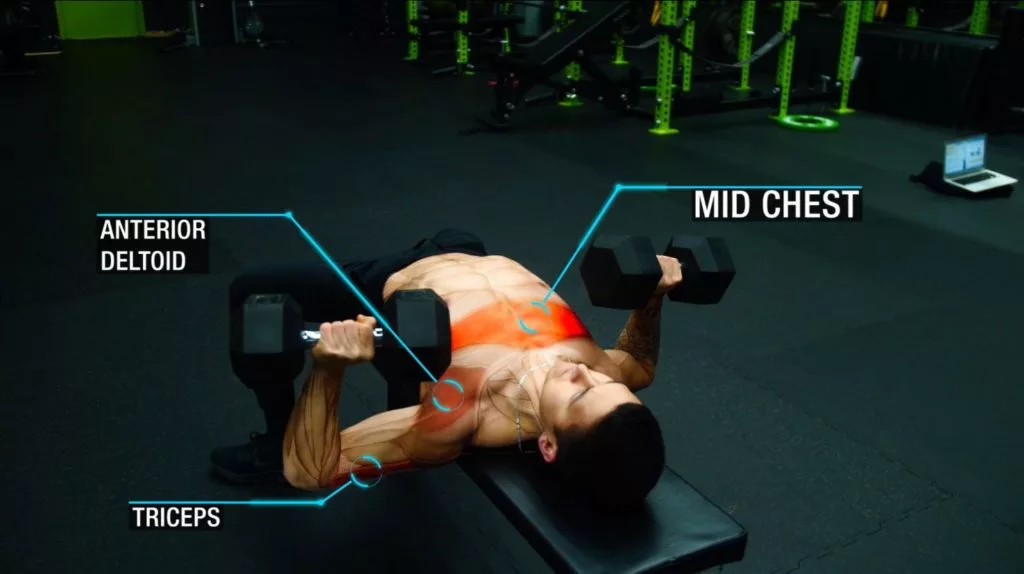
Paused Flat Dumbbell Presses: Provides Most Mid-Chest Activation
Flat dumbbell presses are a great option to do this since they’re very effective at activating the mid-chest. Illustrating this is an extensive EMG study by researcher Bret Contreras. In the study, he analyzed the chest activity within 15 different chest exercises. And found the flat dumbbell press to be the most effective exercise at activating the mid-chest.
In addition, one of the unique benefits of using dumbbells here is that we’re able to achieve a greater range of motion for the chest than we could when compared to using a barbell as we did earlier.
For this exercise, I would also recommend at least periodically in your sessions to incorporate a slight 1-2 second pause at the bottom position of each rep.
How Adding A Slight Pause At The Bottom Position Helps
This in effect not only adds some more variety to your chest pressing movements. But it also helps build more strength out of the bottom position. Which happens to be where most people are weakest in. Now, why does this pause help build strength? Well, it does so by preventing you from receiving any help from the stretch-shortening reflex that you’d typically get at this bottom position.
In addition, brief pauses in this position will also help strengthen you isometrically. Which will, in turn, better help you perfect your form for the movement. That's because you’re now forced to maintain tightness without breaking down your form at this bottom position before you proceed to the next rep.
And for this exercise, we’ll use moderately heavy weight for a rep range of 8-12 reps per set.
Exercise 4: Lean-Away Dumbbell Lateral Raise
Next, we’re going to move onto lateral raises to now prioritize the side delts. Although they were worked to an extent during the standing shoulder press done earlier, lateral raises have been shown to elicit far greater activation of the side delts. And is, therefore, a good idea to include in this push pull legs routine given the importance of developing this muscle for a wider, more powerful-looking physique.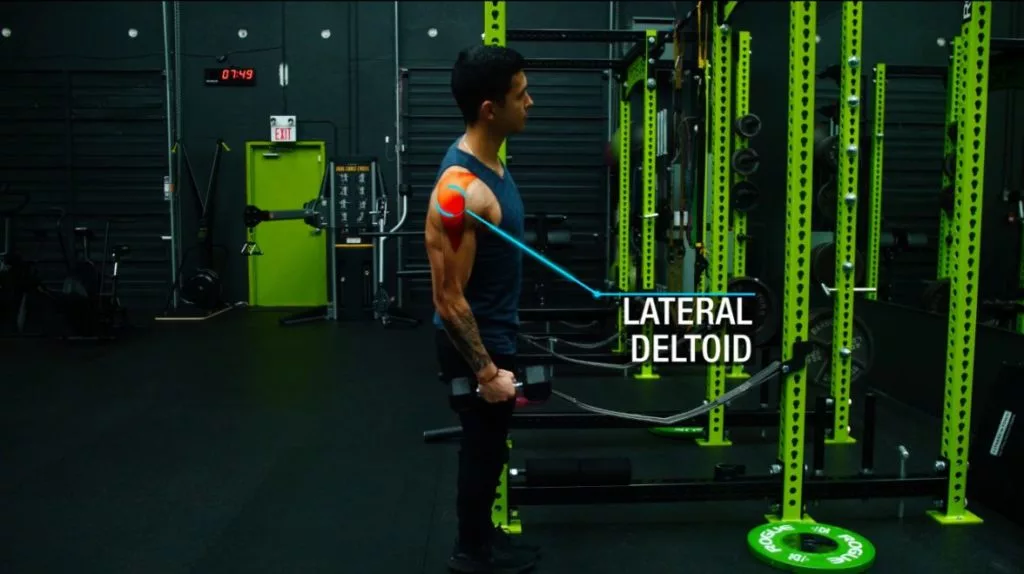
As I’ve stated in past articles (here, here), to potentially make the lateral raise even more effective for the side delts, you can slightly lean in the direction of the raise. The reasoning for this is based on a recent paper. Which showed that one of our rotator cuff muscles, the supraspinatus, is most active during the beginning of the raise. Whereas the side delts only start to become more active at around halfway up.
So, by leaning away, you’re able to remove the beginning portion of the raise. As a result, shift slightly more tension onto the delts. And away from the supraspinatus.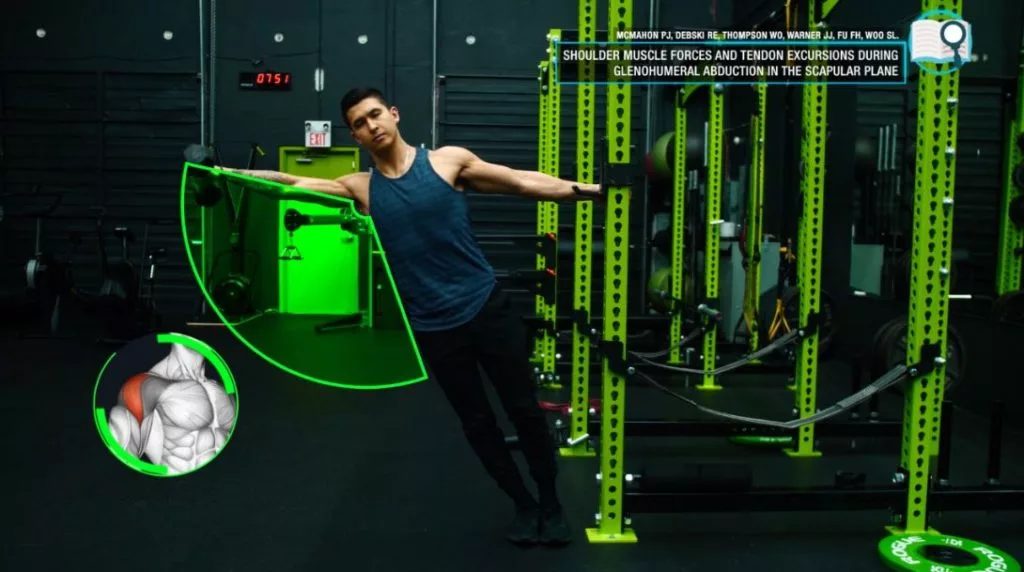
For this exercise, we’ll want to focus on form and activation by using a relatively light weight for a higher rep range of 10-15 reps.
Exercise 5: Seated Decline Cable Flies W/ Supination
Next, it’s time to re-visit the chest with a seated decline cable fly. This exercise will be used to target the lower region of the chest which has yet to receive much emphasis. But is important to develop in order to sculpt that lower and outer chest region.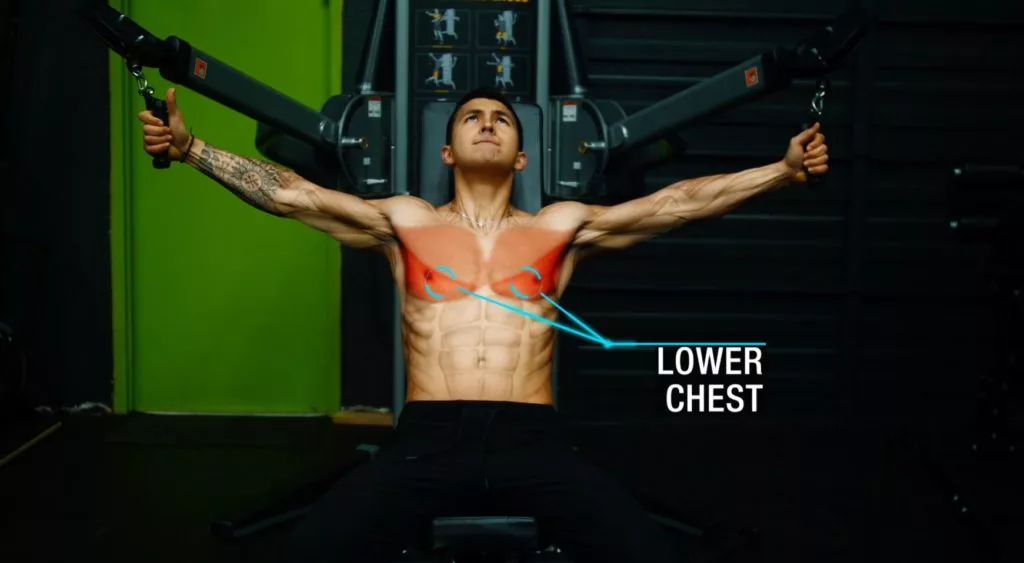
So what you’ll want to do here is:
- Set up a high incline bench
- Move the cables up such that they’re slightly above the height of your shoulders when you’re seated.
- Next, you’ll want to perform a high to low fly motion and supinate your wrists at the end position. You can do so by rotating your palms up and driving your elbows in.
The high to low motion implemented here enables us to apply the tension in direct line with the lower fibres of the chest. And the supination of the wrists at the end will simply heighten the lower chest contraction experienced by enabling the elbows to travel inward to a greater degree.
For these, we’ll again focus on maximizing activation of the lower chest by using relatively light weight and a higher rep range of 10-15 reps.
Exercise 6: Incline Dumbbell Overhead Extensions
Lastly, we’re going to move onto incline dumbbell overhead extensions to target the triceps. More specifically, given the added shoulder flexion of this exercise, we’ll be able to effectively emphasize the long head of the triceps.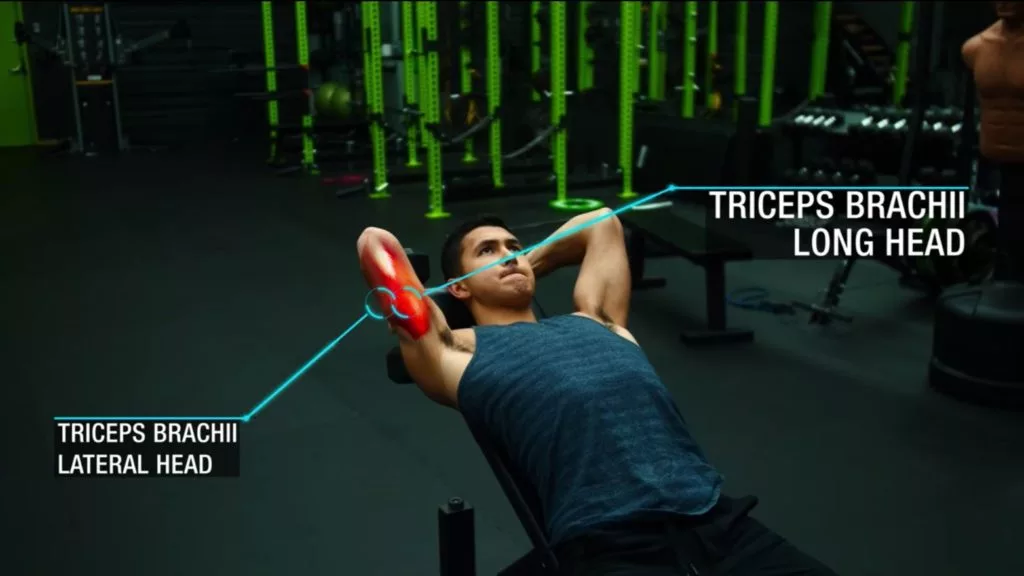
Which is important we do in this workout. That's because it's responsible for most of the mass of your triceps. And has yet to receive much attention from our previous pushing exercises when compared to the other triceps heads.
For these, we’ll use relatively lighter weight. And a higher rep range of 10-15 reps as this is generally easier on the elbows. If that seems to be an issue for you.
Push Pull Legs Routine: Best Science-Based Push Workout
So to sum everything up for you, here’s what your push workout could look like:
Incline Barbell Bench Press: 3-4 sets of 6-8 reps
Standing Dumbbell Shoulder Press: 3-4 sets of 10-15 reps
Paused Flat Dumbbell Press: 3-4 sets of 8-12 reps
Lean-Away Dumbbell Lateral Raise: 2-3 sets of 10-15 reps
Seated Decline Cable Flies W/ Supination: 2-3 sets of 10-15 reps
Incline Dumbbell Overhead Extensions: 2-3 sets of 10-15 reps
I’d recommend that novice lifters stay on the lower end of the volume requirements. Whereas more experienced lifters can opt for the higher recommendation of sets.
As for your second workout during the week, you want to stick to the same general outline. And target muscles but switch up the exercises accordingly.
By the way, here’s the push workout summed up into a YouTube video:
Push Pull Legs Routine: The Pull Workout
How To Set Up Your Pull Workouts
First off, it’s important you understand the overall setup of this upper body pull workout, which involves the following:
- Vertical Pull
- Horizontal Pull
- Vertical Pull
- Horizontal Pull
The first 4 exercises will rotate between vertical pulling movements and horizontal rowing movements. It’s beneficial to rotate from one to the other throughout the workout.
This not only works our back muscles from different angles but also avoids overstraining certain stabilizer muscles that are heavily involved in certain planes of motion. Then, we’ll finish the workout off with 2 accessory movements. This helps to work the smaller muscle groups that will need a little more emphasis:
- Vertical Pull
- Horizontal Pull
- Vertical Pull
- Horizontal Pull
- Accessory Movement
- Accessory Movement
So with that being said, let’s take a look at what research indicates the optimal pull workout in a push pull legs routine might look like.
Exercise 1: Pull-Ups
The first exercise we’ll cover in this pull workout is pull-ups. You'll find that pull-ups are one of the best exercises for targeting the lats to increase the width of your back. In fact, when compared to 7 other back exercises in a paper by the American Council of Exercise, the pull-up came out on top with the highest lats activation. In addition, research has shown that the pull-up activates various other back and arm muscles to a high degree as well. Meaning that it’s a great overall back builder and therefore should be a staple in your routine.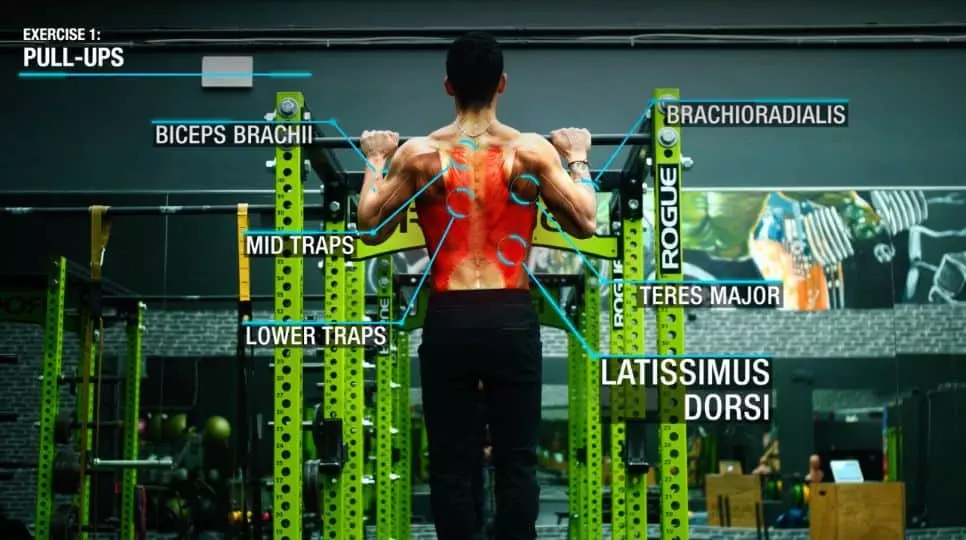
Now, what about the pull-up's counterpart: the chin-up? And its effectiveness? Well, both movements are indeed quite similar. But there are a few key differences that are highlighted in the following paper by Youdas and colleagues.
The researchers found that both exercises activate the lats to a similar degree. But there were two main differences:
- Chin-ups provide greater biceps activation. This is expected due to the grip, and
- Pull-ups provide significantly greater lower traps activation.
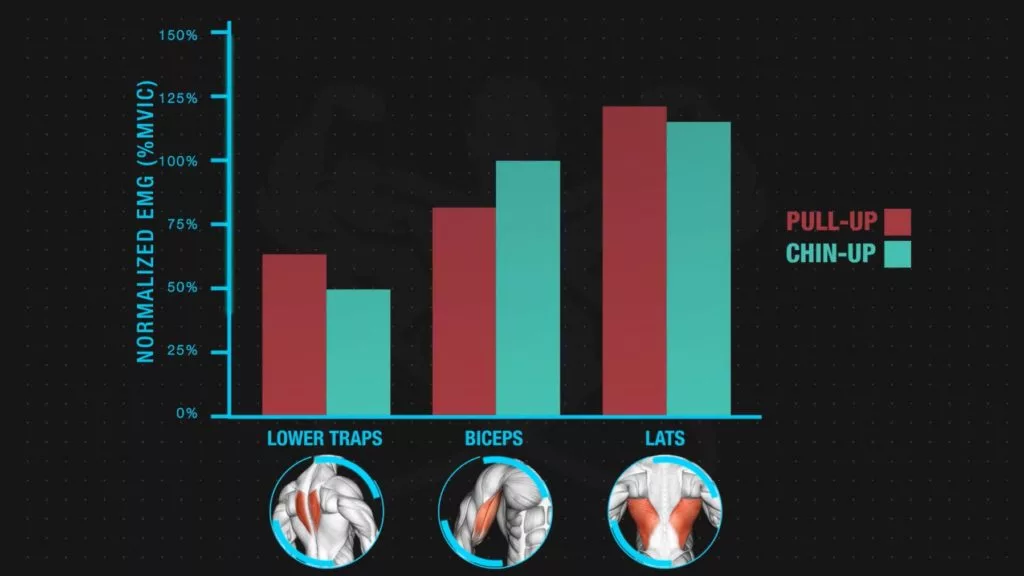
Meaning that overall, both are great options. Nonetheless, the lower traps are a back muscle that tends to become weak and underdeveloped in lifters. Yet is especially important for posture and shoulder health. And that's why, because of their lower traps activation, pull-ups can be argued as the better alternative for this workout. That is why I've included them here.
But if you’re currently unable to perform pull-ups, as suggested in my recent pull-up strength article, you’ll want to swap these for kneeling lat pulldowns instead. Since this exercise has been shown to best mimic their muscle activation pattern when compared to other commonly used alternatives.
Exercise 2: Barbell Row
Next, it’s time to switch the angle of pull. We'll move on to a horizontal pulling movement with the barbell row. This exercise has been shown in research to be a great overall back builder. Not to mention, is also especially useful for mid-back thickness and lower back development. That's because it outperforms other common back exercises in terms of activation of these areas.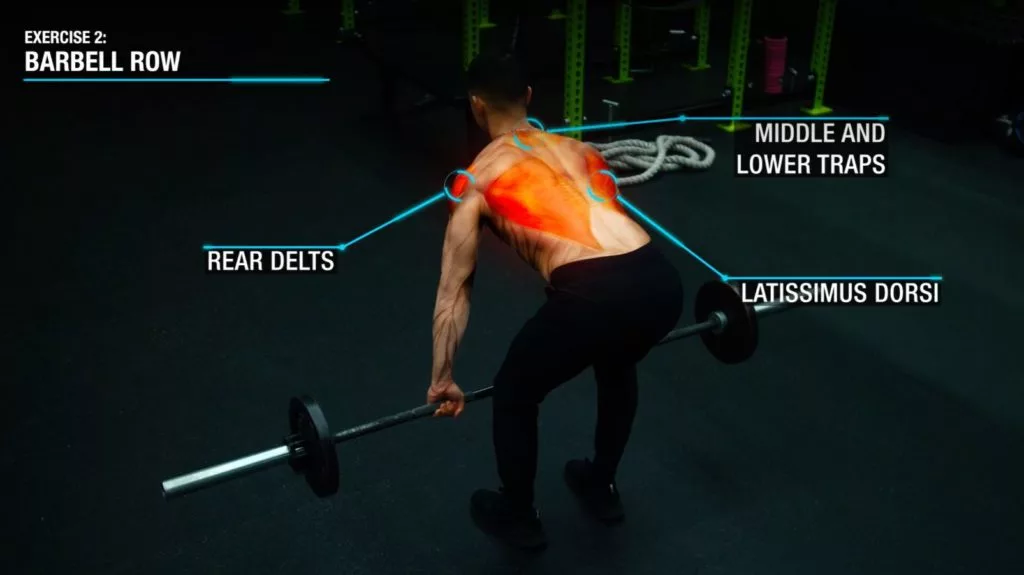
Therefore, we’ll be using them here to compliment the pull-ups done earlier to now focus more on our back thickness. This is a must-have when it comes to designing a pull workout for mass. And to also just hit our lats from a different angle.
To properly execute them for the best back development:
- First, lower your upper body by pushing your hips back while slightly bending your knees.
- Stop at the point where the flexibility of your hamstrings prevents you from going any further without rounding your back. For most individuals, this is somewhere around 45 degrees.
- Then, you’ll want to use an overhand grip that’s just outside your knees.
- Pull the bar up towards your upper abs while keeping your elbows at roughly a 45-degree angle. As this specific form has been shown to be best for upper back thickness. Which is our main goal here.
Exercise 3: Reverse Grip Lat Pulldowns
Next, we’ll move back to a vertical pulling movement. We can do so with the lat pulldown. This further targets the lats and various other back muscles.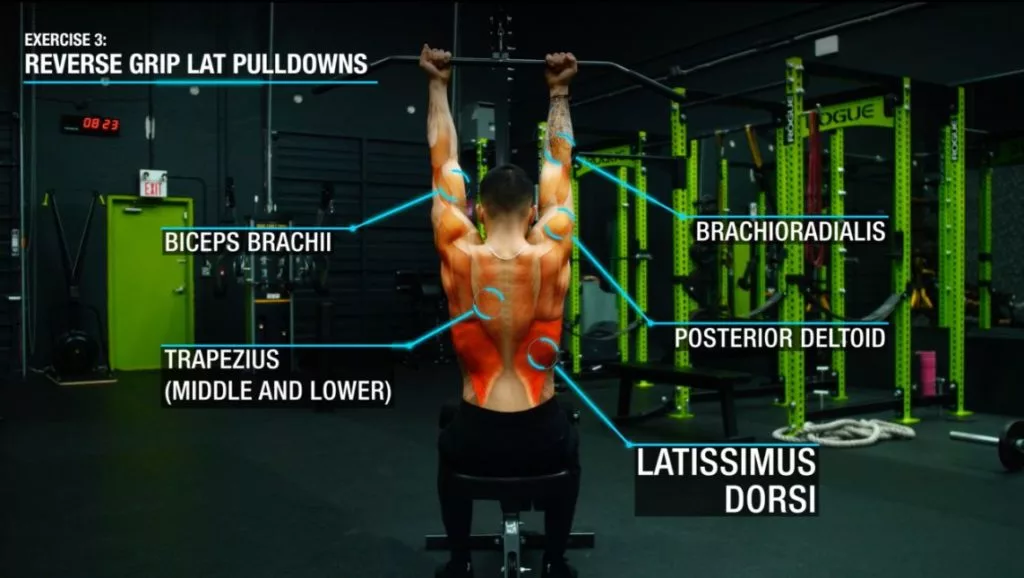
However, rather than the wide traditional overhand grip, we’ll be switching to a closer underhand grip. And the reasoning for this is because anatomical studies have shown that the lats are comprised of an upper and lower region. Which can actually be preferentially activated during your back training.
To understand why, it's crucial to know that:
- Exercises that involve more shoulder adduction (traditional pull-ups) - Have an angle of pull that is more in line with the upper lat fibres and teres major. And, therefore, will more effectively hit this region.
- Exercises that involve more shoulder extension (underhand grip lat pulldown) - Have an angle of pull that is more vertical and in line with the lower lat fibres. And therefore will more effectively hit this region of the lats.
Since we’ve already worked the upper lats sufficiently in the pull-ups done earlier on in the workout, we’ll now want to put more emphasis on the lower lats. This helps to further maximize our back width. This can be done by simply using an underhand grip with the lat pulldown. With this exercise, you’ll want to incorporate a slight lean back. And keep your elbows tucked close to your sides to best activate the lats.
Exercise 4: Chest Supported Rear Delt Row
Next, we’ll move back to a horizontal rowing movement similar to the barbell row. But performed in a way that will now emphasize the rear delt to a much greater degree.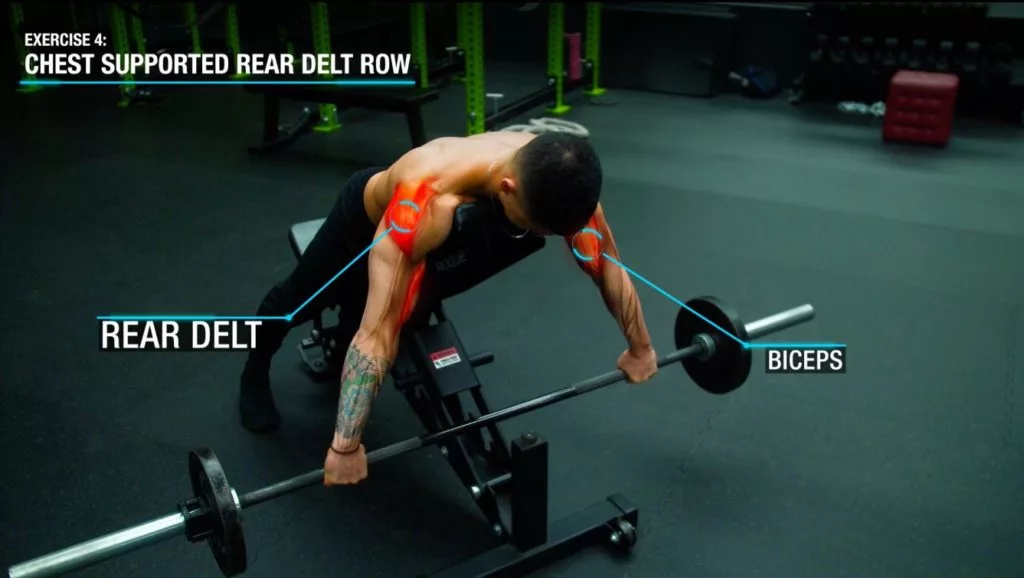
And it’s important we do so in this workout. That's because most people’s rear delts are often neglected. And relatively underdeveloped when compared to the rest of their shoulder.
Although traditional rowing movements do involve the rear delts, we can heighten their involvement by tweaking our elbow position as we row.
Because we know that when the elbows are tucked closer to our sides as we row, the lats are biomechanically in a more advantageous position. But if we widen our grip to enable us to flare the elbows out more as we pull (like in the rear delt row), the rear delts are now put in a more advantageous position. And the involvement of the lats is minimized.
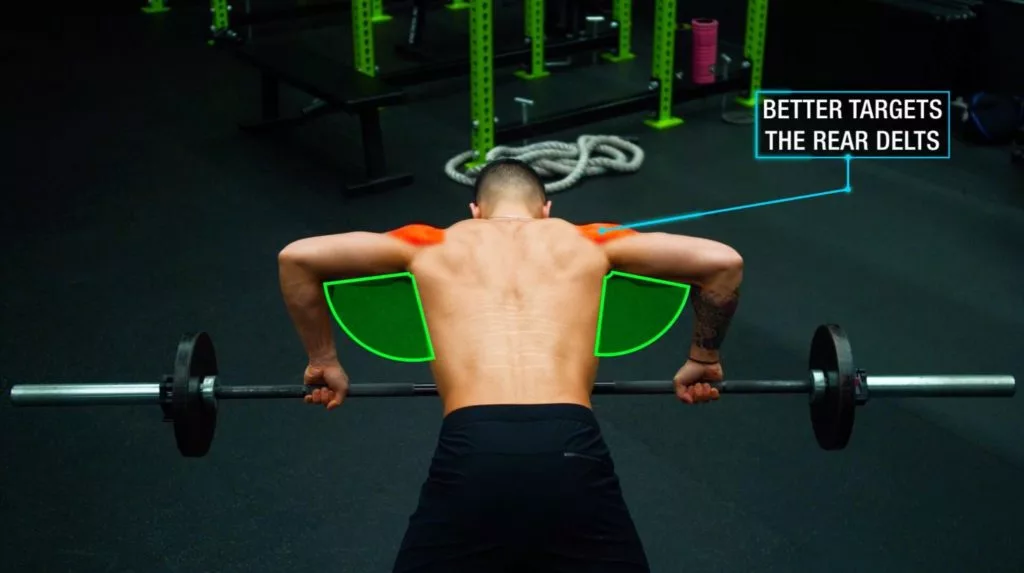
By laying on an incline bench, we can boost the activation of the rear delts to an even greater degree. This is because research indicates that you can better target the upper back muscles by limiting the involvement of the lower back in the movement. Which is especially important for us to do here. That's because our lower back is already relatively fatigued from the barbell rows performed earlier.
If you’re having trouble setting this up with your bench though, a viable alternative is the dumbbell rear delt row. This exercise is where you perform a similar row but externally rotate the shoulder at the end position to best engage the rear delts.
Exercise 5: Close Grip Barbell Curl
Next, it’s time to move onto some isolation work for the biceps. But more specifically we’ll be targeting the long head of the biceps.
That's because the short head of the biceps has already received most of the emphasis in our previous pulling movements.
The close grip barbell curl is a great exercise for this purpose because by both keeping the elbows close to the body and using a narrower grip that’s within shoulder-width, we’ll be able to put the outer head or long head of the biceps in a more advantageous position when compared to the inner or short head. Which you’ll likely feel right away.
And to further heighten its involvement, you’ll want to focus on lifting with your pinkies as you curl the weight up. And utilize a full range of motion during each rep.
Knowing how to tweak/replace exercises that suit your physique goals is pretty complicated. Thankfully, though, the team here at BWS has the necessary expertise to do just that. Our 2-on-1 coaching program takes the guesswork out of training, nutrition, and even mobility work - so you can focus on what matters: making gains. If you're interested:
Click the button below to find out more about the 2-on-1 coaching program:
↓
Exercise 6: Face Pulls (Kneeling + Lying)
Lastly, we’re going to finish off the workout with facepulls. This exercise will be mainly used to work the rear delts, mid and lower traps, and our various rotator cuff muscles.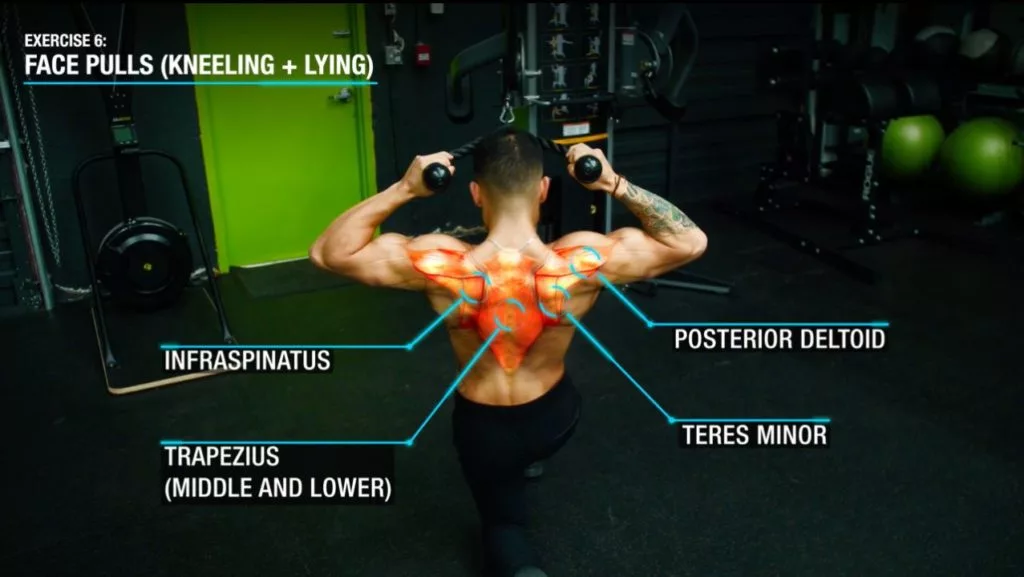
However, we’ll want to do 2 versions of the face pull.
For the first 2 sets, you’ll want to perform them kneeling or standing. Focus on externally rotating the shoulder at the end position such that you’re in a biceps flexing pose. This allows you to best strengthen the rotator cuffs.
And then for the last 2 sets, you’ll want to switch to lying face pulls. This now emphasizes the rear delts to a greater degree. Because as stated in some of my past articles, by lying down you’re able to minimize the effect of gravity acting on the upper traps. And hence better prevent the traps from taking over the movement, resulting in better rear delts activation.
Push Pull Legs Routine:
Best Science-Based Pull Workout
So to sum everything up for you, here’s what your pull day workout could look like:
Pull-Ups: 3-4 sets of 6-10 reps OR Kneeling Lat Pulldowns: 3-4 sets of 10-15 reps
Barbell Row: 3-4 sets of 10-15 reps
Reverse Grip Pulldowns: 3-4 sets of 8-12 reps
Chest Supported Rear Delt Row: 3-4 sets of 10-15 reps
Narrow Grip Barbell Curl: 2-3 sets of 8-12 reps
Kneeling Face Pulls: 2-3 sets of 10-15 reps
*I’d suggest that novice lifters stay on the lower end of the volume requirements whereas more experienced lifters can opt for the higher recommendation of sets.
By the way, here’s the pull workout summed up into a YouTube video:
Push Pull Legs Routine: The Legs Workout
Alright, it's now time to cover your leg day workout for the week. It’s designed to target the quads, glutes, hamstrings, and calves in a balanced and carefully thought-out manner. How so? Well, by using both our anatomical understanding of these various muscles and the findings of current scientific literature.
So without further ado, let’s dive right into one of the best leg workouts at the gym you can do.
Exercise 1: Barbell Squats
The first exercise shouldn’t come as a surprise here. And it is the barbell squats, which has been shown to be a great exercise for developing lower body musculature.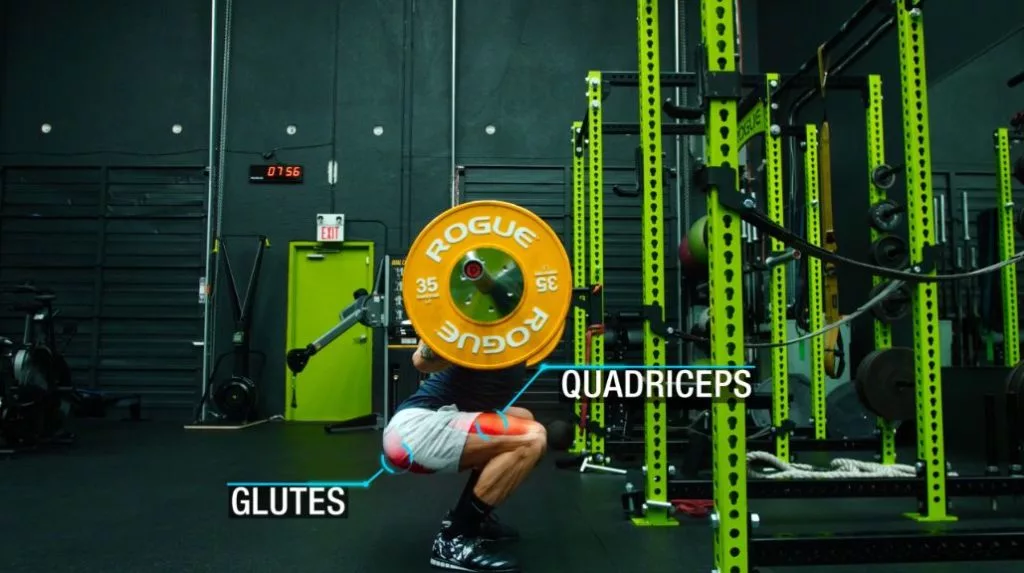
For instance, a recent 2020 paper from the International Journal of Sports Medicine had a group of trained subjects perform only the back squat as their lower body training for a period of 12 weeks.
After 12 weeks, the subjects managed to grow their:
- Quadriceps - By an average of 12%
- Glutes - By roughly 9%
Thus confirming that the back squat is a great exercise for growing not only the quads but also the glutes.
What about whether to perform back squats or front squats? Contrary to popular belief, their muscle activation patterns are actually quite similar. Both squat variations have been shown to activate that quads, hamstrings, and glutes to a similar degree. That said, front squats provide just a slightly higher activation of the quads. And back squats provide slightly better activation for the hamstrings.
Unique benefits of the front squats In A Push Pull Legs Routine
However, there are some unique benefits of the front squats.
First of all, the front squat achieves a comparable level of muscle activation even when using roughly 20% lighter weight than the back squat.
And second of all, research shows that the front squat produces significantly lower:
- Compressive forces on the knee as well as
- Reduced lumbar stress
When compared to back squats. And this is due to the positioning of the bar and the decrease in the forward trunk lean experienced with front squats.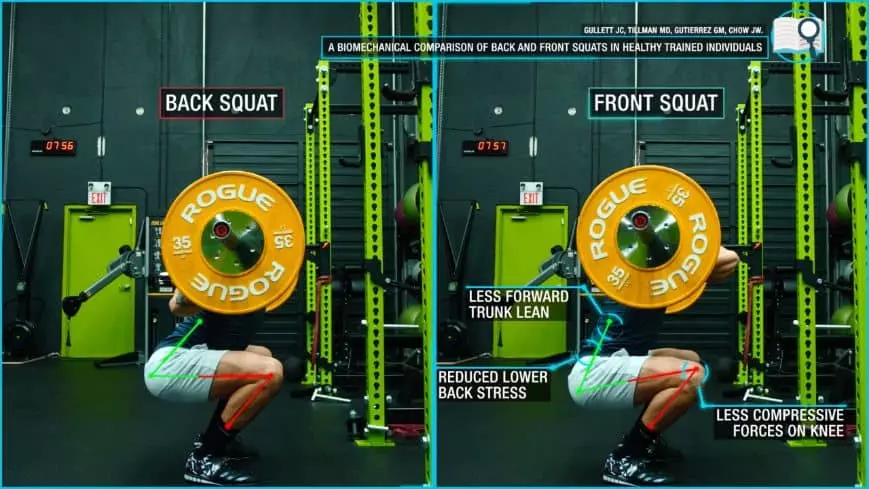
Meaning that for those with past knee injuries and lower back issues, the front squat, when performed correctly, might be the better option. And won’t require you to lift as heavy, yet will still be as effective as back squats.
Regardless, incorporating both into your leg workout routine is a great idea given their complementary muscle activation patterns is a great idea. So, performing the back squat on this leg day and then the front squat on your next leg day of the week, for example.
For both squat variations, make sure to:
- Use a full range of motion down to at least parallel, and
- Relatively heavy weight with a moderate rep range of 6-10 reps.
Exercise 2: Hip Thrusts
Next, we’re going to move onto barbell hip thrusts. This exercise helps prioritize the glutes as well as involve the hamstrings a little more.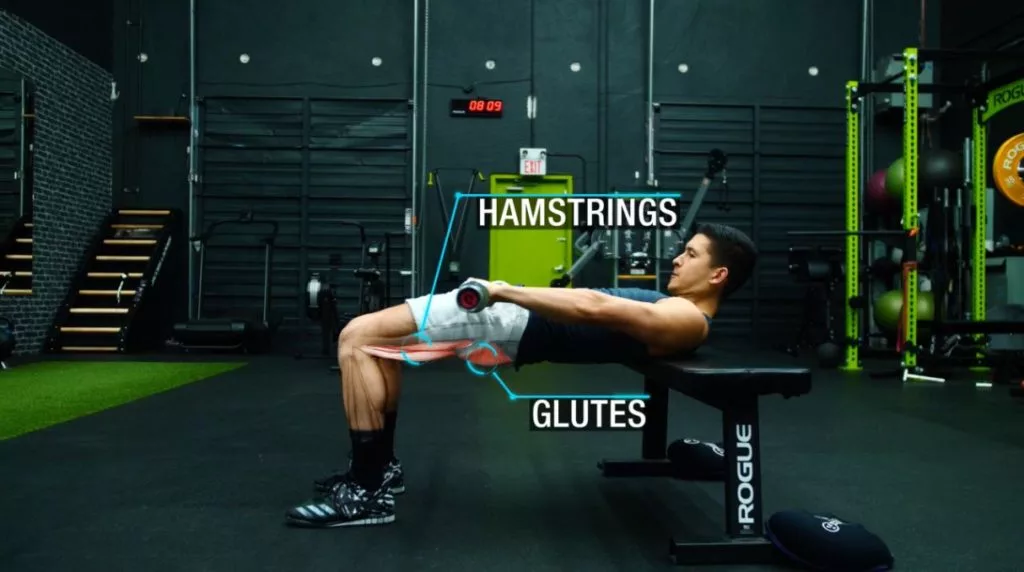
This exercise can be seen as the perfect complementary exercise to the squat. Why? Because they’ve been shown in research such as in this 2015 EMG analysis, to better activate these important posterior chain muscles than the squat does.
That said, a new paper that came out just this year shows how this greater muscle activation may not actually lead to better growth.
The researchers had a group of trained subjects either:
- Perform only hip thrusts
OR
- Only back squats
For 12 weeks for all of their lower body training. After the 12 weeks, squats led to just over double the glute growth than hip thrusts did. Which goes against some of our past beliefs that hip thrusts are king when it comes to the glutes.
Why You Should Include Hip Thrusts In Your Push Pull Legs Routine
So why would I still suggest incorporating them?
Well, first of all, this is a relatively new finding and there has been some conflicting unofficial research. Specifically, by researcher Bret Contreras on identical twins, showing that hip thrusts were the better exercise for glutes growth after a period of 6 weeks. So I wouldn’t take the previous study results as fact just quite yet.
Second of all, we know squats are a great glute builder. That's because they elicit a high amount of mechanical tension of the glute muscle fibres, the primary stimulus of muscle growth. Hip thrusts, on the other hand, provide less mechanical tension on the glutes. But do provide a much greater glutes contraction and puts a high amount of tension and metabolic stress on the glutes when they’re in a shortened position at the top of the movement – something that the squat fails to do.
And lastly, hip thrusts are very low impact on the joints and are easy on the lower back. Yet, still enables you to lift heavy weight when compared to other glute exercises.
Therefore, since hip thrusts compliment the squat so well in terms of its strength curve and enable you to perform more heavy volume for your glutes with minimal additional stress on your joints, including them in this routine is recommended.
And some tips when performing them are to:
- Focus on posteriorly tilting the pelvis as you thrust the weight up
- Avoid arching your lower back
- Position your feet such that your shins are vertical at the top position
You can use a barbell to easily overload the movement over time as your booty develops. And we’ll use a relatively higher rep range of 12-15 reps here.
Exercise 3: Split Squats (2 sets regular, 2 sets contralateral)
Next, it’s time to move onto split squats. This exercise further targets the quads. But with considerable involvement from the glutes and hamstrings as well.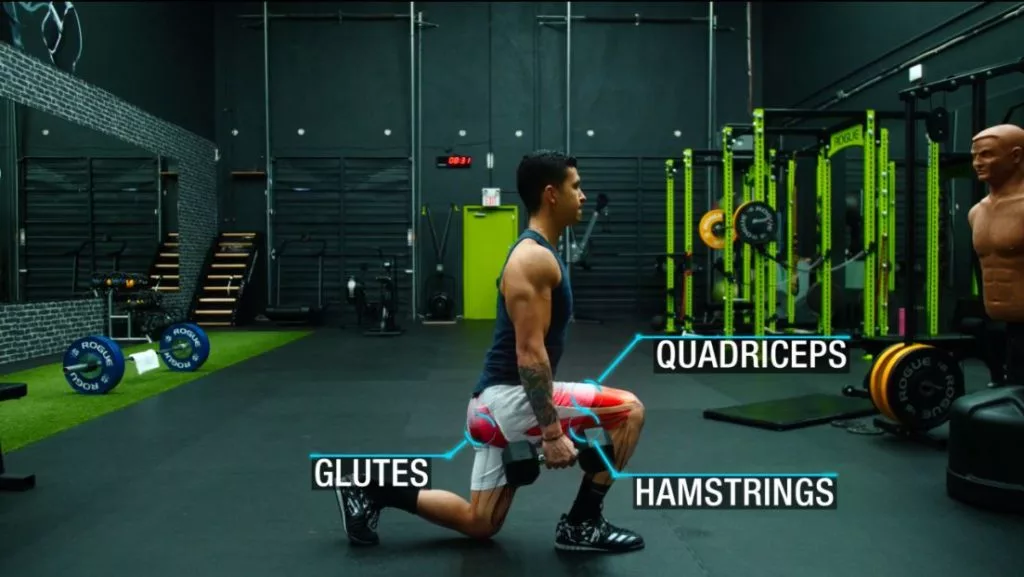
It’s important to include at least one unilateral movement in this routine that trains one leg at a time. Doing so prevents imbalances from developing over time.
Choose Split Squats Over Walking Lunges
Why not choose walking lunges instead? Well, because split squats do have a unique advantage.
First of all, they’re just easier and safer to learn.
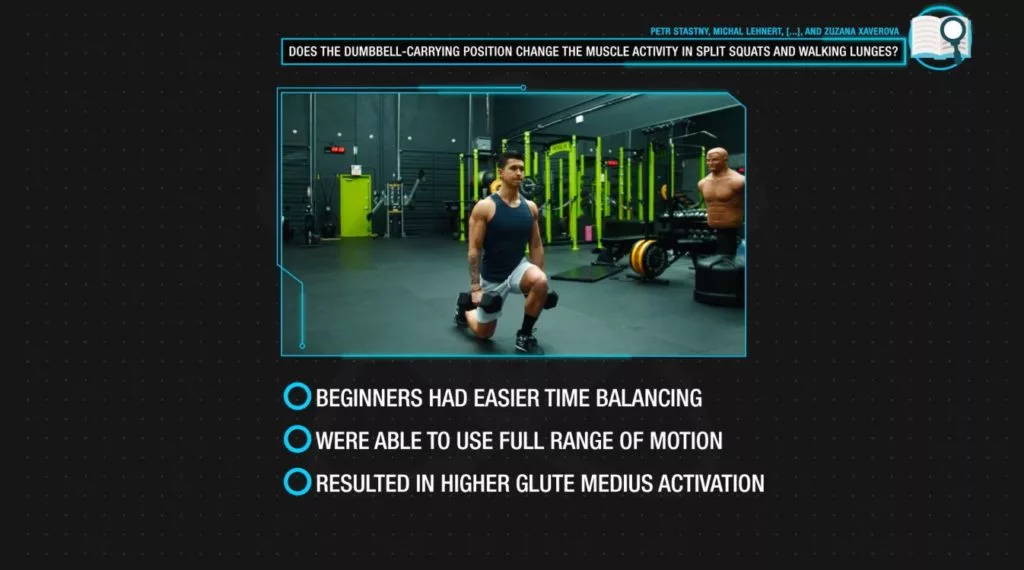
For example, research from the Journal of Strength and Conditioning Research found that beginners that performed the walking lunge had quite a difficult time balancing. And compensated for this by:
- Cutting their range of motion short, while
- Also reducing the activation of their all-important glute medius muscle during the movement
Whereas beginners who performed the split squat were able to:
- Perform it with a full range of motion and
- A significantly higher glute medius activation, which was helping them stabilize their body
Therefore, it's best to start out with the stationary split squat.
How To Progress The Stationary Split Squats In Your Push Pull Legs Routine
Once your balance improves with this, rather than progressing to walking lunges, you’ll want to then progress to the Bulgarian split squat. This is where you elevate your rear leg.
This is the better progression since it:
- Helps you now increase your range of motion
- Enables you to better load and isolate your front leg by minimizing the contribution of your back leg, and
- Also gives you a better chance to identify and address any strength differences between your two legs
And then, once you’re able to comfortably do this variation, what I’d recommend is to progress it once more. You can do so by performing half of your sets with the contralateral Bulgarian split squat. This is where you hold just one dumbbell on the opposite hand as your front leg. This dumbbell-carrying position has been shown in a 2015 analysis to significantly boost the involvement of the glute medius. Since it now has to help stabilize the body by counteracting the weight on the opposing side.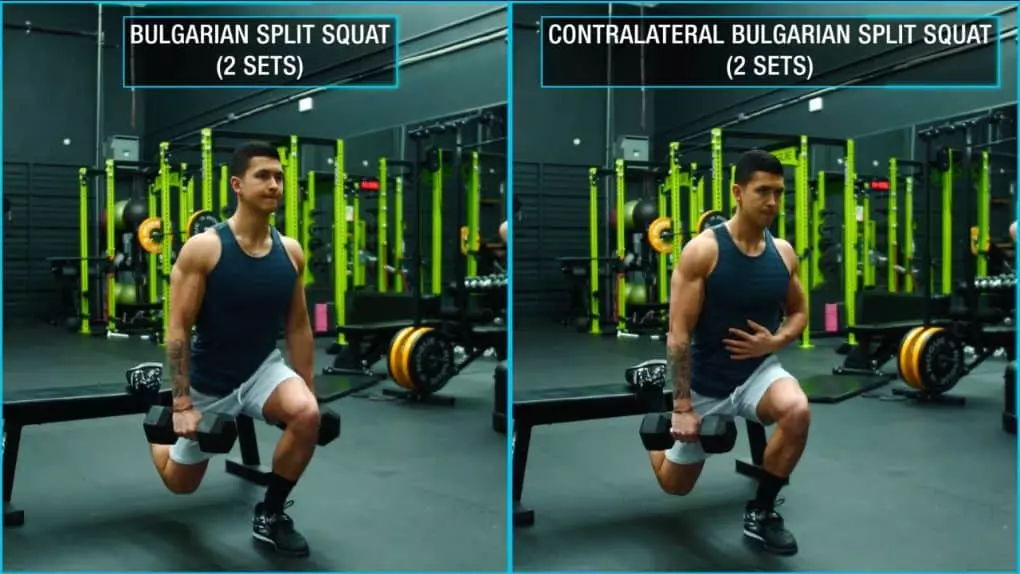
Which is beneficial since this muscle is pretty much neglected in virtually all compound leg movements. Yet plays a very important role in stabilization, balance, and preventing and reducing knee pain. And an added bonus of this variation is that it better activates the outer quads. This can then help balance out any inner versus outer quad imbalances you may be experiencing.
And for these, we’ll use moderately heavy weight for a rep range of roughly 8-12 reps.
Exercise 4: Glute Ham Raise
Lastly, we’re going to be moving onto the glute ham raise. This exercise emphasizes the hamstrings. We're including it since they’ve yet to be prioritized very well in the past movements.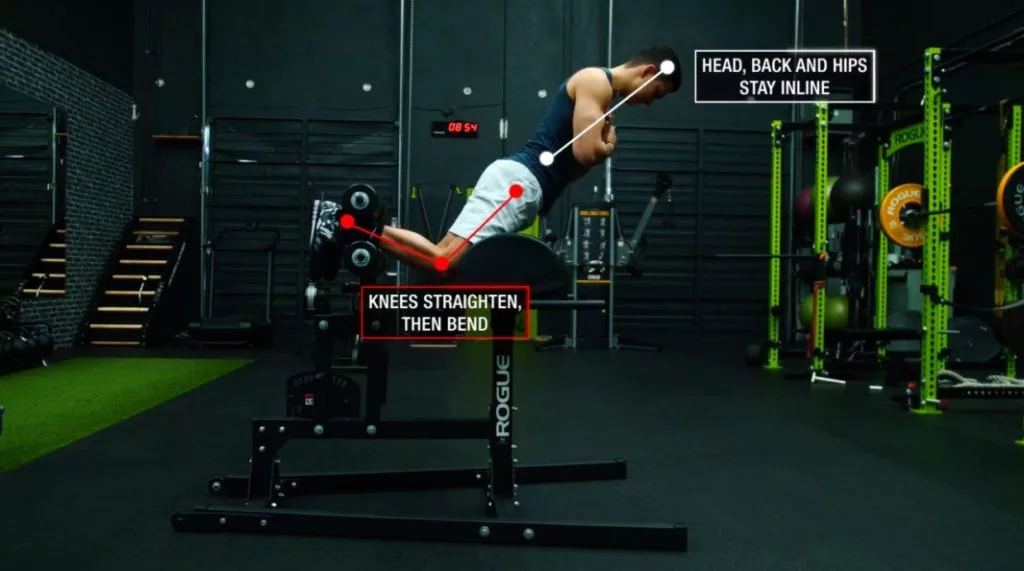
The glute ham raise is a great exercise to do so. Why? Because it’s been shown in EMG analyses like this one by McAllister and colleagues to elicit the greatest activation of the various hamstring muscles when compared to other common hamstring movements. Like the leg curl and Romanian deadlift, for example.
In addition, one of the unique benefits of the glute ham raise is that it forces you to control your bodyweight on the way down or eccentric portion of every rep. This is important. Research has shown that it’s this eccentric strengthening of the hamstrings that seems to be the most important factor:
- Not only for enhancing your athletic performance such as with the vertical jump,
- But also for better protecting your hamstrings from any future potential injuries or imbalances
How To Perform The Glute Ham Raise
Now to properly execute them:
- Position your knees just behind the pad
- Lower your body in a controlled fashion by contracting your hamstrings
- Your head, back, and hips should all stay in line as your knees gradually straighten
- Then on the way up, curl your body up by using your hamstrings. While again keeping your upper body in a straight line and moving in one unit.
 For those struggling with this though or lack the equipment to do so, a good alternative is to perform a similar movement but on a Bosu ball against a wall. The same form tips apply here. But you can make it even easier by either not going as low down before coming up, or simply start out with just doing the negatives by controlling yourself on the way down of every rep and then re-setting to the top and repeating this.
You’ll want to work towards using a rep range of roughly 10-15 reps. And even add weight over time once you’re capable of doing so with proper form.
Push Pull Legs Routine:
Best Science-Based Legs Workout
So to sum everything up for you, here’s what a full leg and glute workout could look like:
Back Squats OR Front Squats: 3-4 sets of 6-10 reps
Hip Thrusts: 3-4 sets of 12-15 reps
Split Squats (2 sets Bulgarian, 2 sets contralateral): 4 sets of 8-12 reps (each side)
Glute Ham Raise (or Bosu Ball alternative): 3-4 sets of 10-15 reps
For calves, I’d simply recommend adding in one standing calf raise exercise and one seated calf raise to ensure that both calf muscles are hit. And a mix of higher and lower rep ranges.
Back Squats OR Front Squats: 3-4 sets of 6-10 reps
Hip Thrusts: 3-4 sets of 12-15 reps
Split Squats (2 sets Bulgarian, 2 sets contralateral): 4 sets of 8-12 reps (each side)
Glute Ham Raise (or Bosu Ball alternative): 3-4 sets of 10-15 reps
Standing Single Leg Calf Raise: 2-4 sets of 6-10 reps
Seated Calf Raise: 2-4 sets of 10-15 reps
As for your other leg day during the week, based on research I’ve gone through in past articles (here and here), you’ll want to ensure that you incorporate:
- A hip dominant hamstring exercise like deadlifts, as well as
- A knee dominant quadriceps exercise
For optimal development of both of those muscles. And then just simply use variations of the day 1 leg day exercises to make up the rest of your volume for day 2.
By the way, here’s the legs workout summed up into a YouTube video:
Get Your Push Pull Legs Routine Below
For your convenience, I’ve compiled all of this information into an easy to a completely free, mobile-friendly PDF for you to download. And use for reference while you’re at the gym performing this push pull upper body workout split. It’ll show you:
- The full workout
- Rest times
- Step-by-step tutorials for each exercise
- And more
To get a copy of the workouts:
Click the button below to download the push pull legs workout:
↓
Push Pull Legs Routine: Takeaway
So I hope you were able to see that when it comes to maximizing your time in the gym and building muscle most effectively, it’s crucial that you not only have a reason behind each and every exercise that you perform in your workouts. But also pay close attention to how exactly you then go about executing them, as the devil really is in the details.
And for a step-by-step program that takes care of all the guesswork for you and shows you exactly how and what to workout week after week in order build muscle most effectively with science:
Click the button below to take my analysis quiz to discover the best program for you:
↓
I hope you're going to try out this push pull legs routine! Don’t forget to give me a follow and connect with me on Instagram, Facebook, and Youtube as well, in order to stay up to date with my content.