
Your Overhead Press Sucks (HERE’S WHY!)
The overhead press has got to be the most stubborn and frustrating exercise to improve on. Thankfully, I'll cover the 2 restrictions you need to work on that'll help you break past your overhead press plateau in this article.
You’ve probably attempted to break through your overhead press plateau by hammering away at it some more volume and more reps. And yet, were met with little to no success. Now, there are various ways that we can try to program our workouts to break us past this plateau. But the truth is that many individuals just aren’t ready to overhead press, to begin with. More specifically, they lack a sufficient range of motion and mobility in key areas. This then makes it considerably harder for them to press weight overhead. This is also why it may seem like you can’t get any stronger with your overhead pressing regardless of what you do.
So, in this article, I’ll cover 2 such restrictions that are the most common culprits. And, more importantly, how to test if you’re actually restricted in these areas. Fix these areas, and your overhead shoulder press form will feel so much smoother. Not to mention, you’ll finally be able to start seeing some progress with your overhead pressing. And who knows? Maybe you’ll even grow to love this “pain in the ass” exercise.
Of course, you shouldn’t only learn about - and fix - restrictions related specifically to the overhead press. Every single one of your lifts will benefit if you take the time to understand and correct common mobility issues. And that's precisely what I cover in every single one of my programs - so you experience the quickest gains possible. Interested?
Click the button below to take my analysis quiz to discover the best program for you:
↓
Restriction 1: Thoracic Spine
The first thing that’s limiting your strength with the overhead press is poor mobility in your thoracic spine. Or in other words your mid-back. Given the high amount of sitting and slouching most of us do every day, our mid-backs get locked up in a forward hunched position. This then negatively affects our overhead press. That's because an inability to extend at the mid-back has been shown to limit shoulder strength during overhead movements.
And to illustrate why exactly this is, take a look at the following picture. On the left, we have someone with poor mid-back mobility. And on the right is someone with better mid-back mobility.
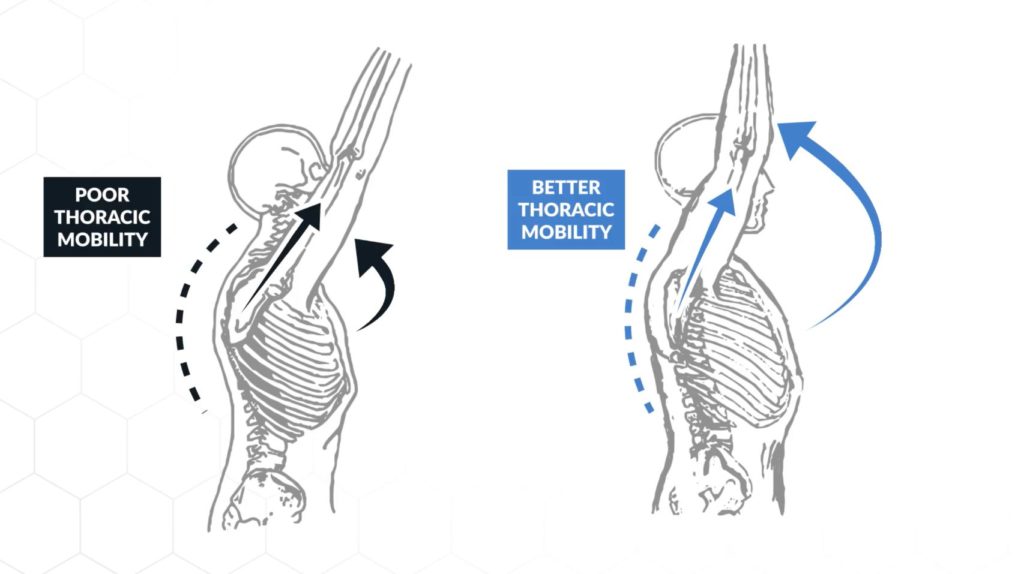
Now when we press overhead, our upper arm cannot elevate past the point where it’s roughly in line with the shoulder blade. So with a tight, rounded mid-back, you can see that your shoulder blade can’t tip back as much. And, as a result, your arm won’t be able to achieve a full range of motion overhead.
This changes if your mid-back is able to extend back. The mobility gives your shoulder blade room to tip back. And, hence, enables your arm to effectively press overhead. Now, the problem comes in if you lack this mid-back mobility and then go to try to overhead press. You will end up compensating for that lost range of motion by either:
- Arching at the lower back which causes a ton of compression and a decrease in core stability, OR
- Creating an inefficient bar path by pressing forward slightly rather than directly upwards
These compensations can lead to an increased risk of injury. Not to mention, limit the amount of weight you can press overhead. And, as a result, essentially the amount of muscle you can build on your delts.
Restriction 2: Lats
A tight mid-back often comes with tight lats as well. And given the attachment points of this muscle on the upper arm and its function to pull the arm down, you can see how tight lats can also restrict your overhead pressing ability. It does so by creating a downward pulling resistance every time you try to press overhead.
This is why many of you will likely feel quite a bit of resistance even when you just press your arms overhead with no weight. And is again why many of you will tend to arch at the lower back whenever you attempt to press overhead.
How To Test If You Have Sufficient Mobility In The Mid-Back And Lats
That said, how do you determine if there’s sufficient extension in your mid-back and sufficient mobility in your lats? There are 2 tests you can do. They will tell you if overhead pressing is a good fit in your current program.
Test For Mid-Back Mobility
First, we’ll test your mid-back mobility with something called the Occiput-to-Wall test. This is a test shown to have high validity when it comes to screening for thoracic mobility restrictions.
To perform the test:
- Stand with your heels, butt, and back flat against a wall
- Then, engage your core to flatten your lower back against the wall
- From here, see if you can touch your head against the wall while keeping your chin tucked in and lower back flat against the wall
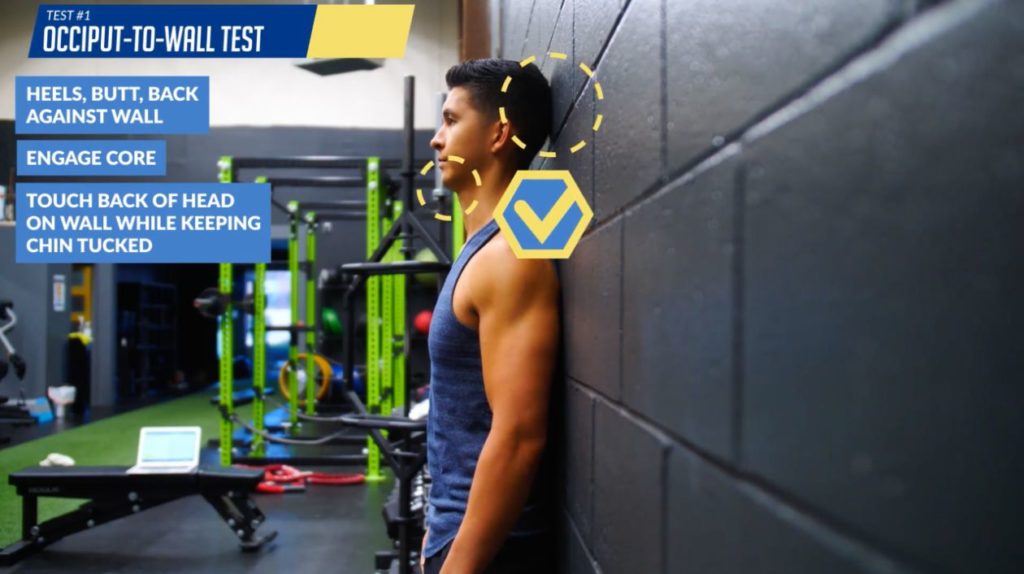
Failure to achieve this position is an indication that your mid-back mobility could definitely use some work.
Test For Lat Mobility
From here though, we’ll test for the lats as well:
- Move your feet forward a couple of steps and bend at the knees
- Try to keep your head against the wall if you’re able to now, and again flatten your lower back against the wall
- Then, raise your arms straight overhead until your fingers touch the wall

You should be able to achieve this position while keeping your lower back flat against the wall. If you can’t, then it’s an indication that your lats and likely your mid-back as well just don’t have the sufficient mobility needed to effectively press overhead.
This then means that pressing more weight will become more difficult for you to do. And that you’ll tend to compensate by compromising in other areas like the lower back.
So, instead of just continuously hammering away at the overhead press without making any progress, take a step back. Focus on these various restrictions.
But to do so, it’s not as simple as stretching the lats and doing a bit of foam rolling.
Yes, that’s part of it. But if you want to actually then see performance benefits in your pressing as a result of this, then we need to take a different, more integrative approach. And that’s exactly what I’ll share with you with a simple 3 step routine.
The 3 Step Routine To Increase Your Overhead Shoulder Press
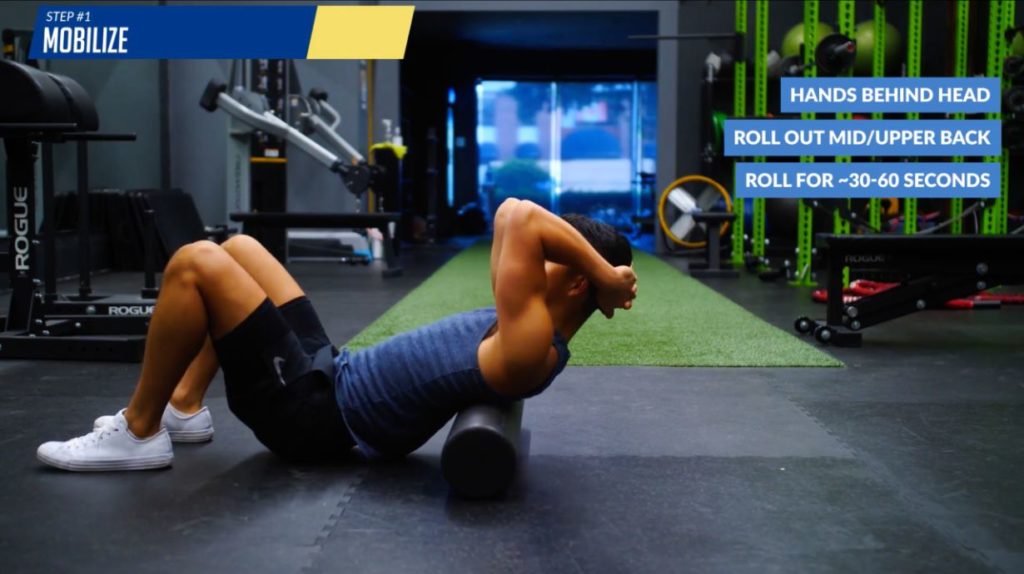
Step 1: Mobilize
Step 1 of this routine involves mobilizing the problem areas. This happens to be your mid-back and lats. So, all we’re going to do is take a foam roller or a sock stuffed with a couple of tennis balls and start foam rolling these areas.
For your mid-back, place your hands behind your head to open up your shoulder blades, and just slowly roll out just that mid to upper back region for about 30 seconds or so.
Then, move onto the lats. Lay onto your side and roll out your lats. Do so from your armpit all the way down to your lower back again for about 30 seconds per side.

As you do so, you can move side to side as well as up and down. But try to keep the pain or discomfort at about a 3 out of 10. All we’re trying to do here is mobilize these areas a bit to decrease muscle tension and get them a little more relaxed. Doing so will help set us up for success with the next steps.
Foam Roller/Tennis Balls Alternative To Mobilizing These Areas
On that note, if you don’t have a foam roller or tennis balls handy OR if you’d just like to experiment with another way of mobilizing these areas, then you can use the following alternative:
- Place your elbows on top of a bench or couch with your hands together
- Engage your abs, and then sit your hips back into your heels while simultaneously dropping your chest towards the ground
- Hold that bottom position for a few deep breaths while keeping your core contracted
- Return back up, and then repeat for more reps
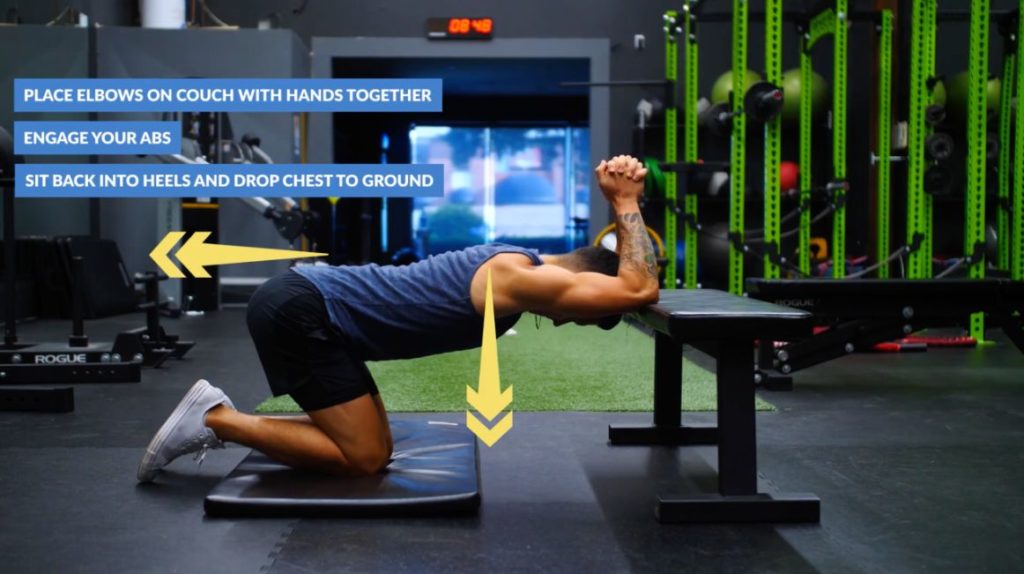
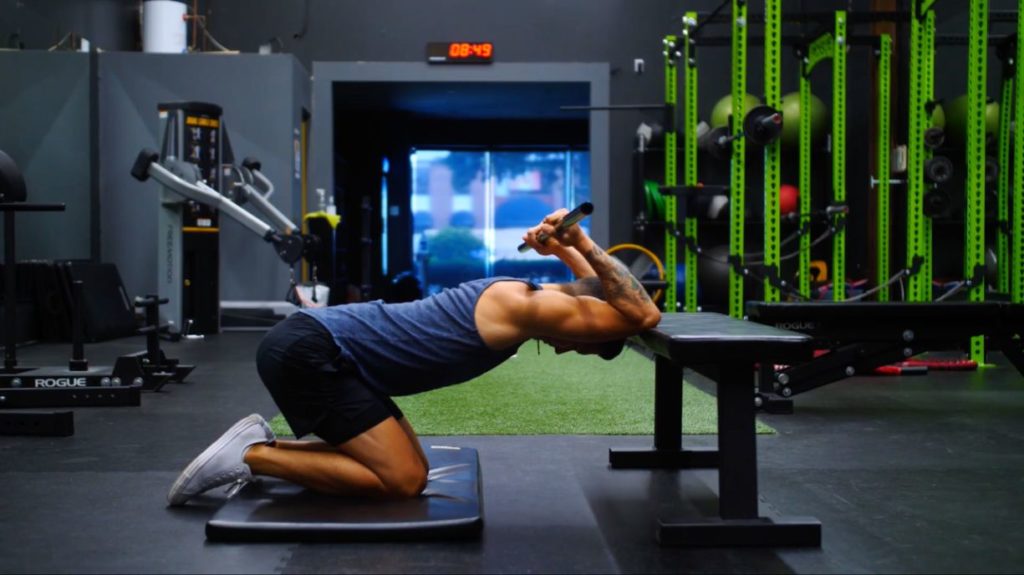
You should feel this stretch in your mid-back as well as your lats. For an even deeper stretch in your lats, you can hold onto any sort of stick or pole with an underhand grip like so and bend your elbows behind your head.
Step 2: Active Stretching
Next, it’s time to move onto active stretching. After any sort of passive stretching or foam rolling as we did in step 1, which can help temporarily increase your mobility and decrease tightness, it’s important to follow that up with now actively moving these muscles through their full range of motion to “lock-in” the mobility gains that you made. It’s basically teaching your brain how to now use your increased mobility from step 1.
To do so, there are 2 active stretches we’ll use.
Active Lat Stretch
First, we’ll focus on the lats with an active lat stretch. For these:
- Get into the starting position with your butt on your heels and forearms on the ground
- Then, bend your torso to one side
- From here, reach up and around as far as you can by really thinking about pushing your arm outwards
- Hold the end position for a second or two before returning to perform more reps. You should feel a deep stretch down along the side of your body that you’re reaching with.
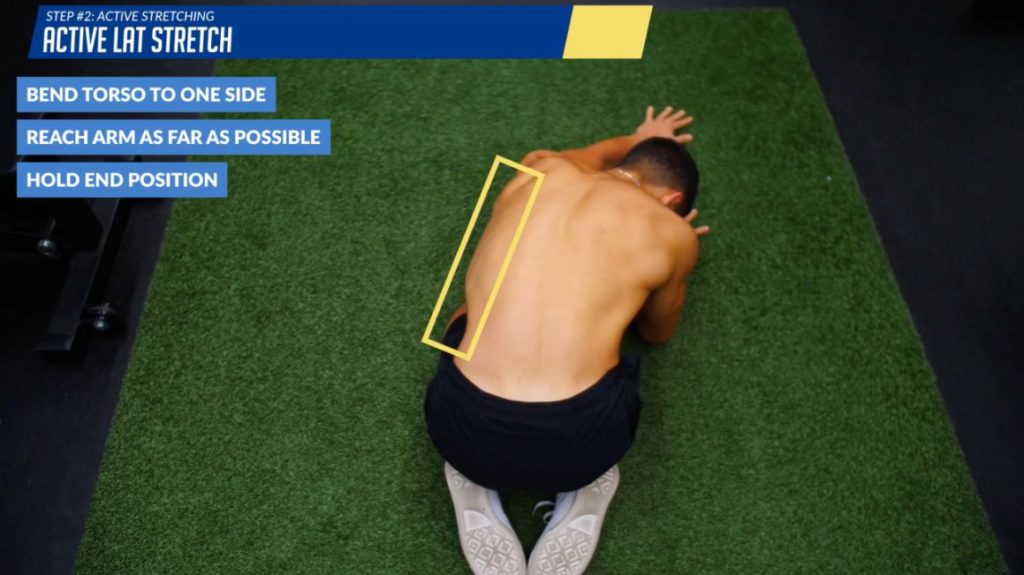
To deepen the stretch, you can simply bend to one side a little more during the setup. You’ll want to repeat this for about 5-10 reps per side.
If you're enjoying this step-by-step guide for proper exercise execution, you're going to love our 3-on-1 coaching program. You are going to have a coach who'll focus solely on your training and making sure you perform every single exercise in your customized workout sessions optimally (and safely!) for muscle growth. Plus, a dietitian and I will also be available to guide you every step of the way. If that sounds good to you, then:
Click the button below to find out more about the 3-on-1 coaching program:
↓
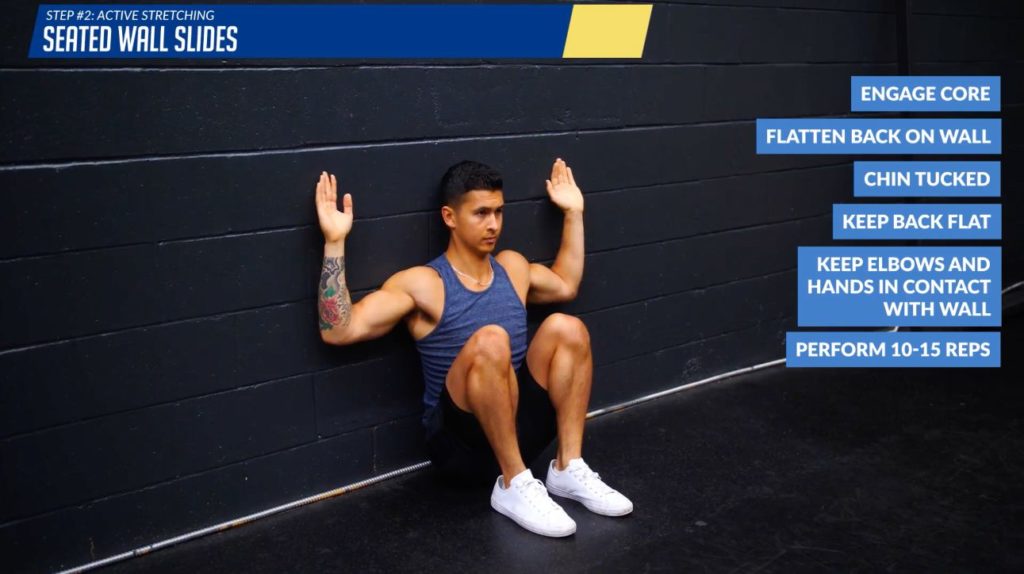
Seated Wall Slides
Next, we’re going to seated wall slides. This is a move that’ll further actively stretch our lats and teach us how to use our increased thoracic mobility in an overhead pressing motion. To set up, sit down against a wall. Then, crawl your feet as close as you can towards your butt. Engage your core and contract your glutes. Make sure your lower back isn’t excessively arching off the wall. Instead, there should be no or at least very little space between the wall and your back. The back of your head should also be touching the wall with your chin tucked.
Next, perform a wall slide. You can do so by placing your elbows and wrists on the wall and slowly pressing your arms up and down against the wall like so. As you do so, focus on keeping your back as flat as you can against the wall rather than arched. And keep your elbows and wrists in contact with the wall as you slide them up and down. You’ll want to perform about 10-15 reps of this.
These are too difficult for you to do? Don’t worry about it. Perform it as best as you can for now. That's even if your back comes off the wall and even if your wrists can’t stay on the wall. Just keep practicing and your form will improve overtime.
The great thing about this exercise though is that it helps mimic an overhead pressing pattern while preventing your lower back from compensating. It also helps engage your mid and lower traps in your back as you slide your arms overhead, which are important muscles that play a major role in stabilizing your overhead press, so expect to feel these mid-back muscles working.
Step 3: Practice Skill With Load
Next is the final piece of the puzzle. You've now improved your mobility with the previous two steps. Now, it’s important to transfer and engrain that into your overhead pressing. This helps your brain understand how to use that increased range of motion under load, which will help achieve our goal of actually boosting your performance in that movement.
What I’d suggest though is at first, lighten the weight. Take time off barbell overhead pressing altogether as this requires the greatest mobility demands. Instead, you’ll want to overtime progress through the following exercises. That's because each will progressively challenge your mobility a little more. For all of these progressions, keep your core and glutes engaged to avoid arching at your lower back. Also, press straight overhead to fully utilize that increased range of motion.
Overhead Press Progressions
So, first up, is the kneeling single arm kettlebell or dumbbell overhead press.
Then, progress to the standing single arm dumbbell press.
Then, progress to the standing two arm dumbbell press.
And finally, if you wish to do so, you can now progress to the standing barbell overhead press.

But basically the idea is that you place the progression you’re at into your program where you’d normally be overhead pressing, or just add that movement as extra assistance work. Then, after a week or two, once you master that progression with more load and feel like you’ve achieved an adequate range of motion in your lats and mid-back in that pressing pattern, you can move onto the next progression.
Improve Your Overhead Press: Action Plan
Step 1: Mobilize
Foam roll mid-back: 30-60 seconds
Foam roll lats: 30-60 seconds each side
Step 2: Active Stretching
Active lat stretch: 5-10 reaches per side with 1s holds at end position
Seated wall slides: 10-15 reps
Step 3: Skill
Progressions:
1: Kneeling Single Arm Kettlebell or Dumbbell Press
2: Standing Single Arm Kettle Bell or Dumbbell Press
3: Progression 3: Standing 2-Arm Dumbbell Press
4 (goal): Standing Barbell Press
*For each progression, perform ~3 sets of 8-12 reps and increase load as appropriate overtime
To summarize the action plan, what I’d recommend is to perform step 1 and step 2 daily. This is just to improve your mobility as quickly as possible. You’ll also want to do those two steps as a warm-up before you perform whatever progression you’re at from step 3. Work through the progressions over time. Eventually, you’ll be back to your barbell overhead pressing.
But this time it’ll feel much smoother. And you’ll very likely be able to work up to much heavier weights than you were prior to this. And at this point, your pressing movements alone should be enough to help maintain that increased mobility you’ve achieved. Meaning that you’ll no longer be having to do those mobility exercises anymore or at least not as often.
How To Increase Overhead Press: Takeaway
Trust me, I know that corrective exercises aren’t fun. But if you want to stop spinning your wheels in the gym and actually break through the plateau you’re stuck in, then you need to address these things as it’ll pay off with more gains and less injury in the long run.
And for a step by step program that shows you exactly how to incorporate important corrective exercises like these into a weekly training routine so that you can build lean muscle and break through plateaus in the most effective way possible, then:
Click the button below to take my analysis quiz to discover the best program for you:
↓
I hope you enjoyed this article! Don’t forget to give me a follow and connect with me on Instagram, Facebook, and Youtube as well, in order to stay up to date with my content.
By the way, here’s the article summed up into a YouTube video: