
The PERFECT Daily Posture Routine To Fix Your Posture From Sitting
Sitting too much (with bad posture) can lead to a host of problems and muscle imbalances. In this article, I go through the perfect daily posture workout routine you can do anywhere.
Are you someone who sits for the majority of the day? Then this article showing the perfect posture workout routine is for you. Whether it is sitting at home, at the office, driving, or just general inactivity, odds are that your body has, over time, adapted to become a very efficient “sitter”. Yes, your body actually gets really good at sitting. How? Well, it turns off certain muscles and over-activates other muscles. And when you then combine this with the fact that most people don’t just sit and instead:
- Slouch forward
- Lean sideways AND
- Do all kinds of things to make themselves more comfortable
...It leads to a host of problems and imbalances that arise when you’re not sitting.
Looking for a training routine that won’t cause all sorts of problematic imbalances? Then you’re in the right place. I’ve designed each and every program available on BWS to help develop your physique in an all-rounded way so you achieve your fitness goals safely – and in the most time-efficient way possible. If you’re interested, then:
Click the button below to take my analysis quiz to discover the best program for you:
↓
Why Do You Need The Posture Workout Routine?
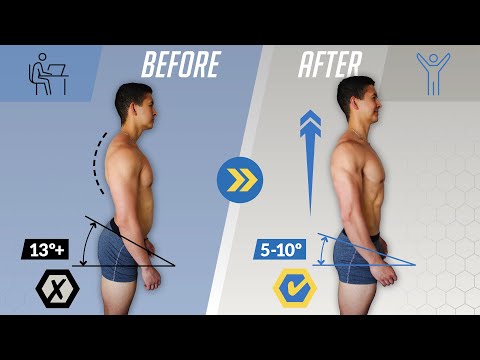
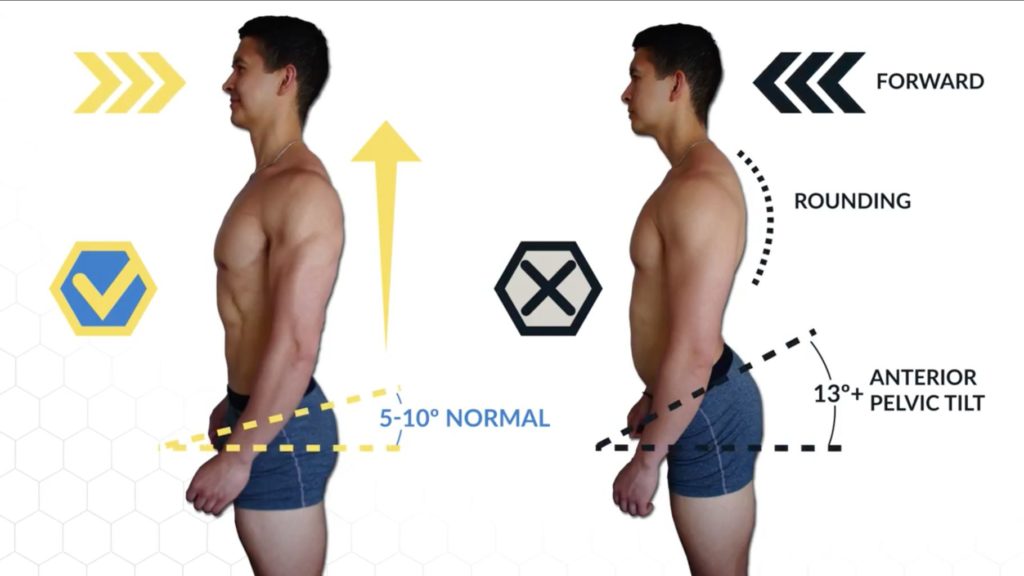
And typically, sitting too much is bad for you as it will lead to is more or less the development of the following posture. Where the:
- Head protrudes forward
- Mid-back and shoulders round forward AND
- Lower back arches excessively with an anterior tilt of the pelvis
To make matters worse, this posture is often accompanied by a host of asymmetries created by various sitting habits. Which can lead to one side of the body being tighter than the other. And, as a result, create a slight drooping on that one side for example.
Which all in all can lead to tightness and aches and pains in the neck, shoulders, lower back, and other areas. It also makes it difficult to properly execute various exercises in the gym. Let alone comfortably stand and move throughout the day.
But, luckily, there are easy ways to reverse this and prevent it from worsening if you spend the majority of the day sitting.
Here's How Sitting Too Much Can Lead To Bad Posture
Because based on the analysis of multiple papers, we know that these various postural patterns created by sitting are simply a result of:
- Various muscles that have become underactive and weak over time, AND
- Other muscles that have become overactive and shortened over time
Which, in effect, pull your body into this new posture.
Therefore, to reverse this, I’ll be showing you two quick and easy 5-minute posture workout routines you can do virtually anywhere. These are designed to mobilize these tightened areas, strengthen the weakened muscles, and work on correcting any asymmetries you may have as well.
The first routine will focus primarily on the upper body. While the second routine will focus primarily on the lower body. Both these posture workout routines each consist of 4 exercises. I'll also show you how you can implement them into your day towards the end of the article. But for now, let's jump into the first routine.
Posture Workout Routine 1: Upper Body Focus
As mentioned earlier, this routine will be used to focus on mobilizing and strengthening various parts of the upper body. It will help to correct the imbalances commonly created from excessive sitting.
Exercise 1: Band Over-And-Backs
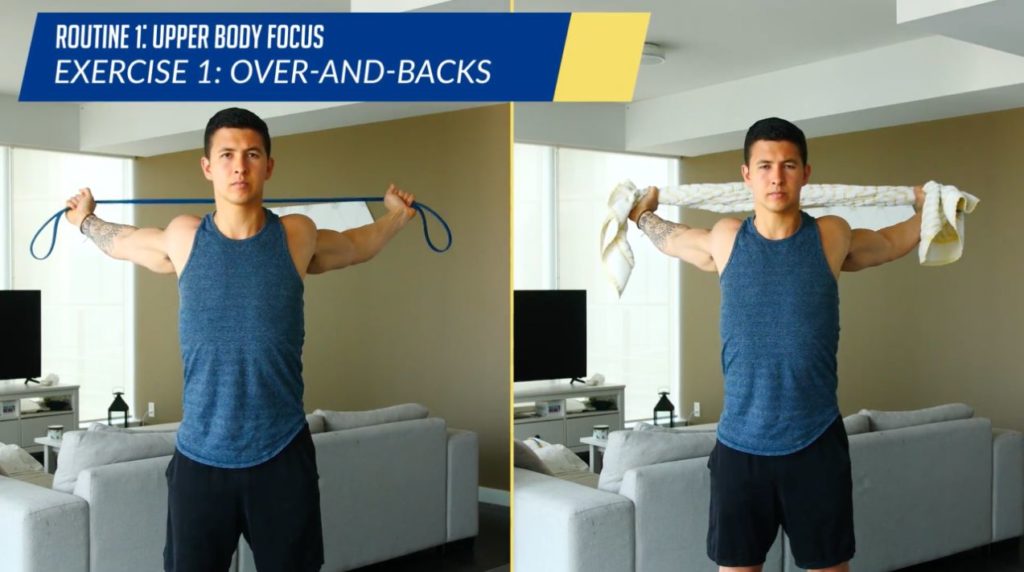
The first exercise in the posture workout routine we’ll use is over and backs. These can be done with either a band or a towel. This exercise is used to open up and stretch the shortened chest and shoulder muscles that are pulling you forward into this hunched posture. Here's how to perform the exercise:
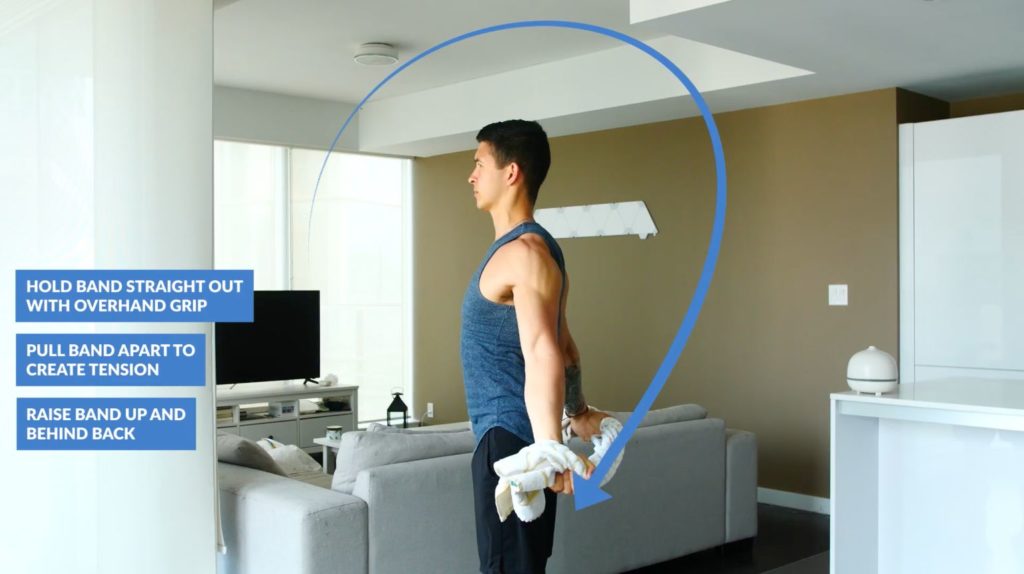
- Grip the towel or band with a wide overhand grip
- Pull it apart slightly to create tension
- And then, without bending your elbows, raise it over your head and behind your back. Only go as far as you’re capable of.
- Then when it gets behind your back, focus on pulling your hands apart.
Start with a wider grip. And over time narrow your grip as your mobility improves.
 Need an easier alternative to this? No worries. You can also do the standing chest opener stretch. This is where you simply:
- Clasp your hands behind your back
- Squeeze your shoulder blades together, and
- Then pull your arms up and hold there to deepen the stretch
Exercise 2: Cobra Pose
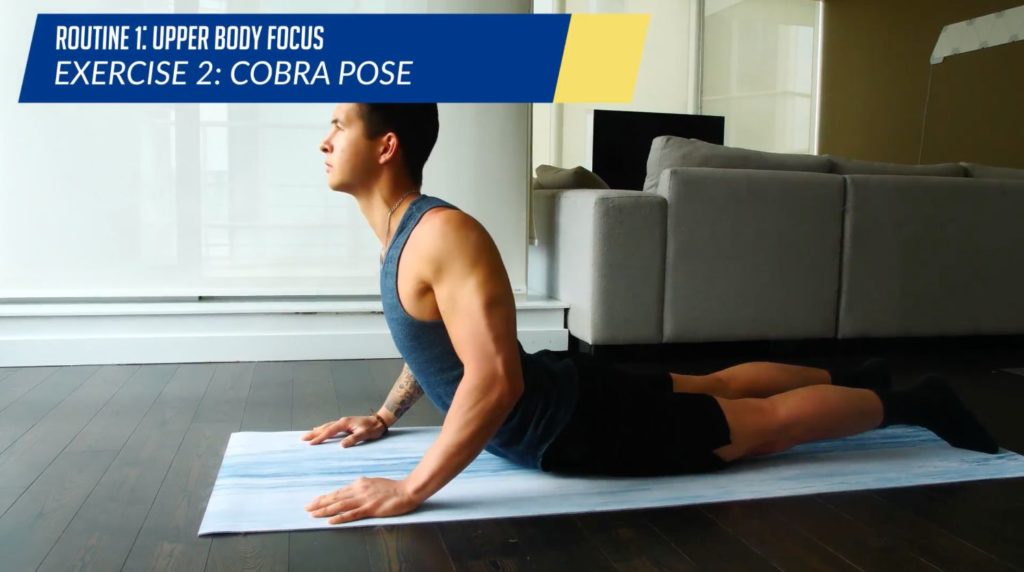
Next, we’re going to move onto the cobra pose in our posture workout routine. This will help stretch out pretty much all the tightened muscles from sitting. This is arguably one of the single best stretches for sitting. Because if you go joint by joint, the entire body is almost completely reversed in this stretch position when compared to a typical sitting posture.
To do it properly and without aggravating your back however, you’ll want to execute the following:
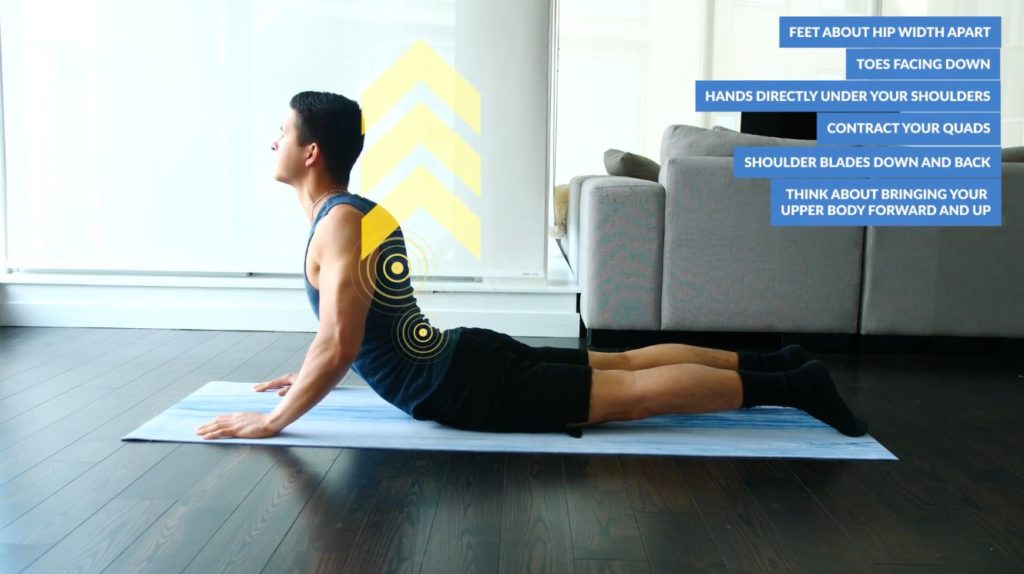
- Lay on your stomach with your feet about hip-width apart. Make sure your toes are facing down, and your hands are by your sides positioned directly under your shoulders.
- Next, contract your quads so that your knees are off the ground
- Bring your shoulder blades down and back, and then lengthen your spine. You can do so by thinking about bringing your upper body forward and up by using and engaging your mid and lower back muscles.
- Hold for a few deep breaths at the top before coming back down and repeating.
Note that you should not be muscling your way up by pushing your arms into the ground. Instead, your arms should simply be there for guidance and stability as you lengthen.
Exercise 3: Stand And Reach
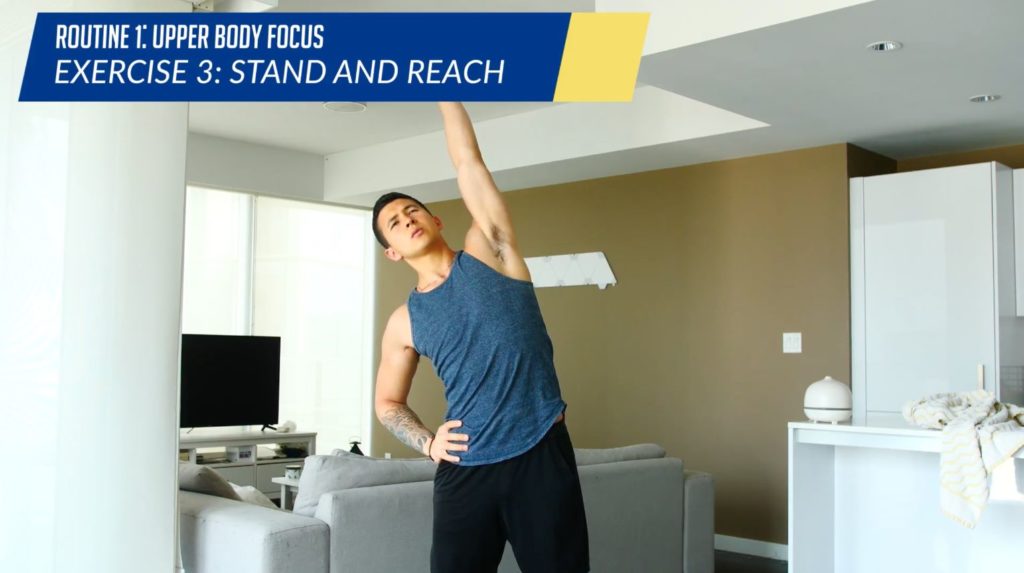
The next exercise we’ll use here will be used to help correct some of the asymmetries developed from slouching one way when sitting. Sitting this way has caused the muscles in your sides, such as your QL, to tighten up. And commonly droop your body one way as a result. For these, we’ll perform a simple stand and reach:
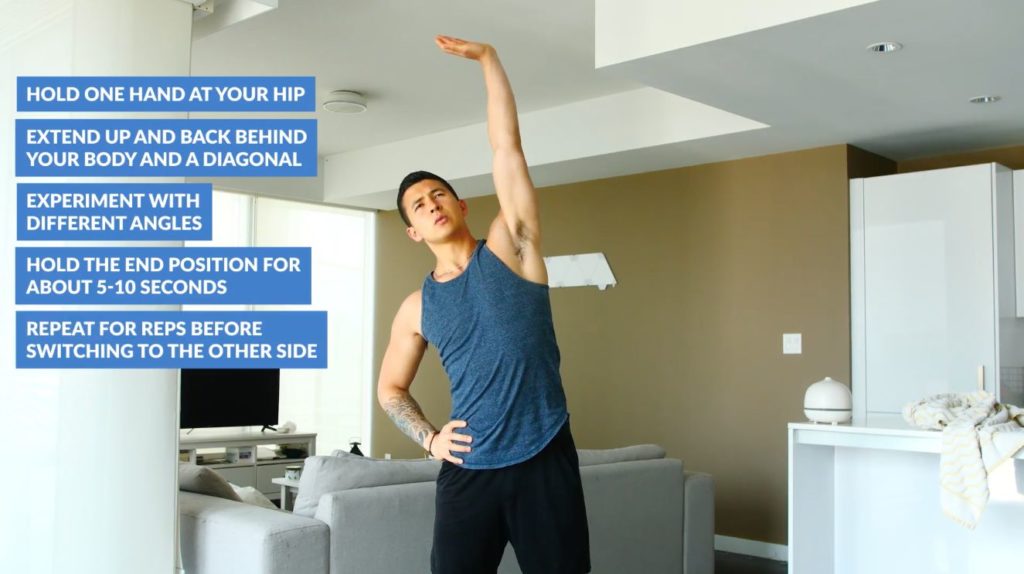
- Hold one hand at your hip
- And then extend up and back behind your body and a diagonal. Think about reaching towards the ceiling. Do experiment with different angles until you find the angle that creates the best stretch in your side.
- Hold the end position for about 5-10 seconds
- And then repeat for reps before switching to the other side.
You’ll probably notice however that one side is tighter than the other. This is a result of your slouching. In which case, you’d want to spend a little more time. And do more reps on that tighter side.
Exercise 4: Wall Slides With Chin Nod
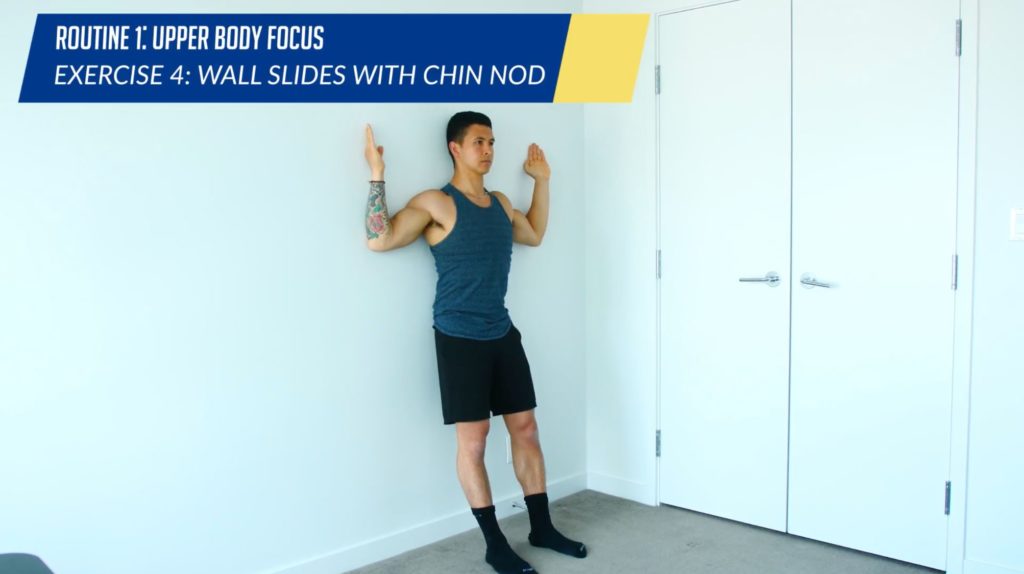
Next, we’re going to move onto strengthening some of the weakened upper body muscles in the posture workout routine. More specifically, the:
- Weakened lower traps - Contribute to that hunched over posture AND
- Weakened neck flexors - Contribute to that forward head posture
To do so, we’ll use wall slides with chin nods:
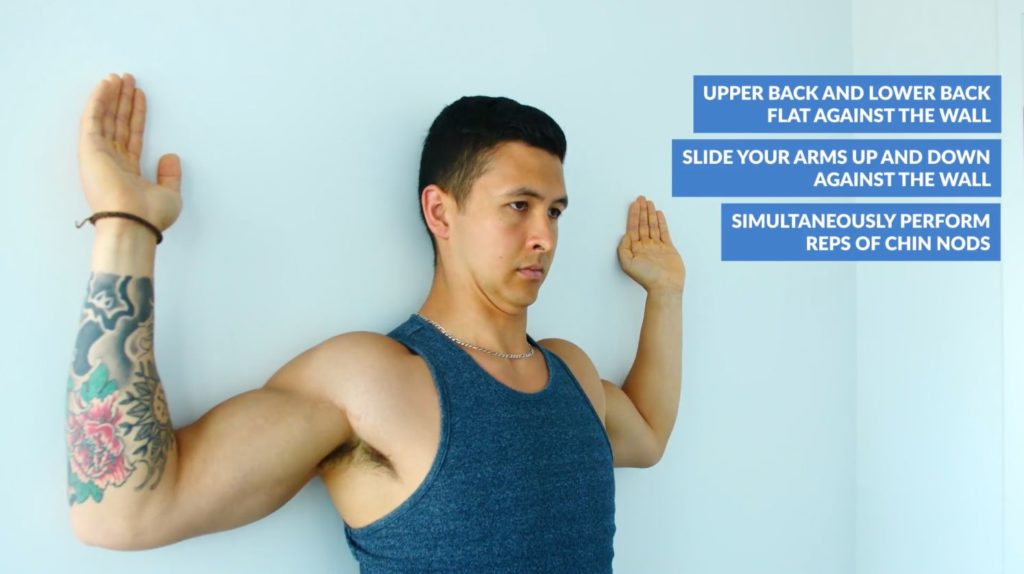
- Stand against a wall with ideally both your upper back and lower back completely flat against it
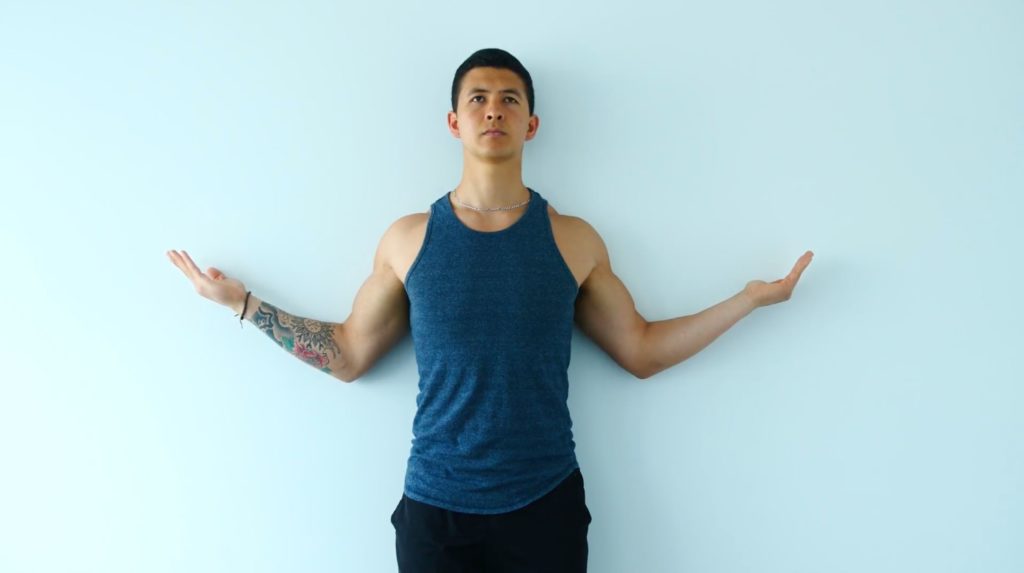
- Then, slide your arms up and down against it
- With the back of your head against the wall, simultaneously perform reps of chin nods. This is where you tuck your chin into your chest by using those deep neck flexors. Think of it as giving yourself a double chin.
Note that you should feel a strong contraction in your mid-back as you raise your arms. And as you perform the chin nods, you should feel the muscles in the front of your neck working. This combination of wall slides and chin nods is an effective way to correct both that hunched posture and forward head posture simultaneously. Find the wall slides too difficult to start with? You can perform shoulder W’s like so with the chin nods as an alternative.
Next, it’s time to move onto focusing a little more on the mid and lower body muscles with the second posture workout routine.
Posture Workout Routine 2: Lower Body Focus
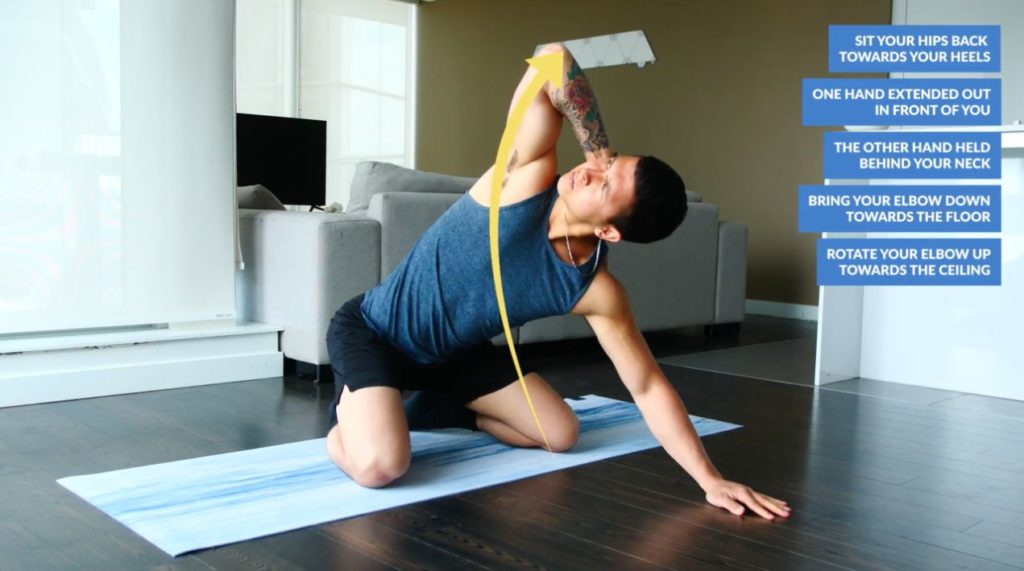
Exercise 1: Quadruped Thoracic Rotations
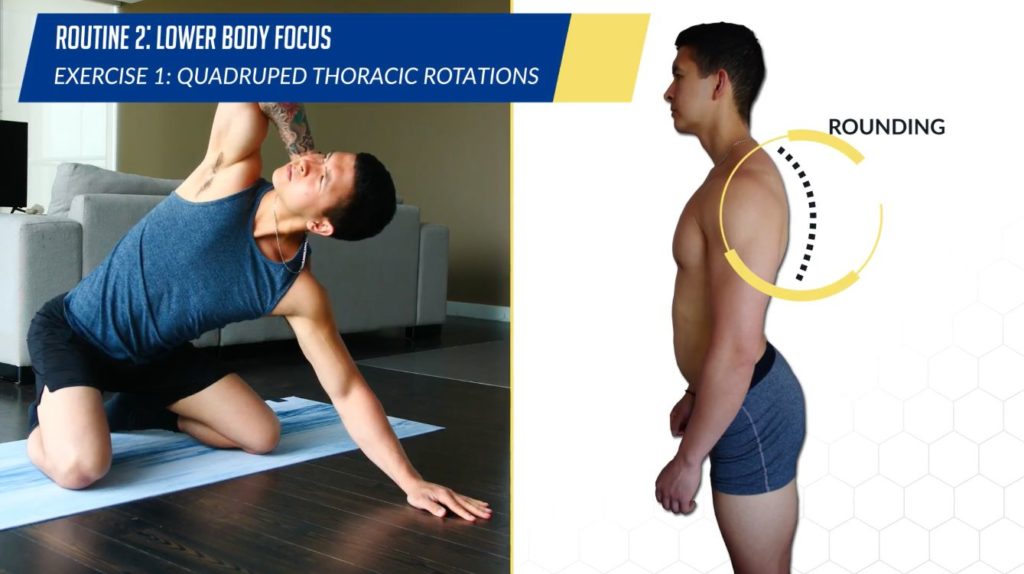
To start off though, we’ll work on thoracic or “mid-back” mobility. This gets stiffened from sitting. And this stiffness not only promotes that hunched over posture, but can also cause problems and compensations in the lower back and lower body. To correct this, we’ll use quadruped thoracic rotations:
- Get on all fours and sit your hips back towards your heels
- Place one hand extended out in front of you and the other held behind your neck
- Then, simply bring your elbow down towards the floor, and while following your elbow with your eyes, rotate your elbow up towards the ceiling as far as you can
- Hold the top position briefly
- Then come back down for more reps before moving to the next side. You should feel a good stretch in your mid-back area as you do so.
If you're enjoying this step-by-step guide for proper exercise execution, you're going to love our 3-on-1 coaching program. You are going to have a coach who'll focus solely on your training and making sure you perform every single exercise in your customized workout sessions optimally (and safely!) for muscle growth. Plus, a dietitian and I will also be available to guide you every step of the way. If that sounds good to you, then:
Click the button below to find out more about the 3-on-1 coaching program:
↓
Exercise 2: Kneeling Hip Flexor Stretch
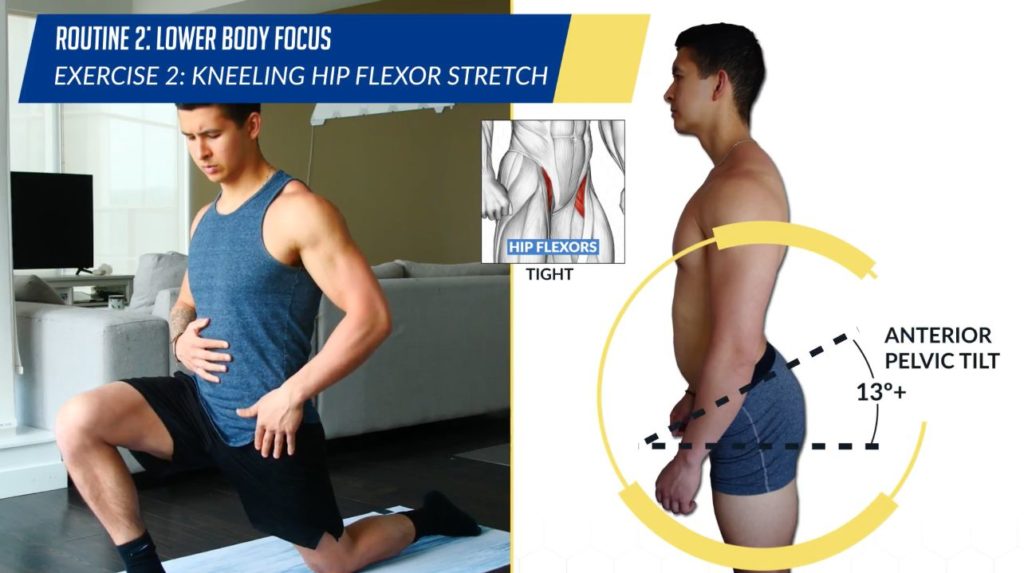
Next, we’re going to move onto stretching out the hip flexors. These have become tightened over time and are pulling the pelvis into that anterior pelvic tilt. To do so, we’ll use a simple kneeling hip flexor stretch:
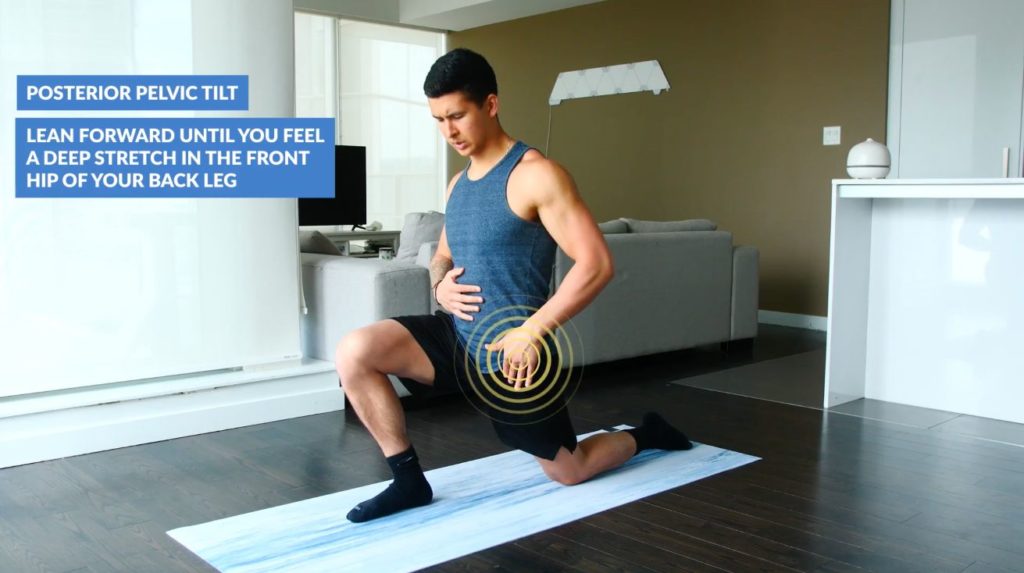
- First posteriorly tilt your pelvis by contracting your glutes and abs. This is the key to this exercise’s effectiveness, which most people overlook.
- Then, only once you’ve properly set your pelvis, gently lean forward until you feel a deep stretch in the front hip of your back leg.
- Hold the end position for 10 deep breaths or so
- And then switch to the other side
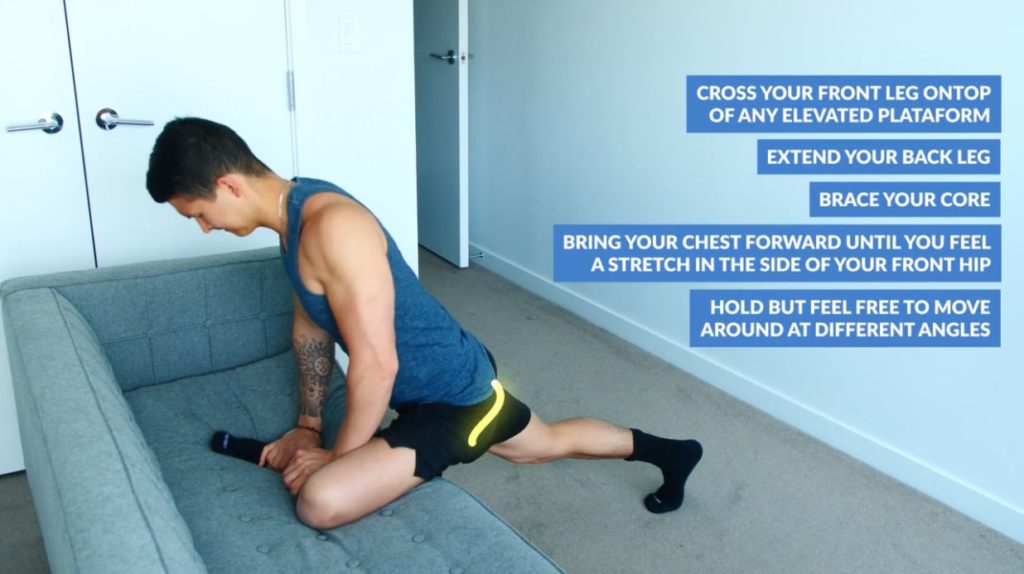
Exercise 3: Pigeon Stretch

Next, we’re going to move onto a stretch that not only further lengthens the tightened hip flexors, but also helps open up the hips with external rotation. It thus helps address any asymmetries present there to best set us up for success in the strengthening exercise we’ll do next. For these:
- You can use a couch or any elevated platform
- Cross your front leg on top of it and fully extend your back leg to lengthen out your hip flexor
- Then, with your hands placed on your foot and knee, brace your core and simply bend at your hips to bring your chest forward until you feel a stretch in the side of your front hip
- Hold it there but feel free to move around at different angles to tweak the stretch a bit
- Then, switch to the other side.
You’ll likely notice one side is significantly tighter than the other. This is especially so if you tend to cross your legs quite a bit while sitting. If so, spend a little more time on the tighter side. And if needed, an alternative is to perform this similar stretch but seated with your foot resting on your opposite knee. And again leaning forward by dropping your chest until you feel a stretch.
Exercise 4: Glute Bridges
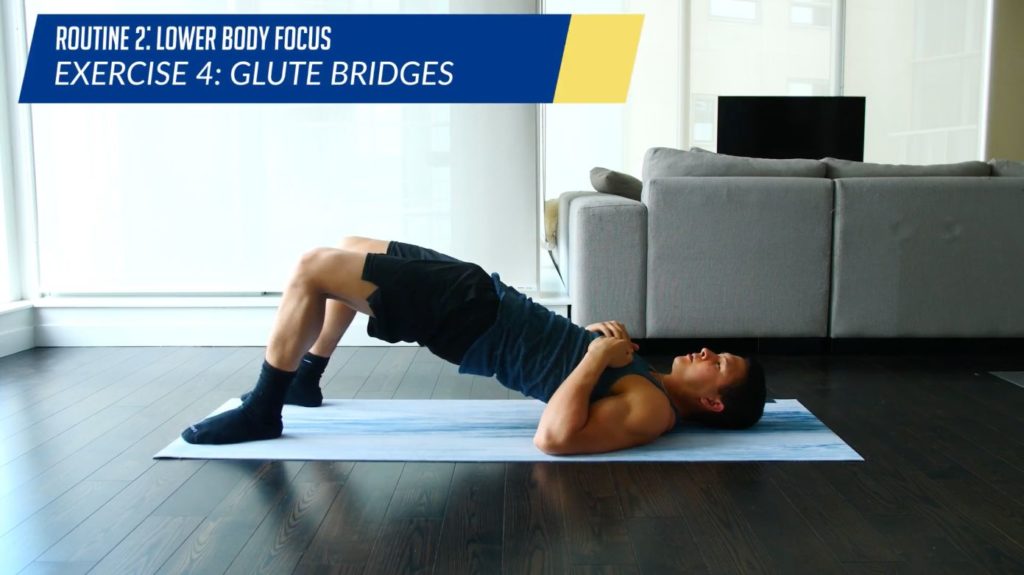
Lastly, we’ll move onto glute bridges to help awaken and strengthen the glutes. That's because the glutes tend to become inactive and weakened as a result of prolonged sitting. And are now pulling the pelvis into that anterior pelvic tilt. It’s vital that you perform the prior stretches, first, however. That's because research has shown that those tightened muscles we stretched will actually inhibit your glute activation. And make it hard for you to effectively use this exercise.
Now, to perform your glute bridges:
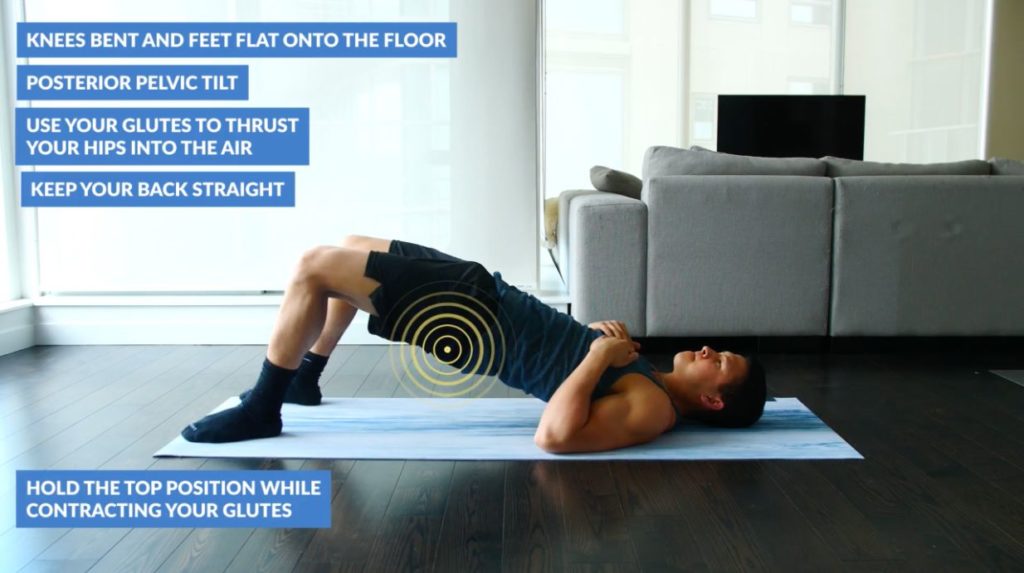
- Lay on your back with your knees bent and feet flat onto the floor
- Then, first move into posterior pelvic tilt by contracting your glutes and abs
- Once that’s set, use your glutes to thrust your hips into the air while keeping your back straight rather than arched
- Hold the top position while contracting your glutes before coming down for more reps.
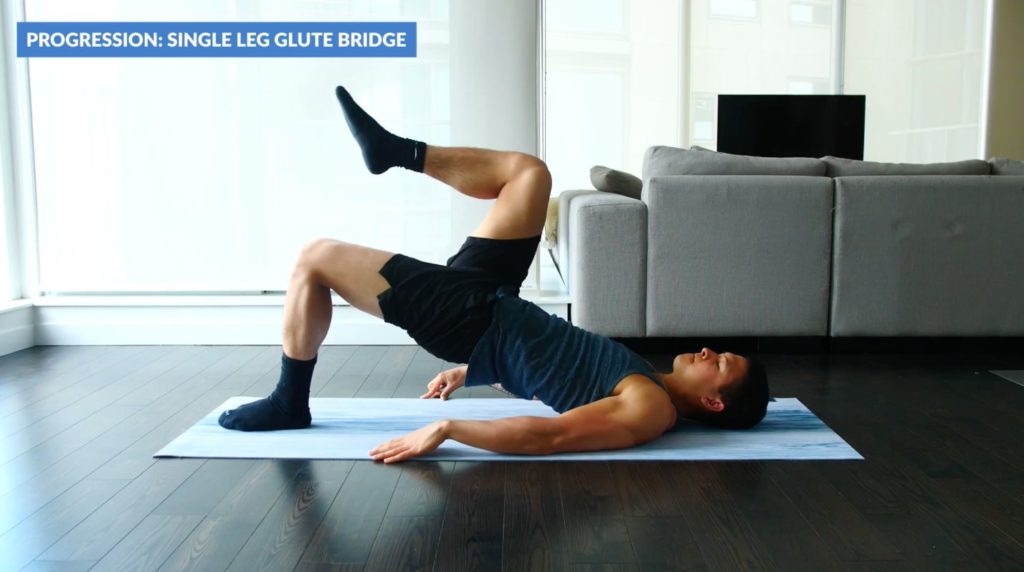
Over time you can then progress to single-leg glute bridges as you get stronger. Doing so can help correct any strength asymmetries you may have in your glutes.
Posture Workout Routine Takeaway
So, here are the two posture correction routines all summarized with rep range and timing guidance for each of the exercises.
Routine 1 (Upper Body Focus)
Exercise 1: Over-And-Backs (~10-15 slow reps)
Exercise 2: Cobra Pose (~5-10 slow reps with pause at top)
Exercise 3: Stand And Reach (~5-10 reaches each side, pause at end position)
Exercise 4: Wall Slides With Chin Nod (2 sets of 10-15 reps)
Routine 2 (Lower Body Focus)
Exercise 1: Quadruped Thoracic Rotations (~10 reps each side with pause at top)
Exercise 2: Kneeling Hip Flexor Stretch (~30-45 second holds each side)
Exercise 3: Pigeon Stretch (~30-45 second holds each side)
Exercise 4: Glute Bridges (2 sets of 10-15 reps with pause at top position)
How To Implement Posture Workout Routine
What about the best way to implement this? Well, there is some research in office workers indicating that for the highest levels of productivity throughout the day, you should take a short break after every 52 minutes of work.
Therefore, a good way to easily incorporate these posture exercise routines is to alternate between each of them after every hour or so of seated work during the day. Regardless though, I’d suggest aiming to perform both of these routines at the very least once a day. And ideally each twice a day if you do sit quite a bit. As it’s the consistency and frequency with these routines that’s key.
But, keep in mind as well though guys, that sitting is just part of the problem. I mean we see similar postural imbalances in those who stand all day as well. The real problem is not taking regular breaks, not being aware of your posture throughout the day, and just not moving enough in general. So focus on improving those aspects, while incorporating the routines mentioned in this video, and you’ll be able to create positive long-lasting changes. And, as a result, look, feel, and perform that much better.
And for a step-by-step holistic program that shows you exactly how to train and eat to build muscle and lean down without overlooking key muscles like the ones shown in this video, then:
Click the button below to take my analysis quiz to discover the best program for you:
↓
Hopefully, this daily corrective routine helps you fix that forward head posture! Don’t forget to give me a follow and connect with me on Instagram, Facebook, and Youtube as well, in order to stay up to date with my content.
By the way, here’s the article summed up into a YouTube video: