How to Fix Anterior Pelvic Tilt in 4 Simple Steps (Daily Corrective Routine)
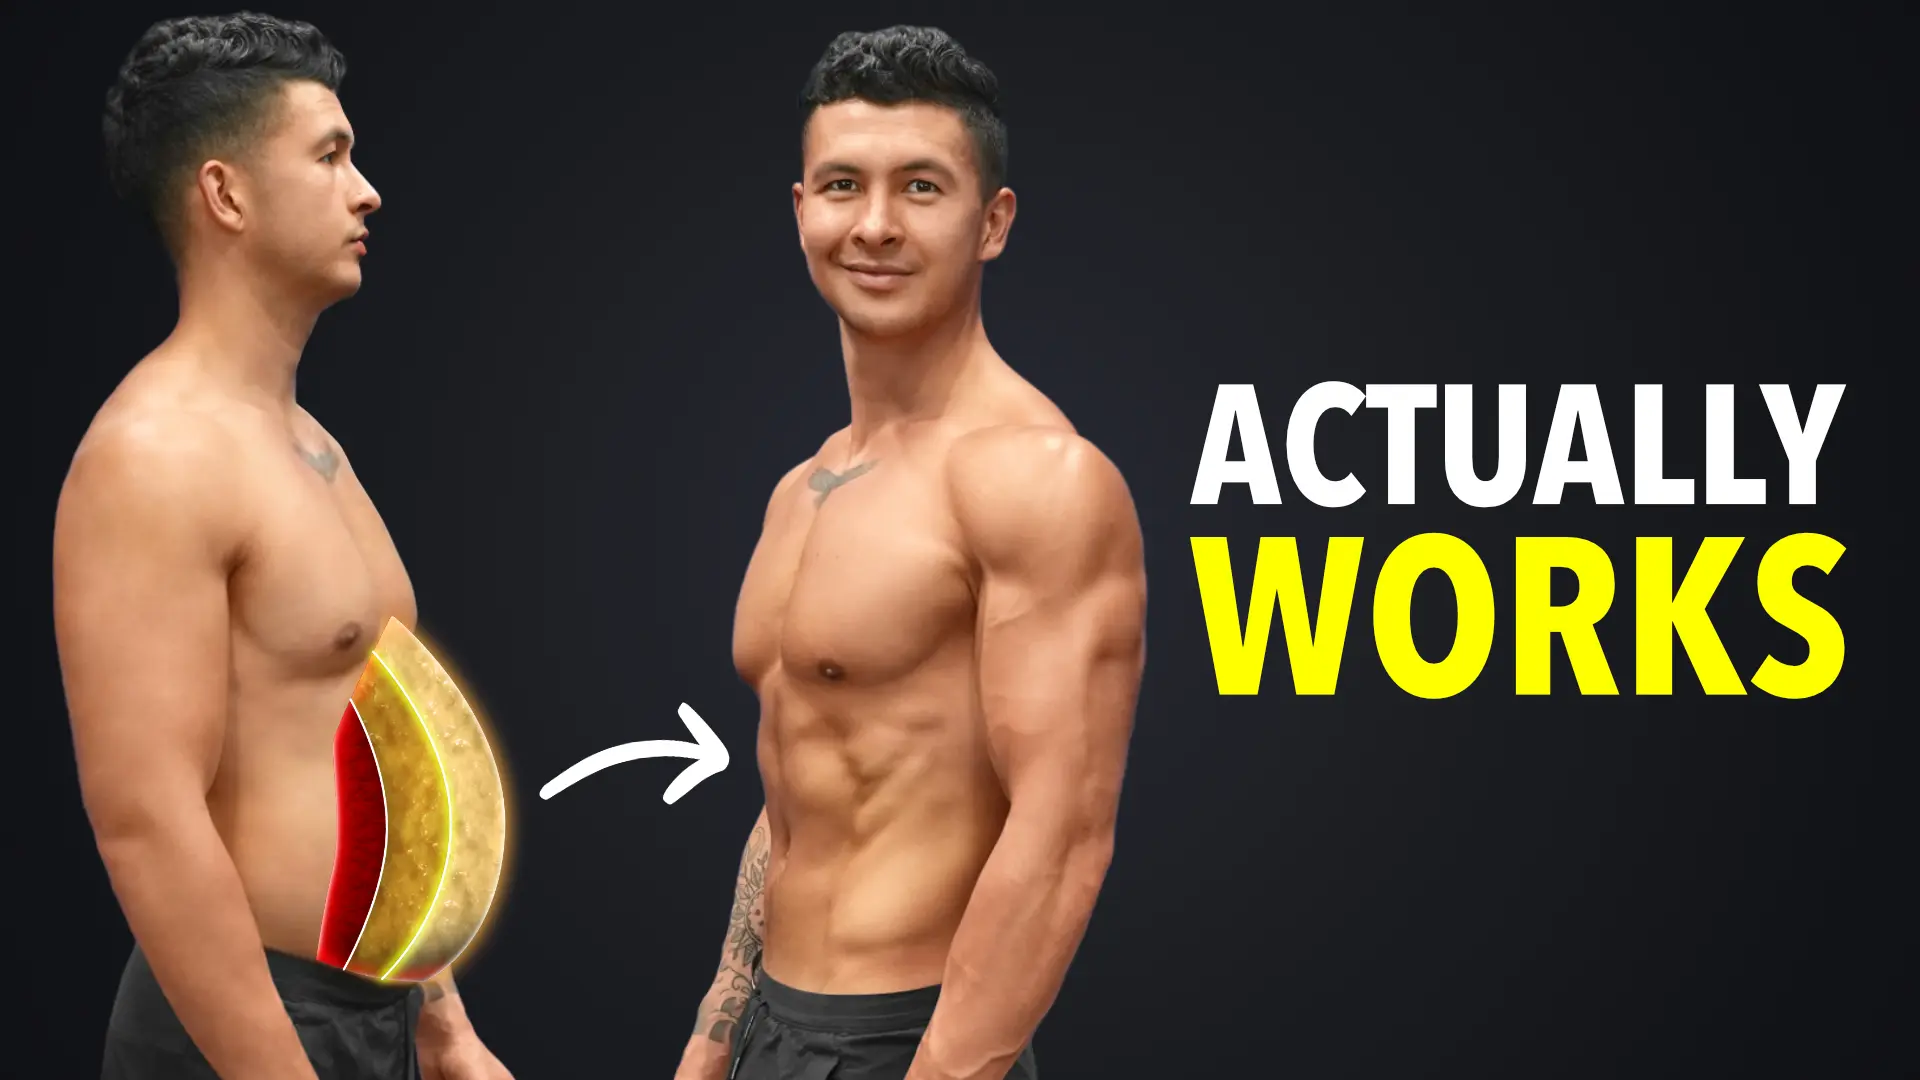
Been struggling with anterior pelvic tilt and want to learn the right way to fix it? You’ve come to the right place. This article provides easy to follow exercises and step by step methods to follow to fix anterior pelvic tilt.
Anterior pelvic tilt, also known as “lower crossed syndrome, is becoming more prominent nowadays because of two reasons:
- The increased amount of sedentary time and
- Poor postural habits we’ve adapted because of the lifestyles most of us lead.
And unfortunately, anterior pelvic tilt can not only compromise your lifting gains but also put you at a higher risk of injuries. That's why I design every BWS program carefully to ensure that it always includes postural work - so you can transform your physique in the most time-efficient and safe manner:
Click the button below to take my analysis quiz to discover the best program for you:
↓
Why Is Anterior Pelvic Tilt Bad For You?
However, it’s not something that should simply be ignored. Because not only can it lead to lower back discomfort, but it can also cause inhibition of the gluteal muscle group. And that includes the gluteus maximus, gluteus medius, and gluteus minimus.
The sum of these effects then leads to a reduced range of motion at the joint. And reduced force production capabilities. Pain and discomfort can be chronic by-products of joint inflexibility. Also, reduced force production can hamper gym performance. Or more specifically, key compound movements such as deadlifts and squats can be effected.
Here's the outline of the article:
- What anterior pelvic tilt is
- What causes some of the negative consequences associated with the condition
- The four essential steps to easily correct anterior pelvic tilt
- A 10-minute corrective routine to reduce anterior pelvic tilt; this can be used daily
Without further ado, let's get started.
What Exactly is Anterior Pelvic Tilt?
The pelvis is a composite bone formed by multiple bones:
- Sacrum and coccyx posteriorly
- ilium, ischium, and pubis anteriorly
The bones of the pelvis are firmly fused through fibrous joints to provide stability. That's because this critical region is utilized for almost all bodily movements. The pelvis provides key functions such as articulating the head of the femur. The head of the femur attaches to the acetabulum and is covered by two key ligaments. The ischiofemoral and the iliofemoral ligaments.
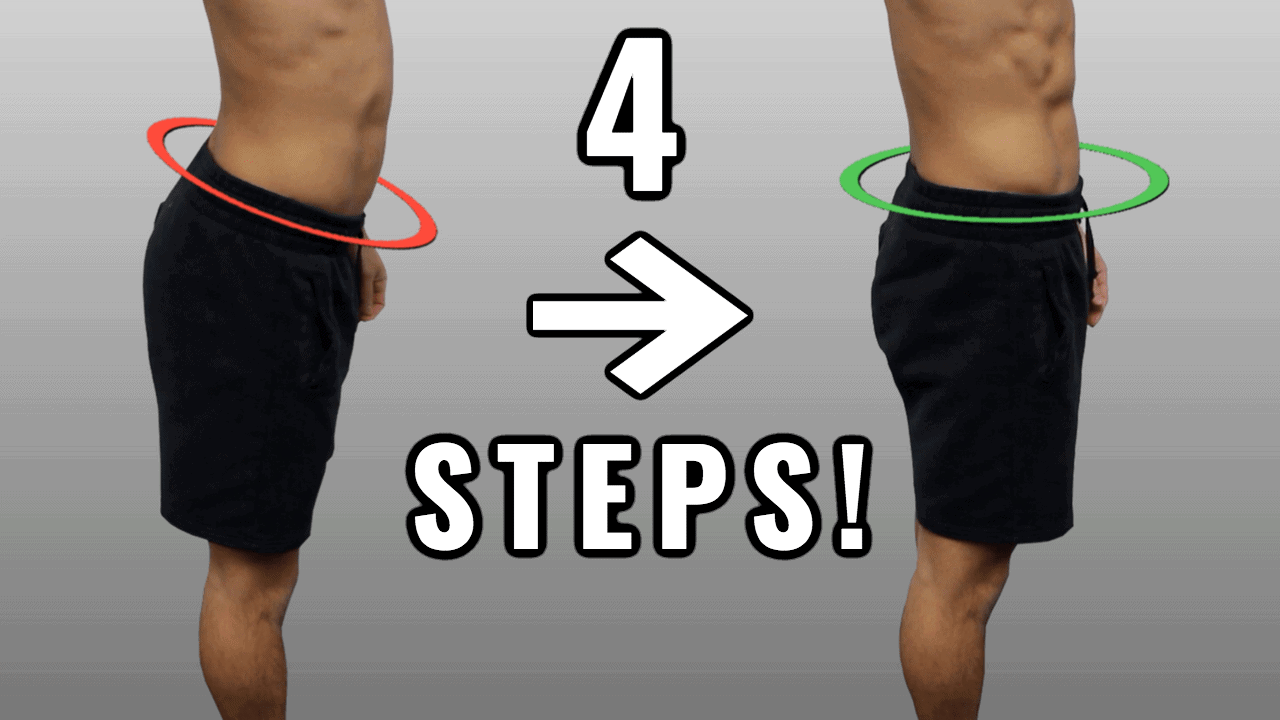
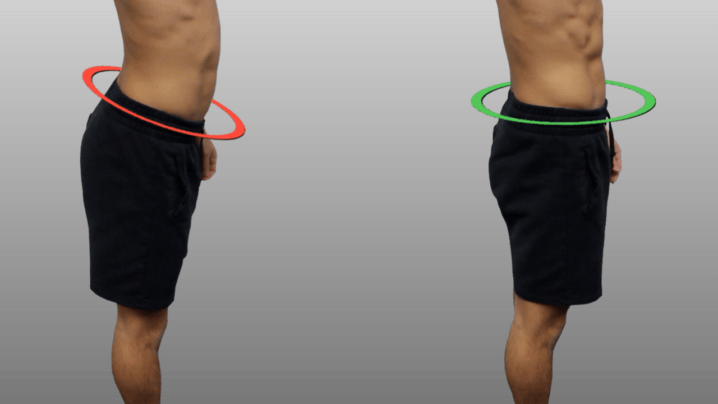
What Does Anterior Pelvic Tilt Look Like?
Forward tilting of the pelvic girdle, as the entire region is called, alters an individual's postural pattern, where the:
- Hips will be pushed back
- Glutes will stick back to a greater than normal extent, and
- Abdomen to stick out in front
The sum effect of these changes results in the accentuation of the arch in one’s lower back. A curvature in the lower spine occurs normally. But can be accentuated by multiple factors (covered in the next few paragraphs) and lead to a more pronounced concave curvature in the lumbar region of the spine.
How Do I Know If I Suffer From Anterior Pelvic Tilt?
The anterior pelvic tilt is relatively well-characterized. Here are its common symptoms:
- Lower back pain (Youdas et al. 2000)
- Chronic lower back tightness
- Knee hyperextension when standing
- Low activation of gluteal muscles
- Tight hamstring muscles
A visual assessment of one’s normal relaxed posture (use above picture as a guide), in combination with these listed symptoms, can be used to self diagnose anterior pelvic tilt. Do not fret if you suffer from this condition. It's relatively easy to acquire and also relatively easy to correct! Read on to see how.
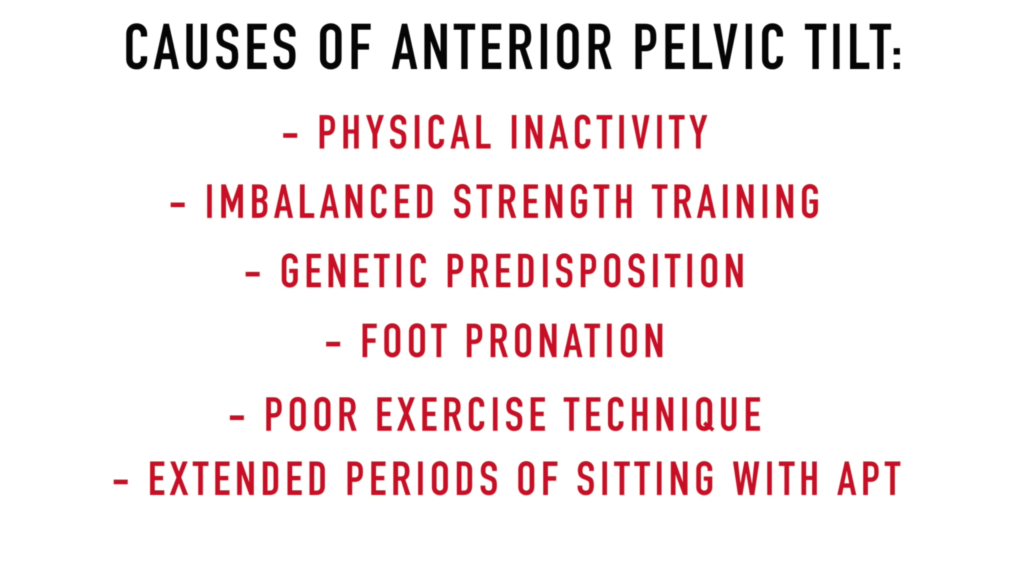
What Causes Anterior Pelvic tilt?
There are numerous causes for anterior pelvic tilt. If you identify the underlying root of the problem, it becomes much easier to reduce the causing factors and correct the issues at the source:
Cause 1: Prolonged Sitting With Poor Posture
Many people’s jobs (or hobbies) necessitates prolonged sitting. This in itself has been associated with numerous health risks. Sitting with improper posture, in an anteriorly pelvic tilted position, can cause numerous musculoskeletal problems.
Cause 2: Physical Inactivity
Strengthening the muscles which control body posture through targeted, regular exercise can alleviate postural issues.
Cause 3: Genetic Predispositions (Bone Structure)
The pelvis is a complex joint that is kept stable by numerous muscles, ligaments, and tendons. The bones which make up the pelvis (and the placement/strength etc. of these fibrous tissues) are often genetically controlled.
Cause 4: Poor Exercise Technique (Excessive Lower Back Arching During Squat Or Deadlift)
Improper form keeps your trainer up at night… it also causes numerous postural issues which have themselves have knock-on effects.
Cause 4: Imbalanced Strength Training (Not Enough Glutes/Ab Training)
Training all the muscles in the body, and focusing on muscles on both sides of joints is key to a well balanced workout routine. Postural muscles are often harder to train and thus overlooked when planning a gym routine.
Cause 5: Muscle Imbalances From Sports
Sports often accentuate the work of some muscles over others. These imbalances in strength can give rise to numerous problems that can materialize in different ways.
Cause 6: Foot Pronation
Many postural issues start at the ground. Improper foot ergonomics can have knock-on effects. That's because they negatively impact posture. And necessitate compensatory adjustments in the rest of the body.
Despite all of these potential contributory factors, anterior pelvic tilt most commonly arises nowadays due to extended periods of sitting with improper posture. Look at the images below.
- Left: Exhibiting anterior pelvic tilt when sitting
- Right: Exhibits posterior pelvic tilt in a similar sitting position
- Neutral: Falls somewhere between the two extremes and is ideal!
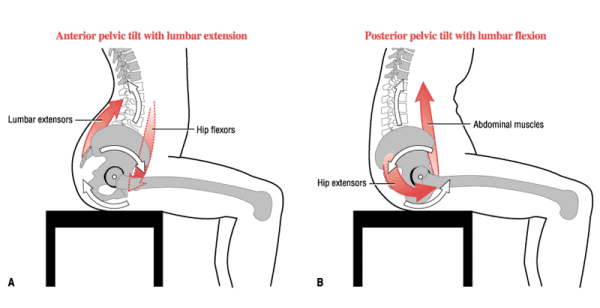
It’s important to note that a slight anterior pelvic tilt is perfectly normal. Research shows that about 85% of healthy males and 75% of healthy females exhibit a slight anterior pelvic tilt.
A “normal” degree of tilt looks something like the below photo.
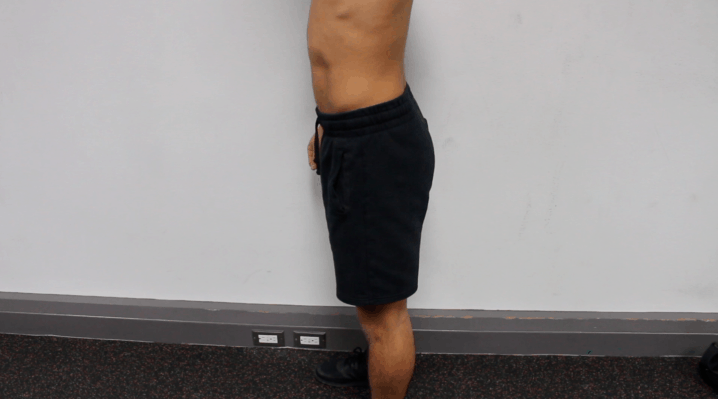
There's Individual Variation Involved In 'Normal' Levels Of Tilt
Despite that, problems can start to arise in those who have a more prominent anterior pelvic tilt.
Bodies respond differently to strain and what may be a normal level of tilt. And well-tolerated in an individual may cause significant postural discomfort in another. These discomforts can compound when those with excessive anterior pelvic tilt lift weights. More specifically, weight training that focuses on the muscles of the lower back/pelvic girdle can push an already unbalanced muscle core over the edge.
Performing loaded movements like the squat and deadlift with an anterior pelvic tilt accentuates and focuses the stress on the lower back. It also reduces the amount of force that can be produced during the exercise. Prolonged activity can result in tightness of the lower back and pain.
This chronic tightness can prevent:
- Regular progression in the gym. You won't be able to lift heavier weight
- Proper activation of the gluteal muscles, which are integral to multiple exercises deadlifts
If this is the case for you, its certainly something that should be corrected sooner than later. It's not just to reduce the amount of discomfort associated with the condition. But also to allow for improvements in the gym that accompany progressive increases in force production.
The “Science” Behind Fixing Anterior Pelvic Tilt
Before diving into the quick and easy corrective routine, it is important to know the reasoning for and the evidence behind it.
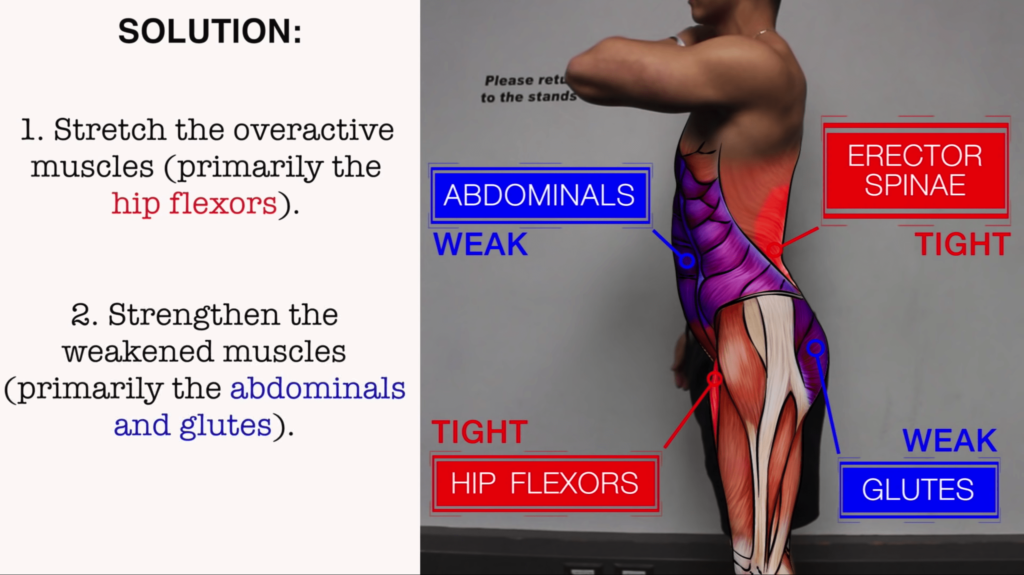
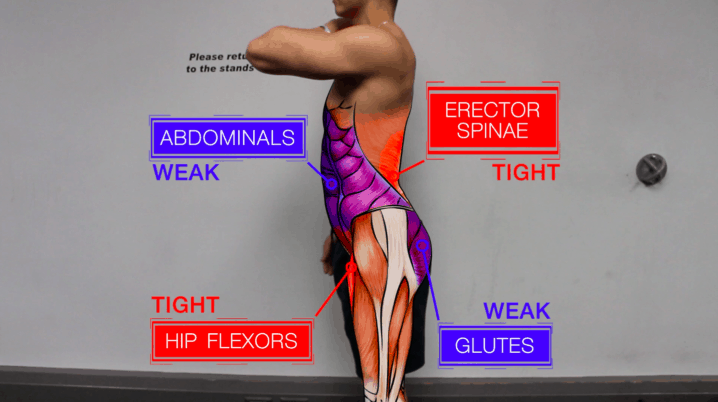
Research indicates that over time, certain muscles become overactive and others become underactive. The imbalance which results leads to anterior pelvic tilt.
In a typical scenario:
- These muscles are weakened - The abs (rectus abdominus, transverses abdominus, internal obliques, and external obliques), as well as the glutes (maximus, medius, and minimus)
- These muscles become overactive - The hipflexor muscles (iliacus, psoas, and recuts femoris) and erector spinae muscle group.
The muscles in question can be seen in the photo shown below. It does not take an extensive understanding of human anatomy to see that the imbalance caused by over/underactivation of the highlighted muscle groups can cause a forward tilting of the pelvic girdle.
How does one go about solving this issue? You should focus on the two overlying principles listed below:
Principle 1: Stretching The Overactive Muscles
Focus on the hip flexors. Tightness in the erector spinae is a consequence, rather than cause for the forward-tilted pelvis. Therefore, working on the iliopsoas muscles which bring about hip flexion is key. Your hamstrings may also feel tight if you suffer from anterior pelvic tilt. Tightness in this muscle group is also a consequence of, rather than a cause for the abnormal tilt in the pelvic girdle.
Stretching the hamstrings, while beneficial on its own will not alleviate the problem. Why? Because the position of your pelvis when in anterior pelvic tilt “pre-stretches” the hamstrings. Which gives you the false impression that they’re tight. Often times, stretching them will do more harm than good.
Principle 2: Strengthening The Underactive Muscles
As mentioned previously, the abdominal muscle group and the glutes are the two main muscles you should focus on strengthening to alleviate the cause of anterior pelvic tilt. People with anterior pelvic tilt will often have trouble activating the glutes and relaxing the hip flexors. With that said, the cause of weakness is apparent. Given this propensity, caution should be exercised in strengthening the underactive musculature around the pelvic girdle.
The routine outlined below is carefully selected to maximize glute activation. And is specific to the issues faced by those with anterior pelvic tilt.
Step 1 of the prescribed corrective routine will focus on learning how to properly maneuver your pelvis. This preamble is absolutely necessary prior to implement exercises that are listed below and available elsewhere online. These exercises on their own will not prove beneficial unless you have the control required to manipulate pelvic position.
So without further ado, let's delve into the details of our 4 step process.
Step 1: Learn How To Posterior Pelvic Tilt
You will need to first learn how to properly posteriorly tilt your pelvis. If you don't, your body will cheat when performing corrective stretches and exercises. As you can imagine, this will not prove beneficial to you.
Exercise 1: Lying Pelvic Tilts
One easy way to learn to posterior tilt your pelvis is to practice this movement while lying on the ground. The support provided by the ground and the increased stability in this position is an ideal way to transition into the more complex exercises soon to follow.
- Begin by simply lying on your back with knees flexed and pointed upwards. You’ll likely notice that there is a space between your lower back and the ground.
- Flatten your lower back as you push it towards the ground. At the same time, squeeze (and activate) your glutes. Be sure to tilt your pelvis to allow for this movement to happen. This action is called the posterior pelvic tilt.
- Then, go back to the starting position by relaxing your glutes. Tilt your hip in the upward direction. And move your back away from the ground. Doing so creates a space between your lower back and the ground.
- You are now in an anterior pelvic tilt.
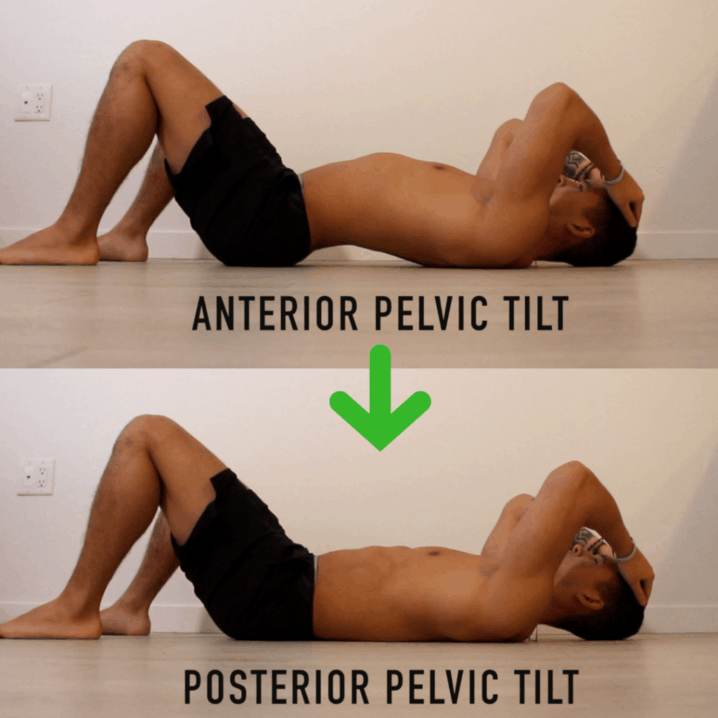
The photo above shows the anteriorly tilted position. And below shows the posterior pelvic tilted position.
By going back and forth between the two positions (for about 10 repetitions), you will begin to become comfortable in controlling the tilt of your pelvis. This exercise can be repeated throughout the day. Or daily as the need varies, until sufficient comfort has been achieved.
Exercise 2: Standing Pelvic Tilts
Here, you want to repeat the previously discussed exercise in the standing position. The exercise is now less controlled. You no longer have the support and stability gained by performing the exercise on the ground. Despite this change, the movement is nearly identical. Mastering exercise 1 will allow you to perform exercise 2 with much greater ease.
- Stand relaxed with your feet shoulder-width apart
- Then, squeeze the glutes to come into posterior pelvic tilt
Exercise 2 is shown with the top picture (number 1) showing the anterior pelvic tilted position and the bottom picture (number 2) showing the posterior tilted pelvic position. The blue arrows indicate the direction of movement of the lower back and glutes in the picture.
The backward movement of the lower back and tilting of the pelvic girdle in the posterior direction will move you from the anterior to the posterior tilted position. The opposite movement will then return the body to the anterior tilted position. You can repeat this movement multiple times (about 10 repetitions) to attain the desired results. You can do so throughout the day or on successive days if you like.
Step 2: Strengthen The Glutes And Abdominals
Step 1 focused on learning to tilt your pelvis posteriorly. The strength and control gained in those introductory steps can be used to move towards strengthening exercises for the gluteal and abdominal muscle groups.
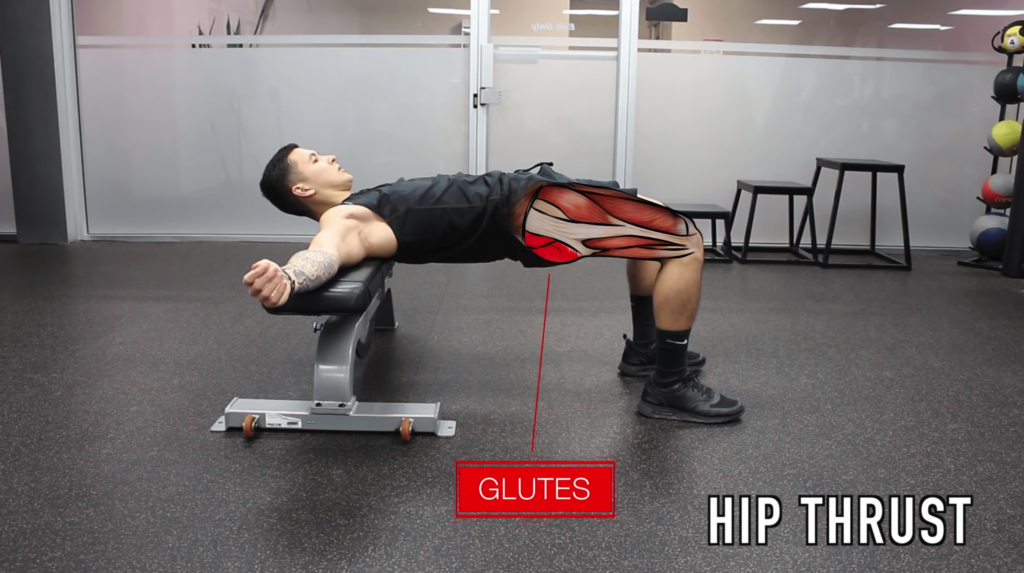
Exercise 1: Bodyweight Hip Thrusts
The first exercise maintains and targets the glutes! The hip thrust is an excellent exercise that can be performed unloaded to target one of the two main muscle groups involved in anterior pelvic tilt.
The key, however, is to do the exercise properly.
The picture below will help better visualize the movement.
- Begin by having your shoulder on the bench with your feet on the ground.
- Then, move your hips in the upward direction and towards the ceiling. Your shoulder blades should not leave the bench. You should place your feet such that your shins are still vertical when the upward movement is completed.
It may take a few attempts to figure out how far from the bench to place your feet initially. The body will try to compensate for a lack of stability through the range of this movement by arching the lower back. You need to be conscious of this compensation and avoid it at all costs. Only then can you activate the desired muscle group; namely the glutes.
What's The Key To Performing Bodyweight Hip Thrusts?
The key to successfully completing this movement is:
- To keep your lower back straight
- And to posteriorly tilting your pelvis throughout the whole movement as discussed in part 1
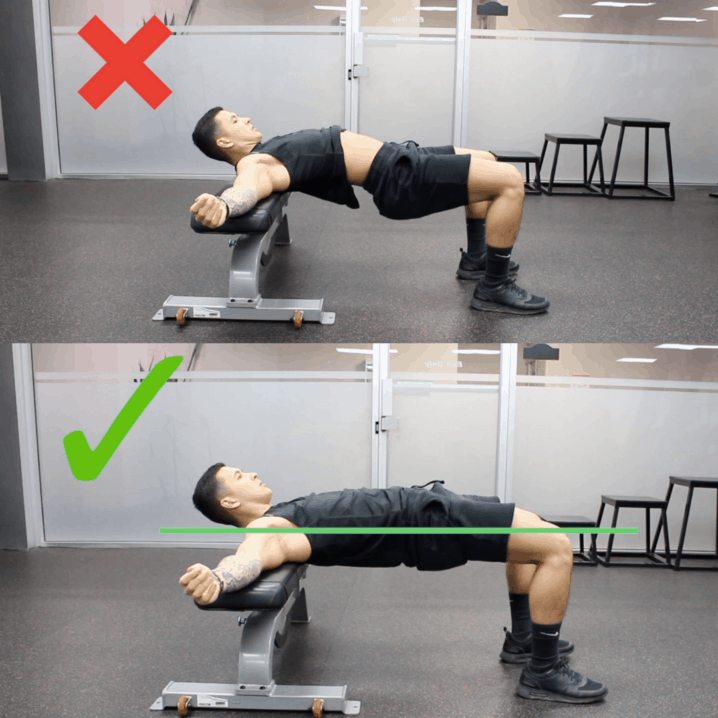
Posterior tilting of the pelvis should allow your body to line up, so that you should be able to draw a straight line from your head to your knees. You should also be squeezing the glutes and feeling them contract.
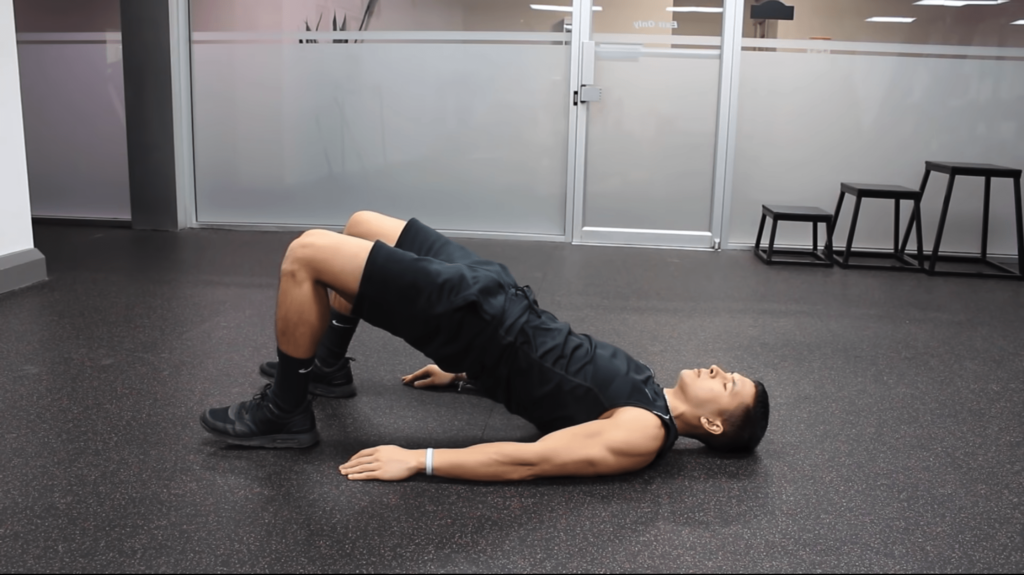
An alternative is to use glute bridges (with your back on the floor) and applying the same protocol. The goal is to eventually build up to posterior pelvic tilt with a weighted protocol. Only then will that allow for the greater strengthening of the glutes with continued application over time.
Exercise 2: RKC Plank
The next exercise focuses on strengthening the abdominal muscle group. This is the second half of those involved in tilting of the pelvis.
There are many different exercises out there that seek to target the abs. Those that suffer from anterior pelvic tilt should select exercises that minimize the involvement of the hip flexors. As discussed previously, these muscles are already more active than they should be.
Why Are RKC Planks Beneficial?
An example of a great exercise that ticks all of the boxes is the RKC plank. RKC planks are very similar to the standard plank. But are especially beneficial for those with anterior pelvic tilt. That's because they help work on everything we want:
- Better engage the abdominal muscle group
- Help minimize involvement of the hip-flexors
- And help strengthen the gluteal muscle group
EMG analysis of muscle activity by Bret Contreras showed that compared to the standard plank, the RKC plank resulted in:
- 4x higher lower abdominal muscle activation and
- 2x higher internal oblique activation
But, as always, the key is to perform these planks properly. Only then can you gain the maximum benefit.
What Muscles Do The RKC Planks Activate?
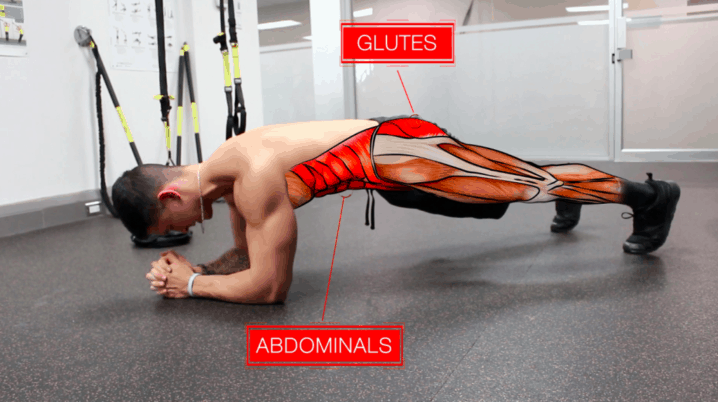
RKC plank demonstrated with the key target groups highlighted in red and labeled. Note the hands are interlocked, the feet are slightly wider than shoulder width apart, and the pelvis is posteriorly tilted to allow for greater activation of the glutes and abdominal muscles.
How To Properly Perform The RKC Plank
Here are some key points to keep in mind to ensure the proper execution of this exercise:
- Set up as you would in a standard plank, with elbows and feet shoulder-width apart. Only this time, with your hands interlocked and your feet slightly wider than normal.
- Activate your abdominals by consciously attempting to draw your belly button towards your spine (in the upwards direction).
- Then, posteriorly pelvic tilt your hips by squeezing your glutes and continue to keep them contracted as you hold the plank. This should be a familiar motion to you by now. Use what you learned and practiced in the two exercises in step 1.
- Hold this position for as long as possible. Be sure not to let your lower back arch and continue to activate your glutes. Keep track of the time.
You can increase the time in small increments for subsequent iterations. Nonetheless, you still need to remain conscious of performing each component properly.
Never sure if you're performing your exercises correctly - and optimally for muscle growth in the gym? Don't worry. Our 2-on-1 coaching program can help. My team of experts here at BWS – and I – will always take the time to explain the dos and do not's of each exercise's execution in your personalized training program. Find out more about how we can help you achieve your dream physique below:
Click the button below to find out more about the 2-on-1 coaching program:
↓
Step 3: Stretching the Hip Flexors
Multiple studies have shown that stretching the overactive hip flexor muscles can help reduce the degree of anterior pelvic tilt over time. And lead to alleviation of tension and pain in this region.
Exercise 1: Psoas Stretch
The first stretch is the “lunge stretch”. This stretch is one that many people know, but do not perform correctly. When done properly this stretch allows one to focus on the psoas muscle.
How To Properly Perform The Psoas Stretch
To properly perform this stretch, use the following tips:
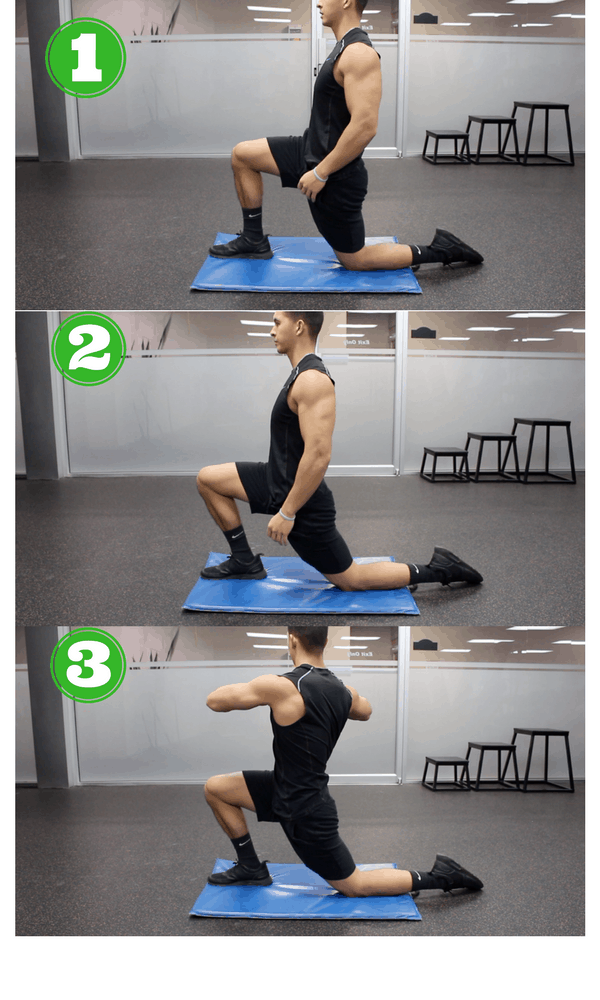
- Get into a lunge position. Bend both knees at 90 degrees.
- Contract your abdominal muscles. You can do so by thinking about drawing your belly button towards your spine. Make sure to move your hips into the posterior pelvic tilt position. The goal of this is to feel a deep stretch in the hip flexors in your back leg. Many will find initially that this position already provides a sufficient amount of stretching. Look at picture 1.
- For a deeper stretch, maintain your position of posterior pelvic tilt and lean forward slightly while contracting your abdominal muscles. Look at picture 2.
- For an even deeper stretch, the trunk region (upper body) can be rotated in the opposite direction from your forward planted leg. These steps can be progressed to after a few sessions of more basic stretching. This is because they require greater comfort with stretch and postural stability. Look at picture 3.
- Repeat the same stretch with the other foot in front, making sure to focus on the posture. To avoid having to count or time, hold each side for about 10 deep breaths.
Exercise 2: Rectus Femoris Stretch
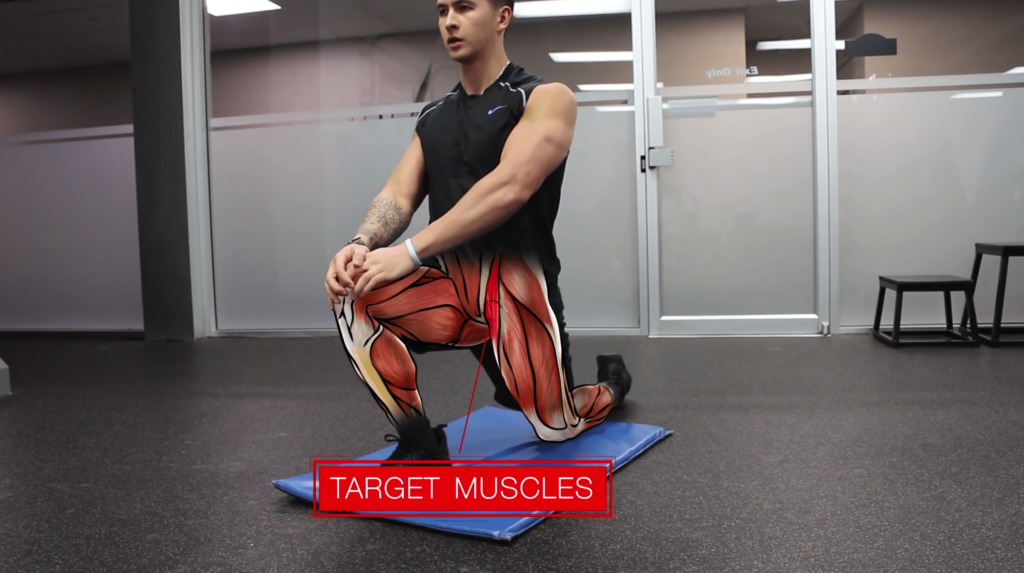
The goal of the second stretch shown here is to specifically target the rectus femoris. This, along with the iliopsoas, makes up the hip flexors. In general, this muscle is tighter than the iliopsoas in those with anterior pelvic tilt.
How To Perform The Rectus Femoris Stretch
In order to perform this stretch:
- Plant your forward foot firmly on the ground. Bend your knees, with the back foot with contact to the ground at the knee (see picture below). For greater stability, support the back foot with a bench or couch.
- Contract your abdominal core. You can do so by drawing your belly button towards your spine. And moving your hips into posterior pelvic tilt position, which you are now familiar.
As you achieve this position, you should feel a deep stretch down the front of your thigh. You can slightly move forward and away from the bench so that your back knee is less bent for less of a stretch or move closer to the bench for more of a stretch.
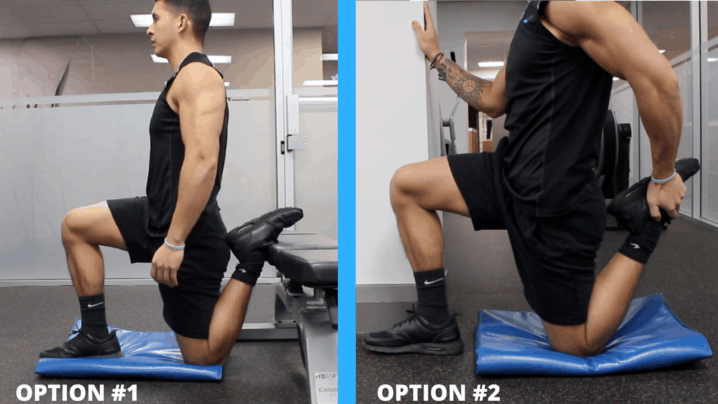
Stretching the rectus femoris muscle which is part of the quadriceps and crosses the hip joint to participate in hip joint flexion. Here are two alternatives: using a bench (left) and without a bench (right).
You can also perform the same stretch without the use of a bench. Hold onto something for balance and then pull your back leg up towards your buttocks. Change the forward leg and hold each side for about 10 deep breaths.
Exercise 3: Laying Down Iliopsoas Stretch
- Sit on the edge of your bed. Your feet should hang off the edge of the bed and be flat on the ground. This is how you can prepare for the stretch.
- Lay on your back on the bed. Your feet should still hang over the edge. And possibly planted on the ground, depending on the height of the bed and length of your legs.
- Lift one leg off the ground and bend the knee.
- Move your thigh as close as possible to your chest. You can use both hands interlocked together and wrapped around this leg to keep it in place (close to the chest). The lifted leg will be stretching in the gluteal region and upper hamstring.
What's The Focus Of The Laying Down Iliopsoas Stretch?
The main focus of this position and our goal is to stretch the iliopsoas muscle in the leg still hanging over the edge of the bed. By virtue of lifting one leg, the other leg is passively stretched as the iliopsoas muscle is lengthened. You just have to let gravity do the work!
And while in this position, implement the posterior tilting of the pelvic girdle which you have mastered previously.
To increase the amount of stretch:
- Pull the bent leg closer to the chest
- And/or thrust your hip in the upward direction, towards the ceiling, as done in exercise one.
Use the number of breaths you take to measure the duration of time. Hold the pose with each leg for 10 deep breaths, then alternate and stretch the other leg.
Step 4: Implement This Into A Daily Corrective Routine
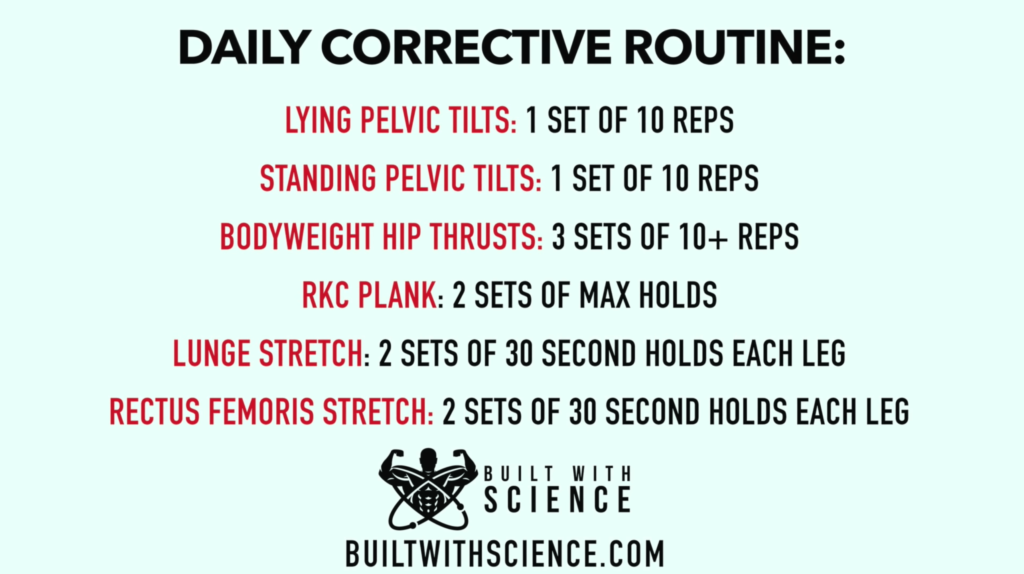
To sum this article up, here’s a corrective routine utilizing all of the exercises I previously discussed. You can use this list to implement the set of stretches and exercises into your daily routine.
Lying Pelvic Tilts: 1 set of 10 reps
Standing Pelvic Tilts: 1 set of 10 reps
Bodyweight Hip Thrusts: 3 sets of 10+ reps
RKC Plank: 2 sets of max holds
Lunge Stretch: 2 sets of 30 second holds each leg
Rectus Femoris Stretch: 2 sets of 30 second holds each leg
And I’ve also made a free PDF of the anterior pelvic tilt corrective routine which comes complete with exercise pictures, tips, and progression exercises so that you always have something convenient to refer to when performing the routine.
Click the button below to access the PDF anterior pelvic tilt corrective routine for free:
Takeaway
When it comes to correcting anterior pelvic tilt, frequency and diligence are the most important factors that will determine your success in correcting your pelvic tilt. You can do these exercises at home. So, try your best to do these daily. If you do that, you’ll quickly start to notice significant improvements.
Another thing to keep in mind is that you should always be aware of how your posture is throughout the day and while in the gym. If you sit or stand for extended periods during the day, then use what you’ve learned in this article to keep your pelvis in more of a neutral position. This is what’s going to prevent your anterior pelvic tilt from worsening or coming back after it has been corrected!
Similarly, when performing movements like the squat and the deadlift in the gym, you need to teach yourself how to maintain a neutral pelvis… AVOID ARCHING YOUR BACK!!! This will help you with strength improvement, especially in your leg workouts.
And for a step-by-step program designed to accommodate your schedule and show you exactly how to build muscle and correct postural issues through the use of science, then:
Click the button below to take my analysis quiz to discover the best program for you:
↓
Anyways, that's it for this article. Hope you all enjoyed it. Feel free to let me know if you have any questions down below. And give me a follow on Instagram , Facebook , and Youtube where I'll be posting informative content on a more regular basis. Cheers!


