Joint Pain from the Gym? These 5 Mistakes Are WRECKING Your Joints
Joint pain after workouts? It's probably not your age, but a sign you're making these gym mistakes. Here's how to fix it.
Most people make common gym mistakes that quietly wreck their joints — and often lead to joint pain.
But they’re easily avoidable.
Instead of just copying the big guys in the gym or online, the real fix is actually understanding YOUR own anatomy.
After years of researching movement science and working as a Kinesiologist, I found 5 simple tweaks that instantly ease joint pain — and more importantly, save you from bigger problems down the road.
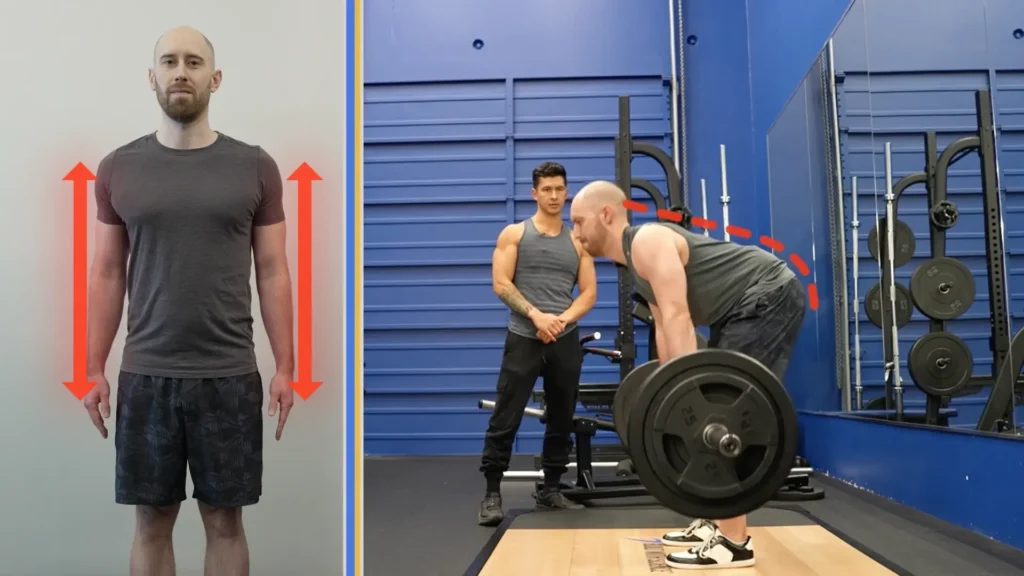
Mistake 1: Using Form That Doesn't Fit Your Anatomy
Now, the first fix you need to make is to start using a form that matches your anatomy.
So, back when I was first learning Romanian deadlifts — which is basically just a straighter-legged deadlift to target your hamstrings — I remember I watched a guy on Instagram lower the bar almost to the floor while keeping his back perfectly straight.
The next day, I gave it a go.
Yet for some reason, I could barely get past my knees.
But I remembered him going all the way down, so I forced it lower anyway, and the next day my lower back was toast.
I’m honestly lucky I wasn’t using too much weight because it could have been a lot worse.
Now I didn’t know it at the time, but the guy I tried copying had long arms and freakishly mobile hips, allowing him to go super deep with good form.
But in my case, I had no business being down there, and my lower back had no choice but to start rounding in order for me to get any deeper.
It’s not talked about enough, but your individual bone length, joint mobility, and even the shape of your sockets change what “proper” form looks like for you.
And when form doesn’t match your anatomy, that’s when issues like joint pain tend to show up.
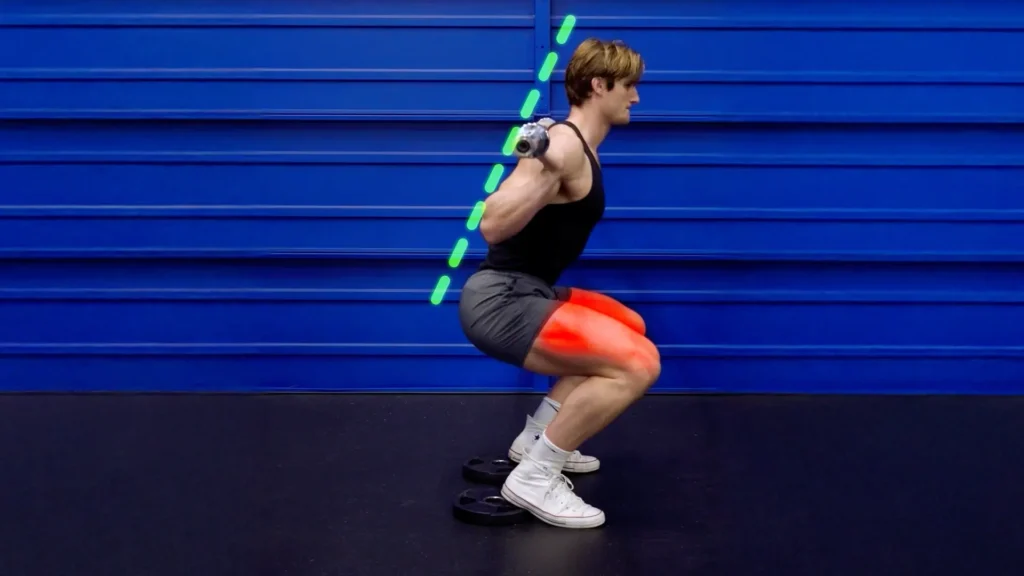
Squats
Take squats, for example.
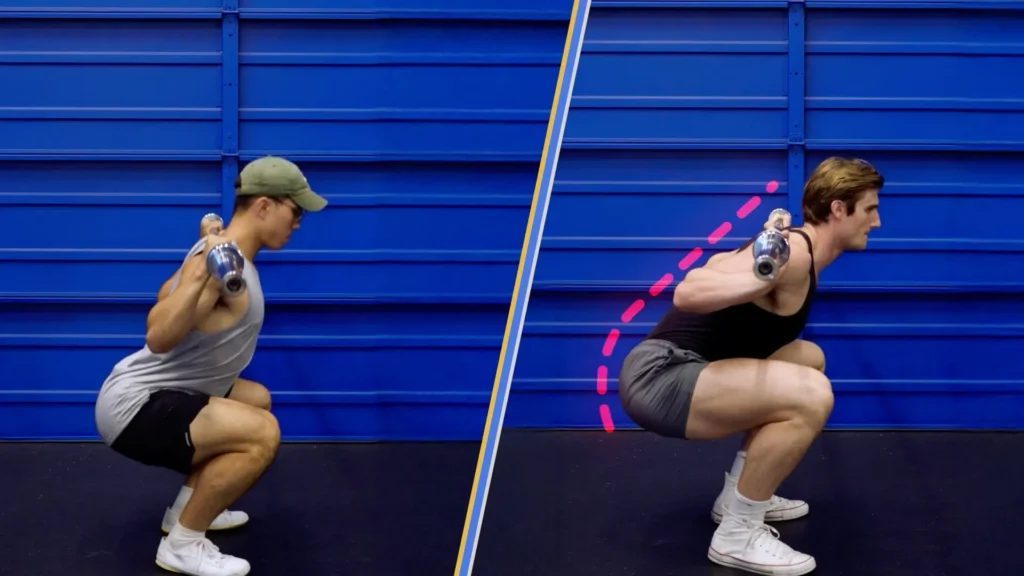
If you’ve got long femurs and tight ankles like Max, your torso will lean forward.
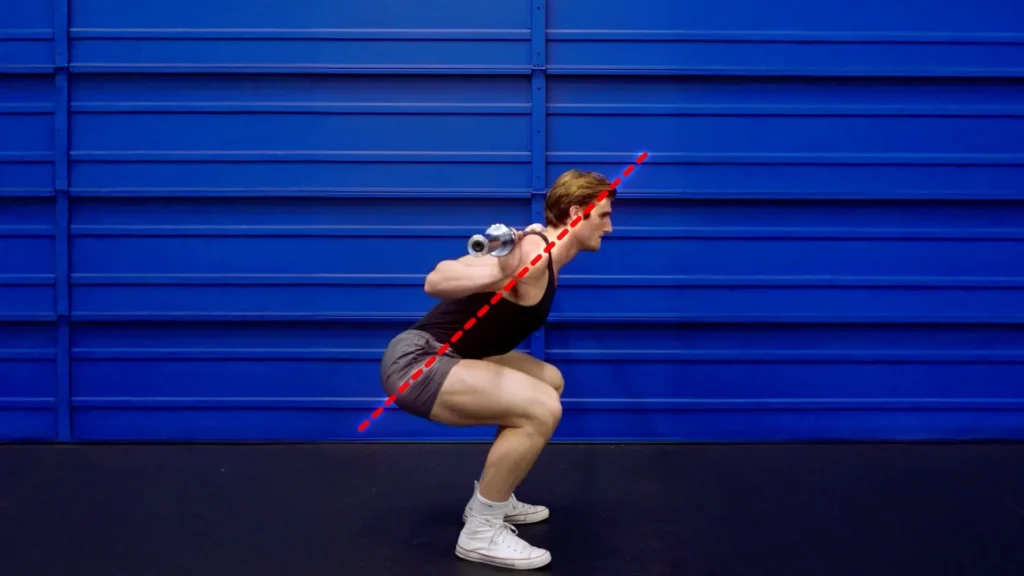
If Max tried to squat straight up, he’d lose balance and fall over.
But some people — like Alex, one of our Built With Science coaches — are just built to squat.
Alex has short femurs and amazing ankle mobility, letting him squat deep and upright all day.
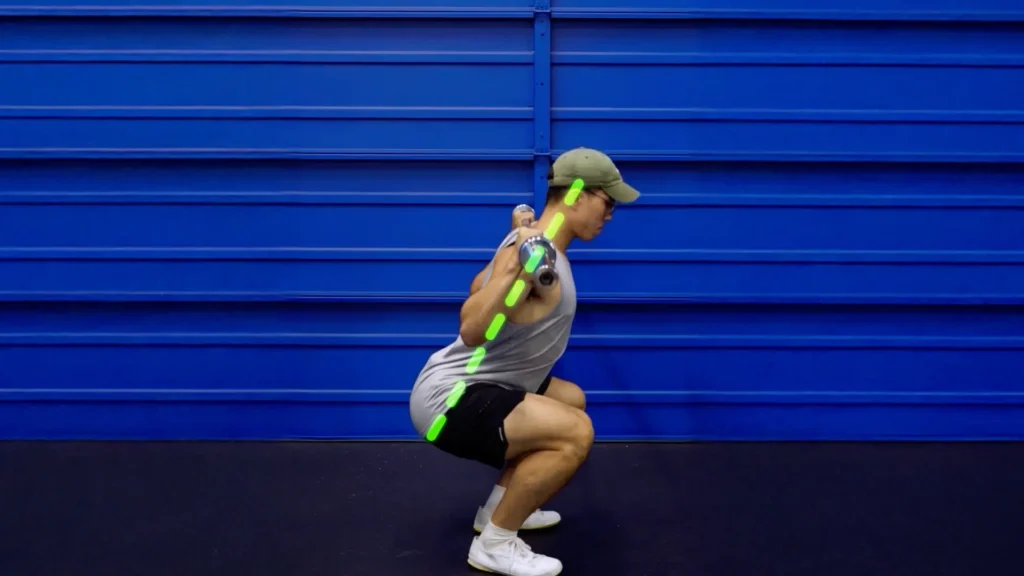
Both are correct for their bodies, but forcing Max to match Alex would compromise his lower back through rounding — and could even lead to joint pain over time.
The same goes for foot placement.
Back when I first became a personal trainer, we were taught that “proper” squat form requires a narrow stance and toes pointing straight forward.
Now, some people’s hip structures are designed well for this.
But others’ hips will feel a pinching sensation and won’t get very deep before hitting a wall — often a red flag for potential joint pain if you push through it.
Deadlifts
Deadlifts tell the same story.
Long arms make conventional pulls a breeze.
But if you have shorter arms like my videographer, Brendan, you’ll have a very hard time getting into the bottom position without rounding your back.
This mismatch between your body and your form is exactly how joint pain and injuries can sneak in, especially if you’re lifting heavy.
Simple Form Adjustments That'll Help With Joint Pain
Now, to “fix” this, you don’t need to start measuring your bones or getting an X-ray of your bone structure.
Just experiment with simple adjustments.
Squat Adjustments
If you’re like Max — leaning forward when you squat — try elevating your heels onto plates.
Now this will hit more of the quads rather than the glutes, but you might also feel less low back strain, less joint pain, and just a smoother squat overall.
But also play around with your squat stance.
Try out narrow with your toes forward. Then try a bit wider with your toes out. Then go even wider with toes really angled out.
Typically, your hip structure will be a good fit for one of these stances, and you should be able to feel it right away — just keep in mind that the wider you go, the less deep your squat will be, which is perfectly fine.
Here's a detailed guide on how to squat properly, according to your anatomy.
Deadlift Adjustments
Then for deadlifts, let’s say you’re like Brendan, having trouble getting into position, that’s where I’d try elevating the bottom position or using sumo instead.
These changes often make a night-and-day difference in reducing joint pain, especially in the lower back and hips.
By the way, here's how to deadlift properly for growth and to avoid joint pain.
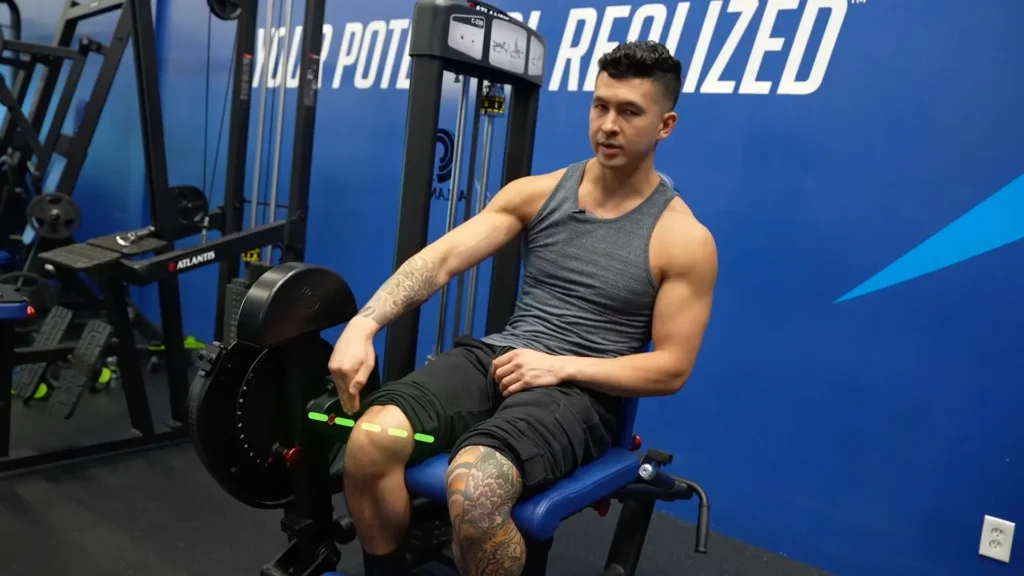
Adjustments On Machines
This applies to machines, too, where you’ll want to adjust the setup to better suit your anatomy.
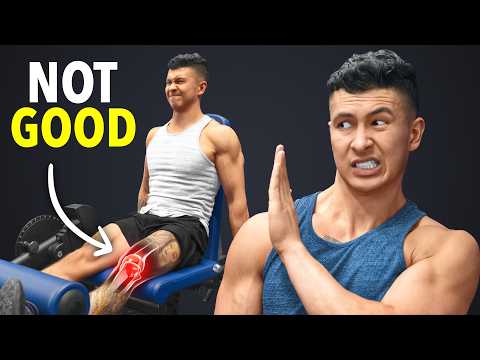
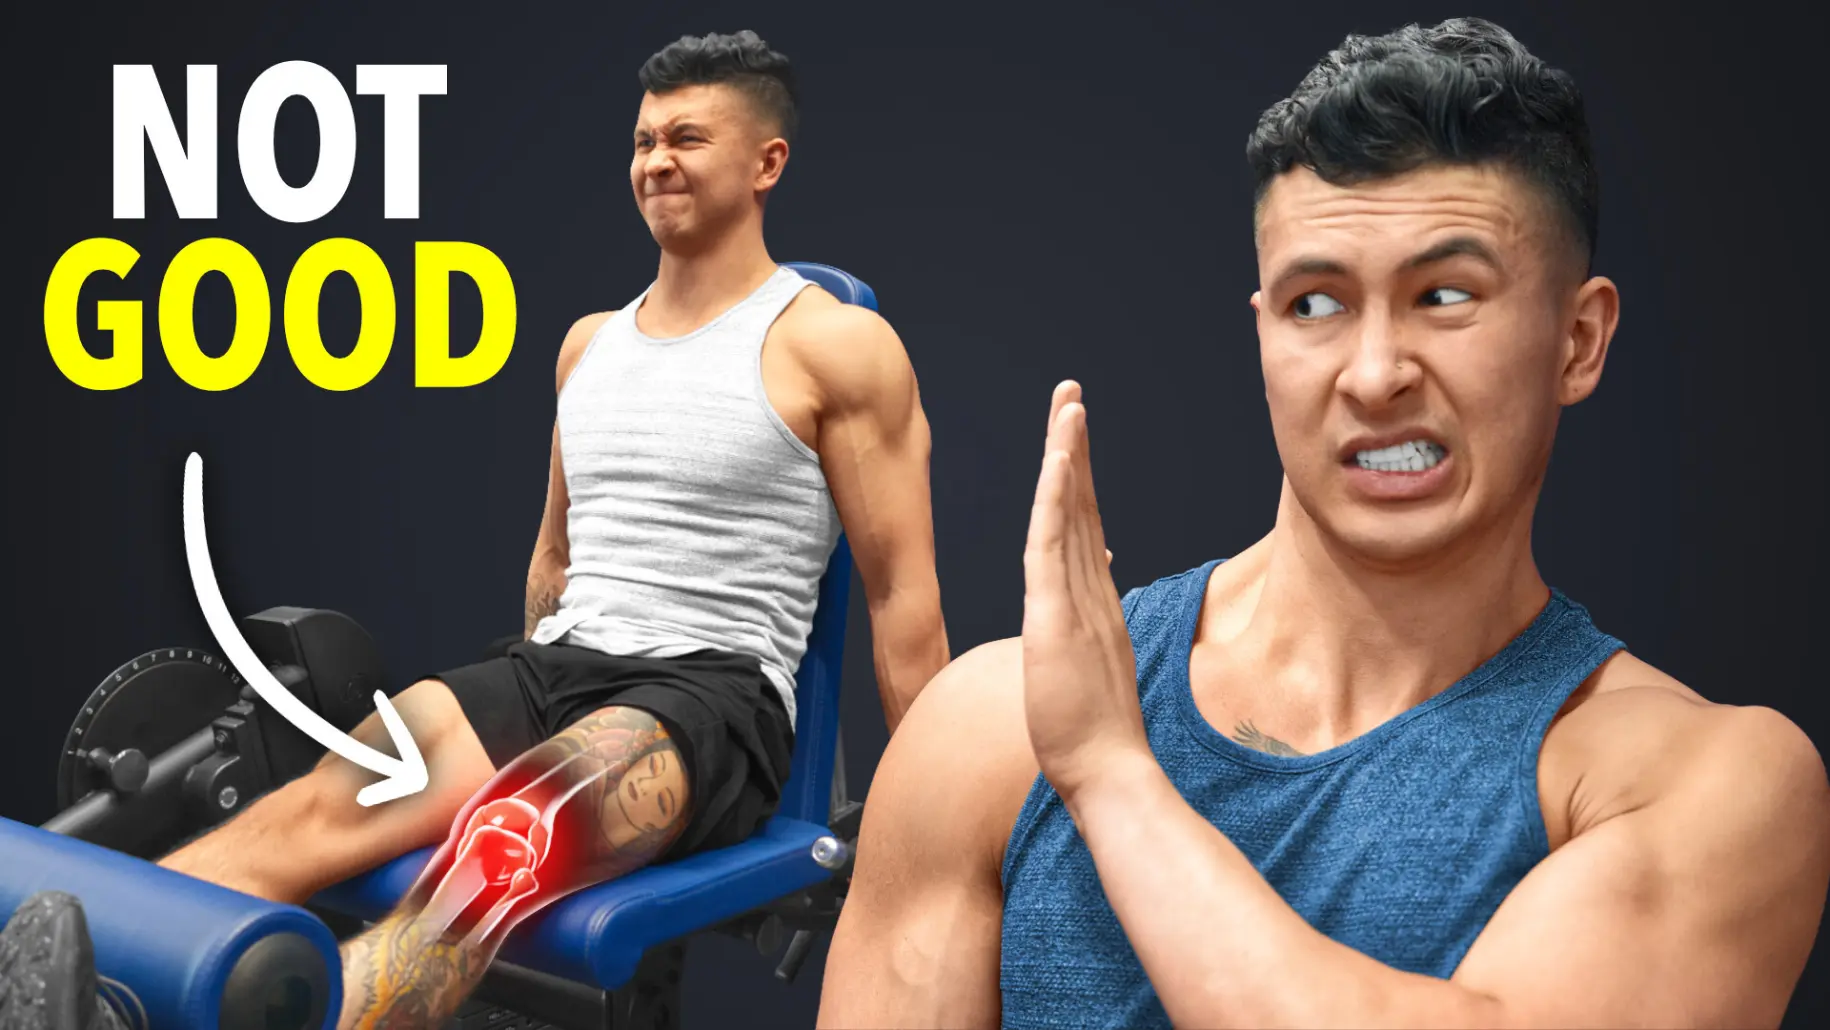
For example, on leg extensions and leg curls, to prevent unnecessary strain on your tendons (and avoid knee joint pain), try to line the machine’s pivot right beside where your knee bends.
Or with chest presses and the pec-deck, adjust the seat height so the handles start around the height of your nipples.
These small setup tweaks take almost no time, but they go a long way in reducing joint pain and improving your comfort and performance.
But while these adjustments may help, you’ll want to avoid the next mistake of ignoring the most neglected muscles in the gym — the ones that keep your shoulders safe every time your arms move.
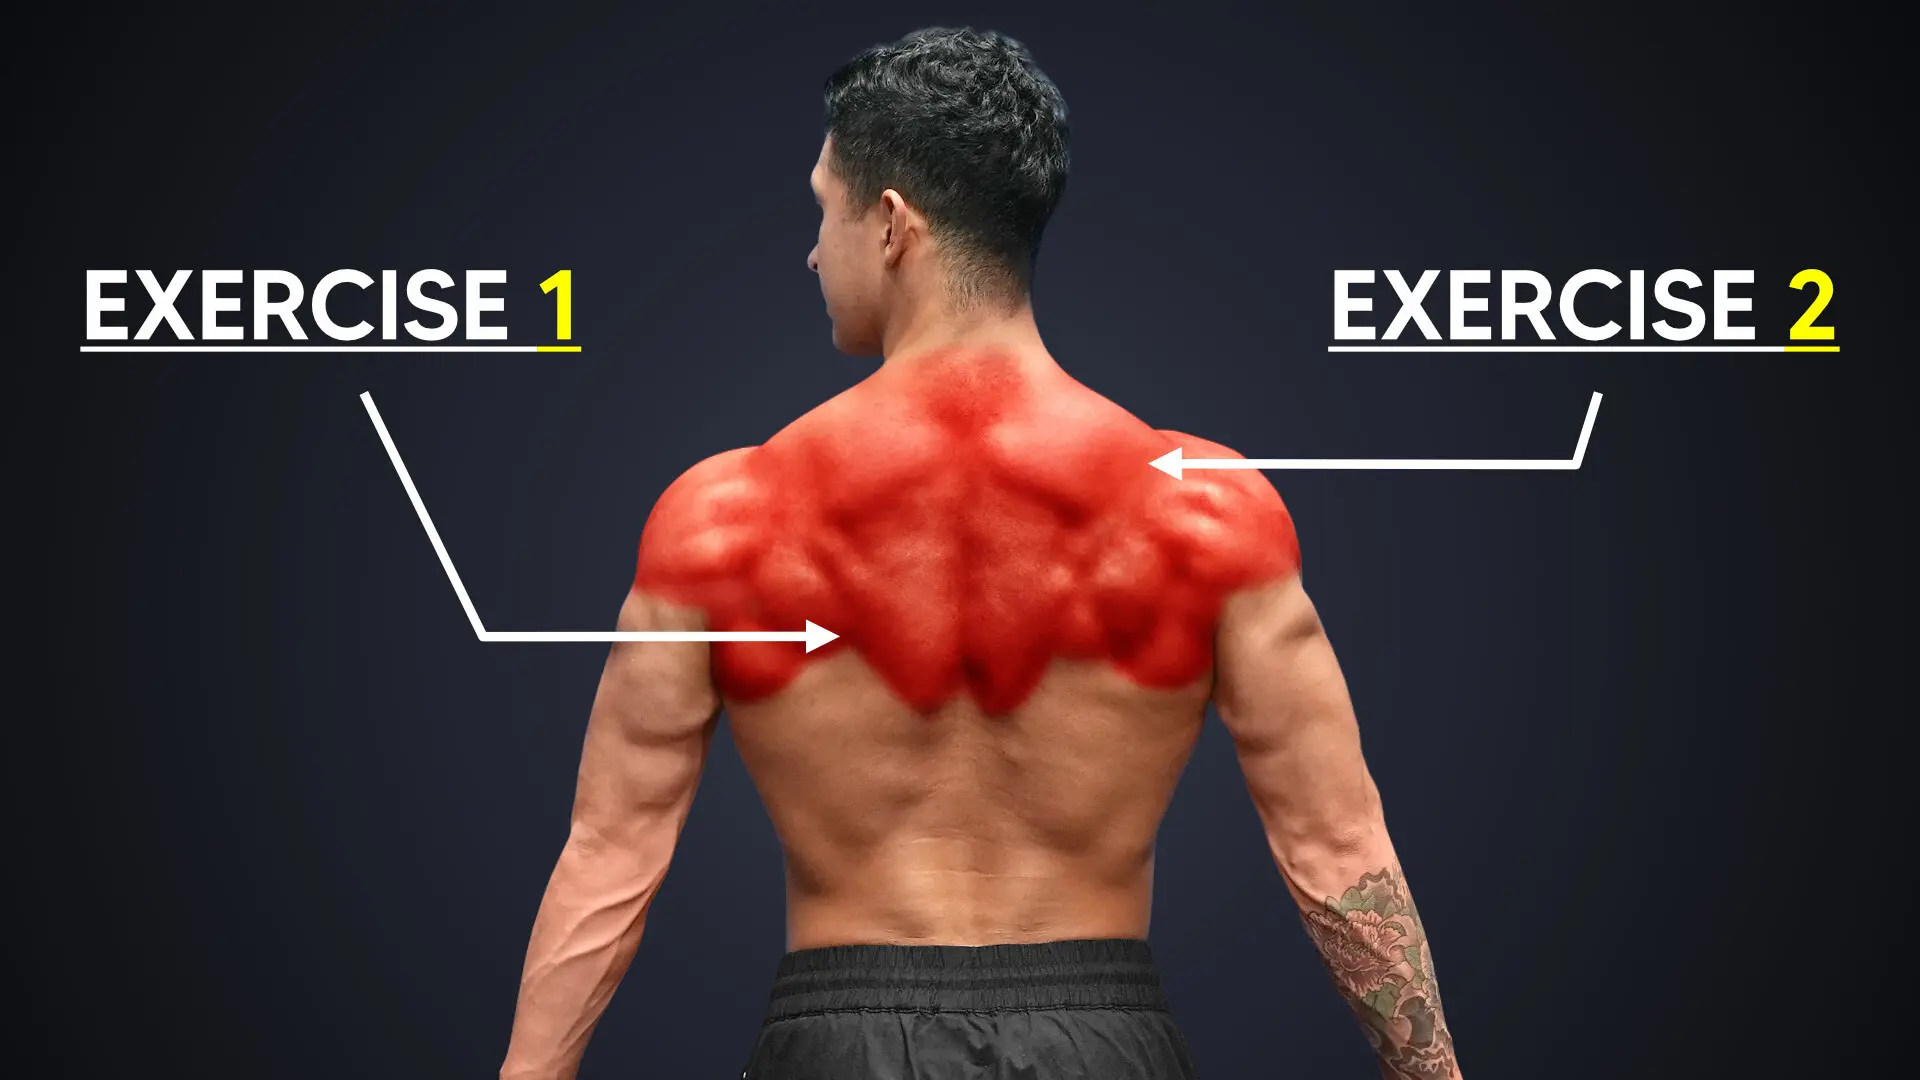
Mistake 2: Not Properly Training Your Back
Now, everyone blames a weak rotator cuff when shoulder pain shows up.
Don’t get me wrong — they’re important and I’ll show you how to strengthen them.
But you can’t ignore your bigger mid-back muscles like the traps and rhomboids.
You see, your scapula isn’t really attached to your rib cage through a physical joint. Instead, it’s suspended by muscles, getting tugged on from every direction.
Your traps and rhomboids pull on the scapula from the top and midline of your body, and since the scapula is attached to your humerus, they have a direct impact on how your shoulder moves.
If they’re weak, your shoulder joint wobbles with every press or pull — and that instability is a fast track to joint pain.
To make matters worse, most of us sit all day with our shoulders pitched forward, making it tough to activate these muscles.
You can think of them as being “locked” in the long position.
So even when you “train back,” you might just let your arms do all the work while your mid‑back takes a vacation.
I know because I did this for YEARS.
Once I fixed it, my back started growing faster, my shoulder clicking and discomfort disappeared, and even my posture straightened up.
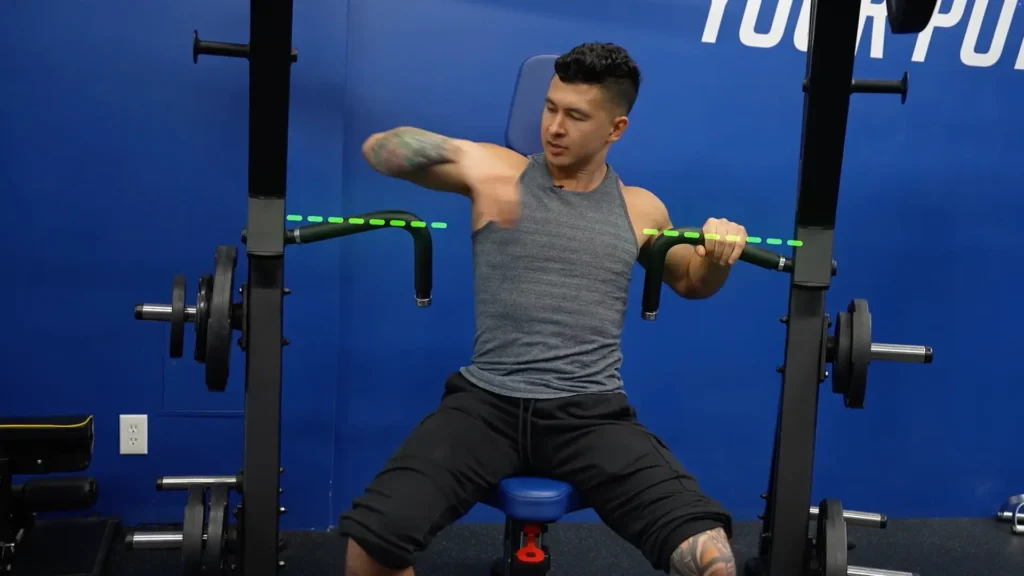
How To Actually Engage Your Back
So how’d I fix it? Two things:
First, I learned how to properly engage my back muscles.
Take our head engineer, Kevin — spends all day coding, slouched over with his back muscles stretched out — just like how you are right now.
So when he first tried doing rows to try to work his mid back, watch what happened.
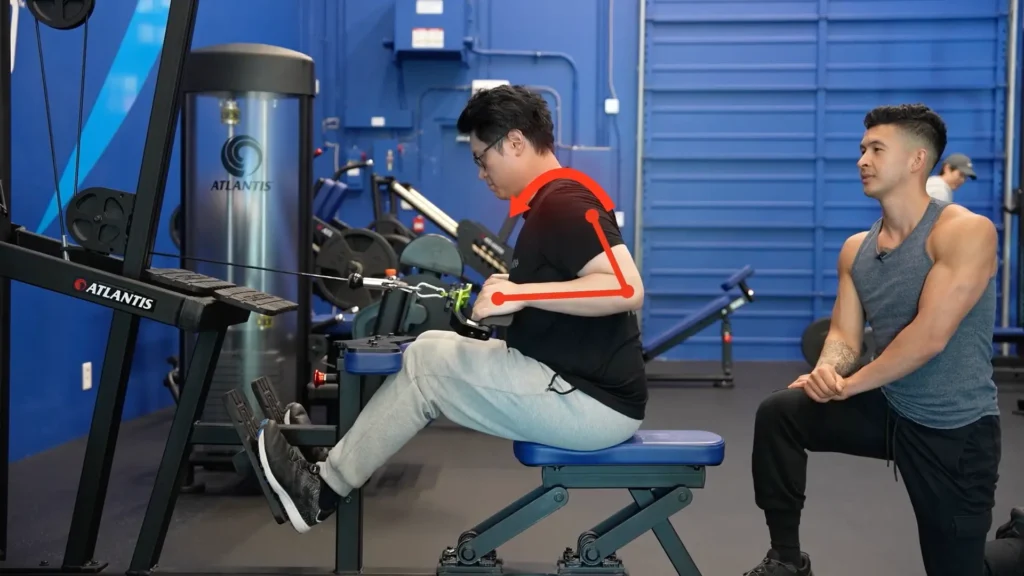
Yeah, the weight is moving, but his shoulder is rolling forward, which tells me he’s just pulling with his arms and his mid-back is basically the WIFI in a hotel gym — technically there, but nobody’s getting a signal …
Instead, it should look like this:

To get there, you’ll wanna start by pressing your shoulders down — skip the shrug.
Then think about pulling with your elbows and pinch your shoulder blades together like you’re trapping a pencil between them.
Then let them fully open up on the way back.
You might need to use less weight, but if you do it right, your shoulders will stay back instead of rolling forward.
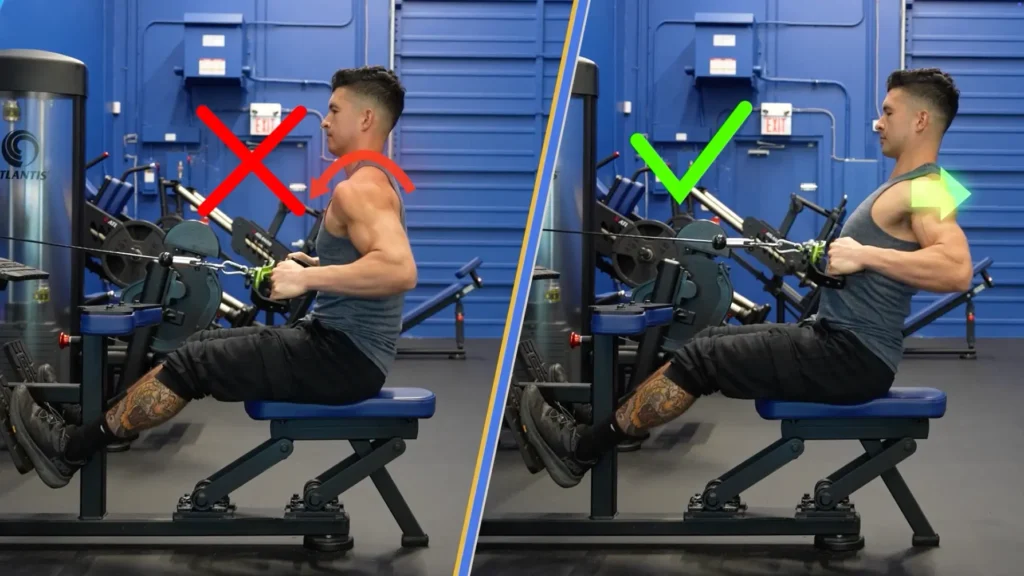
And the contraction will hit your mid‑back instead of just pumping up your forearms and biceps.
This small adjustment not only builds more muscle — it can also dramatically reduce joint pain in the shoulders over time.
Then, for pulldowns and pull‑ups, your shoulders can’t stay frozen.
If your arms are the only ones moving, your back’s barely involved.
So on the way up, let your shoulders relax and rise to your ears.
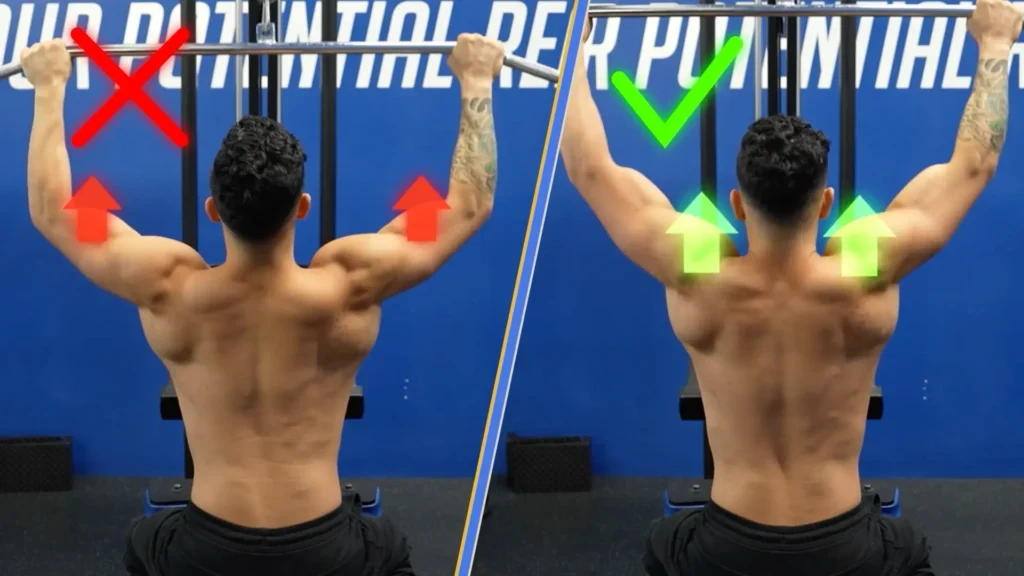
On the way down, pull with your elbows while shoving your shoulders down and away from your ears.
But I also like to sprinkle in some “prehab” exercises to further strengthen these areas, as well as the rotator cuff.
After every upper‑body session, I finish with 3 sets of face pulls or prone arm circles.
Then, every morning and anytime I step away from the desk, I’ll lean on the wall and bang out 10 wall slides to keep things strong.
These daily moves don’t just improve strength and posture — they help you stay pain-free by warding off joint pain before it starts.
Oh, and another part of the back you don't want to neglect? It's your lats; and here are 2 exercises you need to do.
Now, while these changes will make a massive difference in your back strength and shoulder health, you don’t want to make the next mistake, which has to do with your grip.
Mistake 3: Not Enough Free Motion Exercises
So, back when I was younger, I just copied the biggest guys in the room.
Barbell curls, skull‑crushers, bench, barbell rows, overhead press …
My routine was purely built off of these big movements.
While it worked, I noticed issues would quickly come up. My wrist would start to bug me, which would lead down to my elbow, then my shoulder.
Why? Well, let’s start by just looking at barbell curls and bar pushdowns.
The "Carrying Angle"
Most people don’t know this, but your arms don’t hang straight down. They have what’s called a natural “carrying angle.”
The “bump” on the back of your elbow is actually part of your ulna, and as you extend your elbow joint, that “bump” plugs into a groove in the back of your humerus. When it locks into place, the inside of your elbow joint can start to angle outwards slightly, creating that “carrying angle.”
Women tend to have a slightly deeper groove on average, which means their “carrying angle” can be even more intense than it is for men.
Which means, when you clamp your hands to a straight bar during a curl, you force bones, tendons, and ligaments into a line they were never meant to hold.
Triceps are no different.
They prefer to extend out at an angle, which is why — especially once you get stronger — straight bar pushdowns can feel rough on your elbows and wrists.
Now, the carrying angle isn’t as relevant for other muscle groups, but still, anytime you do an exercise where both of your hands are locked onto a bar, handle, or even a machine, you’re forcing both sides to follow the same fixed path.
Plus, even though elbows angle in or out, your wrists can’t rotate to match.
Tendons, ligaments, and muscles pull on each other, which means that strain in your wrists can eventually lead to strain in your elbows and even your shoulders.
And when this goes on long enough, it can absolutely turn into joint pain.
What's The Fix?
Now, the fix isn’t to eliminate these exercises altogether.
And it’s not like if you do any of these exercises, you’ll instantly hurt yourself and experience joint pain.
But let’s say you do one of these exercises twice a week for 3 sets of 12. That’s 72 reps a week. After a year, that’s almost 4,000 reps.
Which is why you’ll want to balance out this stress with a simple rule I like to follow:
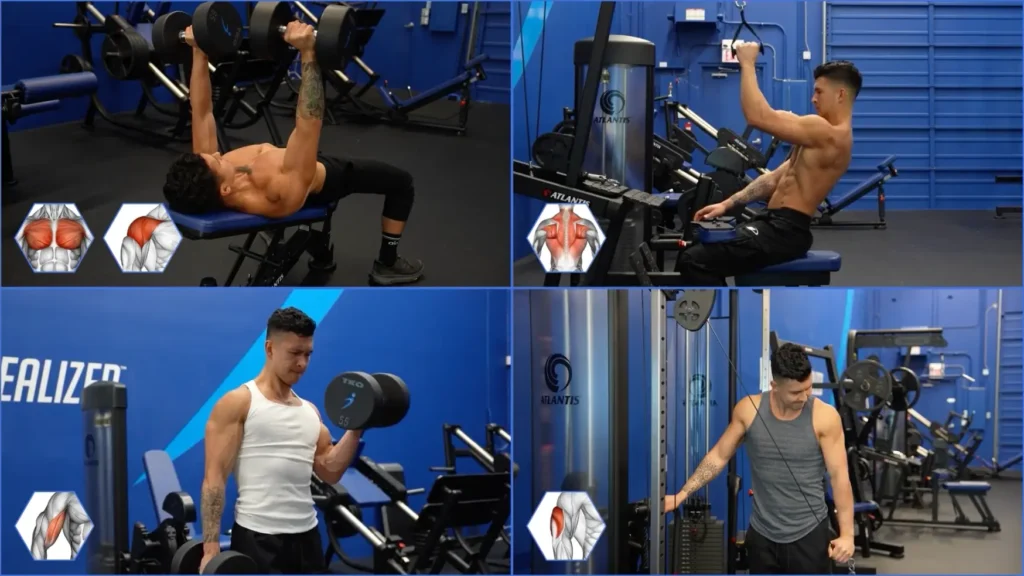
For each muscle group, work in at least one exercise that lets your hands and elbows rotate.
Dumbbell presses for chest and shoulders.
Single‑arm cable rows or pulldowns for back.
Dumbbell or single‑arm cable curls for biceps, and cross‑body cable pushdowns for triceps.
Mixing in these types of movements helps avoid repetitive stress that can build up over time and lead to chronic joint pain.
But now that you’ve fixed your workouts, it’s crucial you avoid the next mistake if you don't want joint pain — which has to do with how you’re progressing them over time.
Mistake 4: Forcing Progressive Overload
So when I first got serious about lifting, I was told the only way to grow was to add weight every single workout — so I did exactly that, no matter the cost.
And it worked, but I would always get to a point where I’d strain my shoulder or knee and be forced to take time off because of all that joint pain.
Everything changed when I switched my mindset about progression.
I was thinking about it all wrong.
You don’t force muscles to grow by lifting heavier.
You challenge your muscles with a certain amount of weight, and if you’ve done your job with recovery, your muscles should come back stronger.
It’s earned, rather than forced.
Pushing too soon and making little compromises with your form just to lift that extra weight adds up, and can lead to an immediate injury, or a slow‑burn strain that shows up months later.
And often, that strain is disguised as joint pain that never seems to go away.
Especially on days when you’ve had a rough night of sleep, missed a meal, or your body just isn’t feeling it.
That’s actually how my girlfriend, now wife, hurt her back 10 years ago.
She came off a full shift of working as a waitress and headed straight to the gym, severely dehydrated and underslept.
She was in a rush but still eager to beat her squat PR from last week.
So she skipped her warm-up, slapped on heavier weights, and grinded through the reps with not-so-good form. Until she felt a sharp pain in her lower back.
Later that night, she could hardly walk.
It still bugs her to this day.
So if a PR isn’t there, don’t force it.
Another Way To Progress To Minimize Joint Pain Risk
Plus, lifting heavier is just one form of progressive overload.
Imagine for a second two groups of people.
The first group uses the same weight over 12 weeks, but focuses on just doing more reps.
While the second group focuses on adding more weight as they get stronger.
Which group will build more muscle?
Well, scientists have tested just that and found both methods are equally effective for growth.
So if your body isn’t ready for more weight, just aim to do 1–2 more reps.
Or, try to match the same reps as last time but with better form or less effort.
The farther you advance in the gym, the slower your progress, and your programming needs to reflect that.
It’s why within my Built With Science+ app, we’ve designed a workout coach that uses all your data to tell you exactly how much weight and reps to do every workout to make sure you’re still progressing without overdoing it and experiencing joint pain as a result.
But you also need to pay attention to your body along the way…
Mistake 5: Ignoring the Warning Signs
Take 8x Mr. Olympia Ronnie Coleman.
In his prime, he was lifting incredibly heavy weights and training for hours and hours a day.
These days, Ronnie’s experiencing excruciating pain every day.
It’s hard to say exactly what got his body to where it is today, but one thing’s certain: his obsession with training played a major role.
Take this as an example: mid-set of his usual 600 lb squats, on the 8th rep—pop.
A gunshot-like crack in his back. Instant pain.
Most would’ve gone straight home or to the hospital. Ronnie finished his leg day.
And while you’d think he has regrets about the way he trained…
Now, Ronnie was a different breed. A straight savage.
But there’s an important lesson to learn here:
If your elbow whispers “that doesn’t feel so great,” don’t reply with “suck it up.”
Lift lighter for higher reps or just switch it up.
In fact, every 8–12 weeks, take a look at your plan.
Are there any exercises you feel are starting to wear you out?
Your joints need a break from doing the same movement over and over again, so consider changing things up to avoid joint pain.
Like switching your favorite chest machine for a dumbbell press.
Or changing up your grip on pull-ups.
Even minor changes can help with joint pain, and you can always go right back to your favorite exercise after giving your joints a breath of fresh air.
These small adjustments can prevent recurring joint pain and keep your body training longer and stronger.
TL;DR
- Anatomy-first form: Stop copying random influencers, tweak your squat, deadlift, and machine setups to match your bone lengths and joint mobility. Proper form = less lower-back rounding and way less joint pain.
- Mid-back engagement: Ditch the arm-only rows and presses. Depress your shoulders, pull with your elbows, and pinch your traps/rhomboids so your shoulder joint stays stable, and you sidestep chronic joint pain in your shoulders.
- Free-motion balance: Don’t lock both hands on a fixed bar for everything. Mix in single-arm and rotating-grip moves (DB presses, cable rows, cross-body pushdowns) to avoid the repetitive stress that leads to joint pain in wrists, elbows, and shoulders.
- Smart progression: You don’t always need heavier weights — sometimes 1–2 extra reps or cleaner form beats slapping on plates. This earned-not-forced approach keeps micro-strains and nagging joint pain at bay.
- Listen to your body: If an exercise starts whispering, “That doesn’t feel right,” switch it up or deload for a bit. Regularly cycling exercises and grips gives your joints a breather and stops small niggles from turning into long-term joint pain.
What's Next?
But if you’re wondering what some excellent exercises are for growth, yet will also minimize the risk of joint pain, start by reading this article next for 2 great exercises for your arms.
Or, if you’re looking for something that takes care of all the guesswork for you, get 2 weeks free of my fitness app here:
Click the button below to try the BWS+ app for 2 weeks, for free, no strings attached:
↓
Thanks for sticking to the end, and I’ll see ya next time!
By the way, here’s the article summed up into a YouTube video: