

3 Powerful Back Workouts For Size And Strength
Regardless of your end goal, developing a large and strong back will help you. But why? And how, exactly, do you go about building a large and strong back? Find out here.
Trust me; you want to have a big back. Intuitively, if you want to look large and muscular, a big back will help. However, it can even help you appear far leaner as well.
Developing a muscular back will greatly benefit you if your goal is to appear thinner and have a smaller-looking waistline. This might not make sense at first, but by developing a larger back, you’ll increase the width of the upper part of your torso. This causes the lower part of your torso, your abdomen, to appear smaller by comparison. Given that a significant amount of the fat you carry is stored in your abdomen, this will result in you appearing to be leaner than you are.
Although it’s impossible to force your body to lose meaningful amounts of fat in a specific area, you can think of back workouts that effectively increase your back size as workouts for back fat because it will result in you appearing to carry far less than you currently do.
But of course, if you’re not just looking to develop your back, then you’d benefit from one of our programs. These go through, step-by-step, how you can develop a well-rounded physique. If you’re interested:
Click the button below to take my analysis quiz to discover the best program for you:
↓
Developing A Large, Strong, And Attractive Back
So, performing highly effective back workouts will support your goal. But, how exactly do you go about even doing that? Well, you just need to learn which back exercises to perform in your workouts, which points to perform those back exercises, and how to actually perform them in the way that best serves your goals.
Don’t sweat it if you are concerned that you might not have access to the proper equipment to optimize your back training (e.g., if you work out at home). I’ve got you covered.
Although it may be helpful, your training does not have to include back workouts with barbells or back workouts with cables if you don’t have access to that equipment. There are still plenty of highly effective back workouts with dumbbells that you can perform at home and in the gym.
Keep reading, and I’ll walk you through exactly what developing an attractive and muscular back really means — and how to effectively develop each area of it.
Developing an attractive and muscular back really just means creating one that is wide, thick, and balanced.
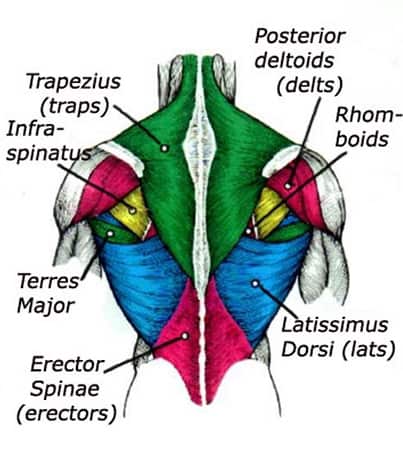
Focus On These Back Muscles
As mentioned earlier, developing a wide back is incredibly important regardless of your ultimate training goal.
This is most effectively done by increasing the size of the lats — these are the largest back muscles and the ones that most people tend to gravitate towards training whenever they perform back workouts.
Developing a thick back comes from increasing the size of your:
- Upper back muscles
- Middle back muscles
- All 3 sections of your traps AND
- Lower back muscles
When it comes to training the traps, most people will focus on training just 1 section and ignore the rest without even knowing it. This is a huge mistake but easy to avoid by knowing which back workouts to perform. Keep reading to make sure that you avoid making this crucial mistake in your future back workouts.
A Note On Training Volume
Although it’s essential for your back workouts to emphasize key muscles in each back region, each needs to be trained with an appropriate training volume (# of sets per workout and per week).
The volume of work you do per area and muscle should differ based on its unique size and properties. It’s common for people to train each area with equal volume, but this is a huge mistake. A muscle that's as small as the upper traps requires far less training time than a muscle as large as the lats.
You will develop an incredibly attractive back if you focus on back workouts that pursue all 3 goals to develop a wide, thick, and balanced back.
As a bonus, developing a muscular and balanced back will also result in you having a strong back.
Although muscular strength can be increased more effectively via other means, increasing muscle size will directly increase the amount of force that muscle can produce. When this is done in a balanced and symmetrical way, you will naturally avoid developing significant weak points in your back.
This will improve your strength and performance during physically challenging back exercises — making it easier to accomplish impressive feats like performing 10 pull-ups in a row.
Boosting Back Activation
Although I’m going to cover plenty of exercises in this article that you can use to develop a full and attractive back, the quality of the training effect you experience from each exercise will be dependent on you.
The way you perform each exercise at the moment will influence the effectiveness of your back workouts — even if you nail form. This is because it’s possible for you to affect how engaged muscles are while training, even if you don’t alter form.
#1: Mind-Muscle Connection
This is possible by taking advantage of something called the mind-muscle connection. This is a well-researched phenomenon that is basically your ability to increase how active a muscle is by simply thinking about engaging it more.
This is hard to take advantage of while starting out but can get far easier with consistent practice.
If you want to train a specific muscle, all you have to do is think about contracting that muscle tightly and squeezing it while you perform a set, and that muscle will experience greater adaptation to your training than otherwise.
There is plenty of research on this topic, but the scientific consensus on the value of mind-muscle activation was recently re-affirmed in a 2018 study published in the European Journal of Sports Science.
This can be an excellent tool for increasing the quality of your back workouts, especially if you don’t already have a strong mind-muscle connection.
#2: Cue Yourself During Movements
However, you can tell yourself certain cues while performing an exercise that will help your body recruit certain muscles more readily.
This was strongly supported in research published in 2009 by Snyder & Leech, who concluded that training cues shift muscle emphasis during back workouts, allowing you to prioritize growing specific muscles.
Here are a few helpful cues that you can use to really bolster the effectiveness of your training:
- Lats: When training your lats, focus on pulling with your elbows rather than your hands. If rowing, focus on driving your elbows backward. If you want to emphasize your lats more while pulling overhead, focus on driving your elbows down into your sides.
- Upper back: When training your upper back, it can also help to focus on driving your elbows backward while keeping them flared out. However, you can significantly increase the activation of upper back muscles by consciously focusing on squeezing your shoulder blades back while pulling them together.
Building Your Lats (Gives You Back Width)
The lats are large wing-like muscles that span from the center-middle of your back up to the top-sides.
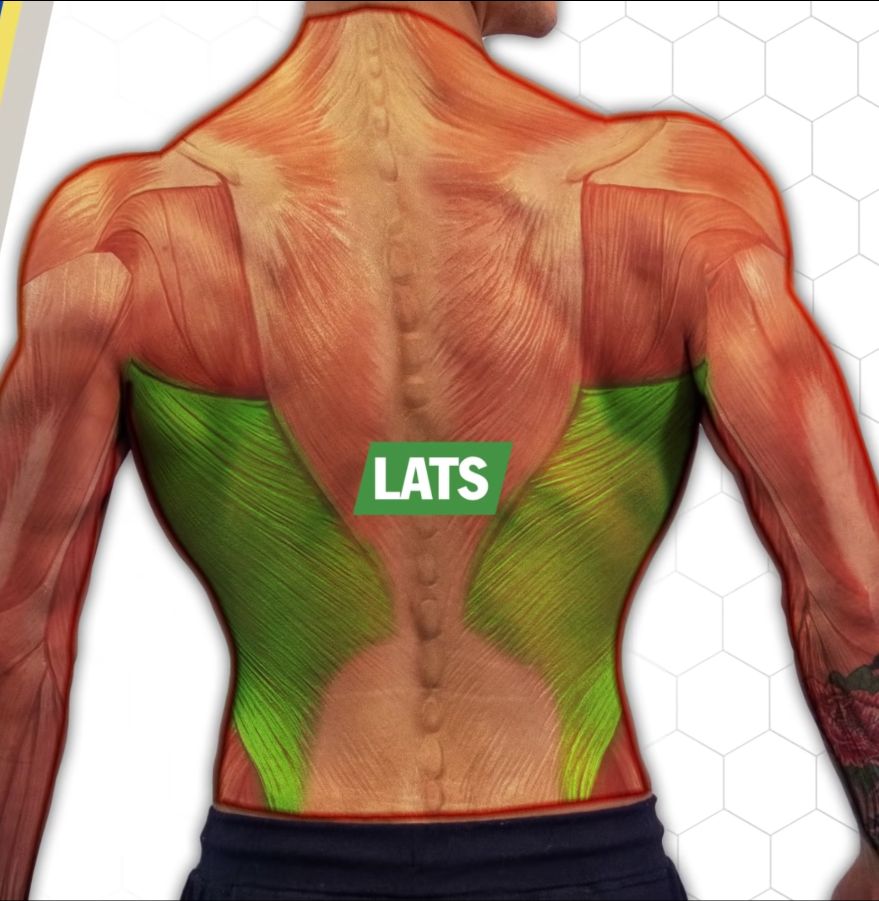
When they are well-developed, they create a sort of V shape for your torso, increasing back width. Since they span such a large part of your back, back workouts that emphasize them effectively increase overall back thickness. As the lats get larger, the significant area of your back that they cover will also get larger.
Understanding The Lats' Biomechanics
The lats are biomechanically responsible for adduction, extension, and internal rotation of the shoulder joint, so back workouts that involve one or more of these motions will involve the lats.
#1: Shoulder Adduction
Most importantly, shoulder adduction is the most effective way to isolate the lats in a way that will increase back width. This happens when you pull your arms down to your sides while you keep your torso upright and avoid leaning back.
You can actually focus on this by modifying exercises that you may be familiar with, which will greatly support the development of your lats.
#2: Shoulder Extension
Back workouts that focus on shoulder extension will also lead to effective lat growth. Shoulder extension occurs whenever you bring your upper arm down towards your torso, whenever your arm is positioned out in front of your body.
Because of this, when performing exercises that involve any form of rowing, keeping your elbows by your side will more effectively train the lats. Flaring them out will force your body to move the weight via an action other than shoulder extension, resulting in it more effectively training the muscles of your upper back instead.
This can get a bit confusing since flaring your elbows out while training the lats with your arms overhead will allow them to be effectively trained as well. However, this is only the case when working overhead given this allows them to move your arms downward through shoulder adduction.
Interestingly though, you can also train your lats with your elbows close together when training overhead in the same way that keeping them close together works while rowing.
What All This Means When Training The Lats
Research on the biomechanics of the lats has been very well explored over the decades and scientific consensus on its function is not a mystery.
A recent publication by Jeno and Varacallo substantiates this consensus, supporting that the lats function through shoulder extension, adduction, and internal rotation. In a practical sense, this means that the authors concluded that when rowing: keep your elbows close to your sides.
When pulling overhead, if you want to emphasize your lats, either keep your elbows very close to your sides or flare them very far out.
Despite both training the lats via adduction and extension being effective, there is evidence to support that training them via extension may support more overall growth.
This is supported by a paper by Lehman et al. published in 2004 who found that lat activation was higher in two seated row variants than the Wide Grip Lat Pulldown exercise, with one version seeing just under 20% greater activation and the other seeing around 40% higher activation.
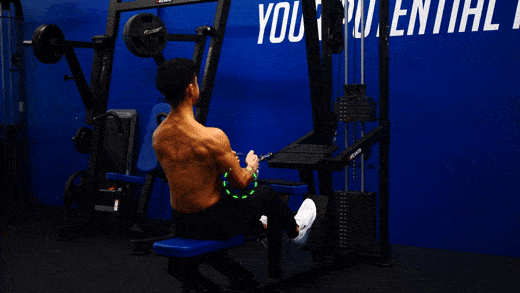
#1: Single Arm Lat Cable Pulldown
The single-arm lat cable pulldown is an exercise that trains your lats through a larger range of motion than any rowing exercise is able to.
This is because it allows you to position your hand overhead so that your shoulder is in a deeply flexed position. If the shoulder is more flexed at the start of the range of motion of an exercise, the lats will experience a greater range of motion during each rep — leading to greater mechanical tension each set, and subsequently more overall growth.
Rowing variants that focus on training the lats using shoulder extension only involve a limited range of motion for the lats given the arm is placed in a position where the shoulder is only slightly flexed at the range of motion.
The publication by Jeno and Varacallo I mentioned earlier touches on this briefly, but this is true for all exercises — not just those you perform during back workouts.
Performing a bicep curl that stops when your arms are parallel to the ground will lead to less mechanical tension than one where your arms go all the way down during each rep. This exercise variant is able to take advantage of that same phenomenon so it’s incredibly effective to incorporate into your back workouts.
Because this exercise is only performed one arm at a time, it also allows you to rotate your torso slightly at the end of the range of motion, which forces your shoulder to rotate internally, further engaging the lats.
How To Perform The Single-Arm Lat Pulldown
- Kneel on the ground while gripping a pulley attachment positioned above head level with one arm extended in front of you.
- Using a neutral grip, exhale and drive your elbow back while keeping it tucked towards your side.
- Continue until your hand reaches your abdomen. As it does, begin to rotate your torso to increase lat activation further slightly.
- Inhale and return to the starting position by extending your arm.
- Repeat for as many reps as necessary.
- Switch sides to train the other arm as appropriate.
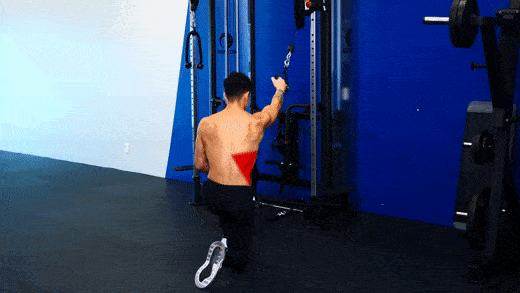
Back Workout Placement: This should be positioned towards the early-middle of your back workouts given the muscles of your abdomen are required to stabilize your torso while you are pulling.
#2: Seated Cable Row (Lat-Focused)
You can perform the lat-focused version of the seated Cable Row with either two pulleys or a close grip attachment.
Unlike other variants of this exercise, you should perform the lat-focused version with your elbows held close to your sides throughout the full range of motion. This allows your lats to drive your elbows back through shoulder extension.
How To Perform The Seated Cable Row (Lat-Focused)
- Position yourself on a Seated Cable Row Machine, grabbing the cable attachment firmly using a neutral grip.
- While maintaining a vertical torso with your arms extended in front of you, exhale and begin pulling the weight towards your abdomen while keeping your elbows tucked firmly to your sides.
- While pulling back, focus on actively driving your elbows back rather than pulling with your hands. Continue until the attachment is pulled towards your torso.
- Inhale and then return to the starting position by allowing your arms to extend forward.
- Repeat for as many reps as necessary.
Back Workout Placement: This exercise should be performed around the middle of your back workouts.
#3: Chest Supported Dumbbell Row (Lat-Focused)
As far as back workouts with dumbbells go, consider this a top-tier exercise.
Chest-supported dumbbell rows are excellent tools for working the back muscles because they eliminate the need for your lower back to stabilize your torso while you perform the exercise — the bench stabilizes you instead.
Without the use of a bench, the erector spinae muscle in your lower back will become fatigued. In fact, a paper in the European Journal of Applied Physiology and Occupational Physiology investigated the fatigability of the erector spinae and its effects on performance.
They observed that its muscular endurance is reduced by around 60-62% once fatigued. This means that heavily fatiguing it may significantly impair the quality of your back workouts.
Using a bench will instead allow you to use more weight than otherwise and makes it easier for you to perform rows with your arms tucked in — which is important, given doing so will better help you engage your lat muscles.
How To Perform The Chest Supported Dumbbell Row (Lat-Focused)
- Position yourself on an incline bench angled at 30 degrees.
- Grab one dumbbell in each hand and maintain them directly below your shoulders with your arms fully extended.
- Then, exhale and pull the dumbbells outwards while keeping your elbows close to your sides.
- Focus on driving your elbows backward as you pull.
- Continue until your elbows pass the midline of your torso.
- Inhale and lower the weight, returning to the starting position.
- Repeat for as many reps as needed.
Back Workout Placement: This exercise should be performed in the earlier portion of your back workouts but should generally be done after exercises that require a lot of stabilization.
#4: Underhand Narrow Grip Barbell Row
This is an uncommon variant of the common barbell row that emphasizes the upper back muscles.
It requires that you keep your arms close by your sides so that the lats are the primary focus of this exercise. It is also performed underhand, which increases bicep activation but makes this exercise more mechanically feasible to perform effectively.
How To Perform The Underhand Narrow Grip Barbell Row
- Bend down while maintaining a flat back until your torso is parallel to the floor.
- Grab a barbell with your hands shoulder-width apart and both palms facing away from you.
- Exhale and begin rowing the barbell towards your belly button while keeping your arms by your sides.
- While maintaining a flat back, focus on driving your elbows backward as you pull.
- Continue until the bar touches the area around your belly button.
- Inhale and begin lowering the bar down to fully extend your arms, returning to the starting position.
- Repeat for as many reps as needed.
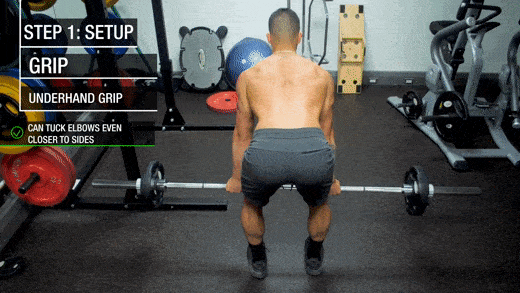
Back Workout Placement: This exercise should be performed towards the beginning of your back workouts. Typically this should be one of the first three exercises performed.
Building Your Upper Back (Gives You Back Thickness)
Developing the upper back can be overwhelming at first because many muscles are located in that region. However, it’s not as bad as it seems.
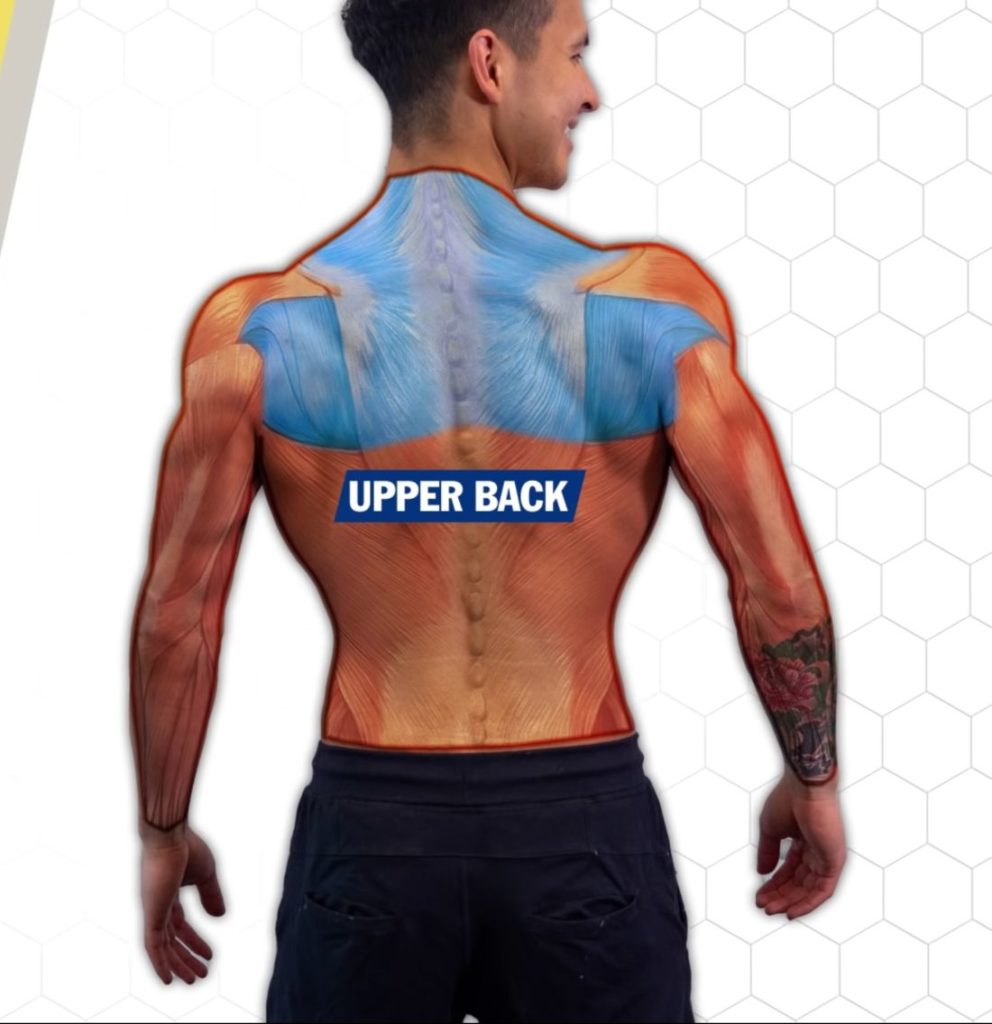
Many of those muscles share similar mechanical functions, meaning that training one means training several others. You just need to become familiar with the joint actions most of them share and incorporate exercises that involve those shared actions into your back workouts.
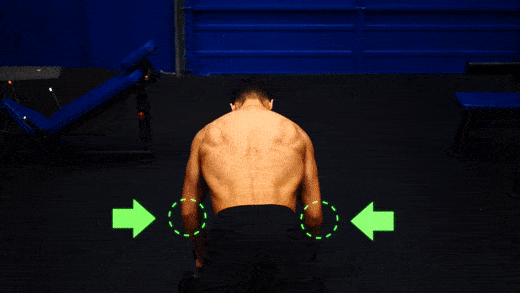
The most important joint actions for training the upper back are horizontal shoulder abduction, scapular retraction, and scapular elevation. Although upper back muscles can produce other joint actions, these are the most important.
Fortunately, back exercises that involve shoulder horizontal abduction will also involve scapular retraction.
This is due to a phenomenon known as the scapulohumeral rhythm.
Whenever motion occurs at your shoulder, your scapula will also move proportionally to support this motion. You just need to make sure that whenever you perform exercises that involve these motions, you consciously focus on pulling your shoulder blades back throughout, and you’ll develop far greater upper back thickness.
#1: Wide Overhand Grip Pull Up
Pull-ups are excellent tools for developing your upper back, mid-back, and lats.
However, using a wide overhand grip without leaning backward will also dramatically increase lat involvement by focusing on shoulder adduction. If you are not strong enough to perform a pull-up yet, try checking out this video for help working your way up.
How To Perform The Wide Overhand Grip Pull Up
- Grab a pull-up bar with your hands far wider than shoulder-width and your palms facing away from you.
- Exhale and pull yourself up by driving your elbows down and into the sides of your torso while bringing your shoulder blades down and together.
- Continue pulling until your elbows are within several centimeters (1 inch) of touching the sides of your torso.
- Then, inhale and lower yourself down in a slow and controlled fashion until your arms are fully extended, and you return to the starting position — continuing to maintain tension in your back, even at the bottom.
- Repeat for the desired number of reps.
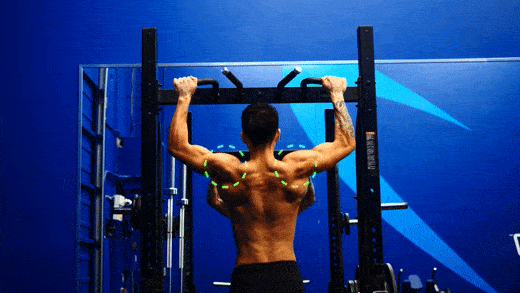
Back Workout Placement: The wide overhand grip pull up should be performed towards the very beginning of your back workouts, given the number of stabilizer muscles required to perform it effectively. Performing it later while those stabilizer muscles are weaker may result in a significant decrease in performance.
#2: Wide-Grip Lat Pulldown
The wide grip lat pulldown is a staple in most people’s back workouts.
Despite its name, the way your elbows move during the movement makes it a better exercise for the upper back muscles than it does for the lats. The lats will still be involved to an extent, but the upper back muscles will receive most of the tension.
How To Perform The Wide Grip Lat Pulldown
- Grab a pull-down bar with your hands far wider than shoulder-width and your palms facing away from you.
- Maintain a mostly vertical torso, with your eyes facing forward — slightly lean your upper back backward.
- Exhale and begin lowering the bar by driving your elbows down and into the side of your torso.
- Continue pulling until your elbows are within several centimeters (1 inch) of touching the sides of your torso.
- Then, inhale and raise the bar up in a slow and controlled manner until your arms are fully extended and you return to just before the starting position.
- Do not allow the weight to return to the stack or tension released from your back.
- Repeat for the desired number of reps.
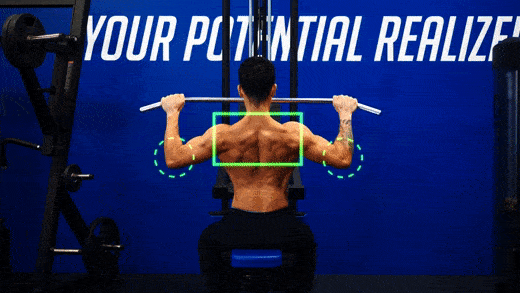
Back Workout Placement: Place this towards the early-middle of your back workouts. It does involve multiple joints so it should not be performed at the end, but there are other more important back exercises you should perform first.
#3: Wide Grip Seated Cable Row
Cable seated rows notoriously have many exercise variations, given there is a seemingly infinite number of attachments and hand positions you can use.
But, one version stands out above the others as an excellent choice for increasing upper back thickness.
The wide grip seated cable row allows for you to move the cable attachment almost entirely through the joint actions of shoulder horizontal abduction and scapular retraction — meaning it’s extremely effective in back workouts focused on developing your upper back thickness.
How To Perform The Wide Grip Seated Cable Row
- Position yourself on a seated cable row machine with either a wide grip attachment firmly gripped in your hands or two individual pulleys with one gripped in either hand.
- While maintaining a vertical torso with your arms extended in front of you, exhale and begin pulling the weight towards your sternum by flaring your elbows outwards to around 45 to 60 degrees and driving your elbows backward.
- While pulling back, focus on actively pulling your shoulder blades together.
- Continue until the attachment is pulled towards your torso.
- Inhale and then return to the starting position.
- Repeat for as many reps as necessary.
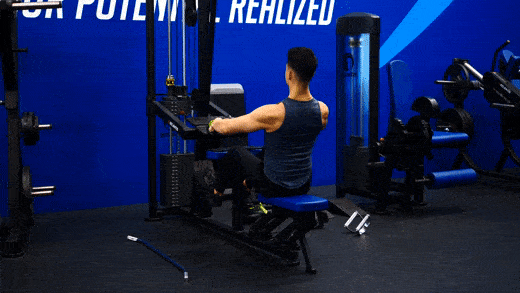
Back Workout Placement: This exercise should be performed around the middle of your back workouts.
#4: Chest Supported Dumbbell Rows (Upper Back Focused)
Similar to the lat-focused version of the Chest Supported Dumbbell Row, the upper back focused version will benefit your back workouts by removing the need for your lower back to stabilize your body while performing this exercise.
This version is very similar to what I’d discussed earlier, except your elbow positioning will differ significantly.
How To Perform The Chest Supported Dumbbell Rows (Upper Back Focused)
- Position yourself on an incline bench angled at 30 degrees.
- Grab one dumbbell in each hand and maintain them directly below your shoulders with your arms fully extended.
- Then, exhale and begin pulling the dumbbells outwards while flaring your elbows out to the point that is angled about 60 degrees from your torso.
- Make sure to also pull your shoulder blades in and together while pulling.
- Continue until your elbows are in-line with your torso.
- Inhale and lower the weight, returning to the starting position.
- Repeat for as many reps as needed.
Back Workout Placement: This exercise should be performed in the earlier portion of your back workouts but should generally be done after exercises that require a lot of stabilization.
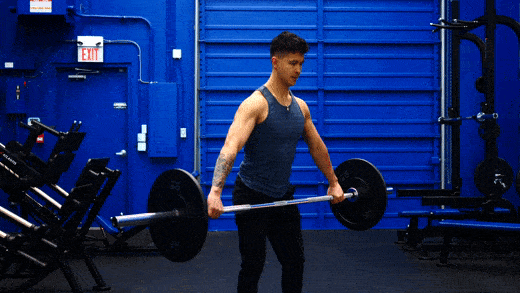
#5: Wide-Grip Barbell Rows
This exercise is a variant of the traditional barbell row that emphasizes the upper back muscles.
It requires that you lift the bar with your arms flared out, meaning that you’ll lift it via shoulder horizontal abduction. This will heavily recruit the muscles of your upper back.
How To Perform The Wide-Grip Barbell Rows
- Bend down while maintaining a flat back until your torso is almost parallel to the floor.
- Grab a barbell with your hands far wider than shoulder-width apart and both palms facing you.
- Exhale and begin rowing the barbell up towards your sternum while flaring your elbows out to the side.
- While maintaining a flat back, focus on bringing your shoulder blades back and together while you pull.
- Continue until the bar touches the area around your sternum.
- Inhale and begin lowering the bar down so that your arms are fully extended, returning to the starting position.
- Repeat for as many reps as needed.
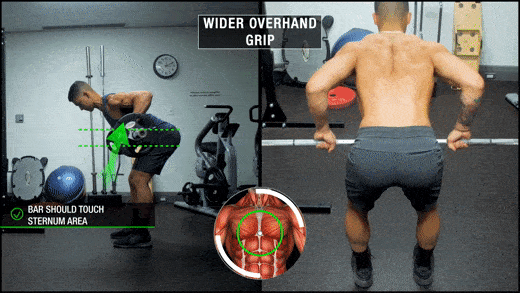
Back Workout Placement: This exercise should be performed towards the beginning of your back workouts. Typically this should be one of the first three exercises performed.
Building Your Upper Traps (Gives You Neck Thickness)
The upper traps are small so do not require a lot of training volume.
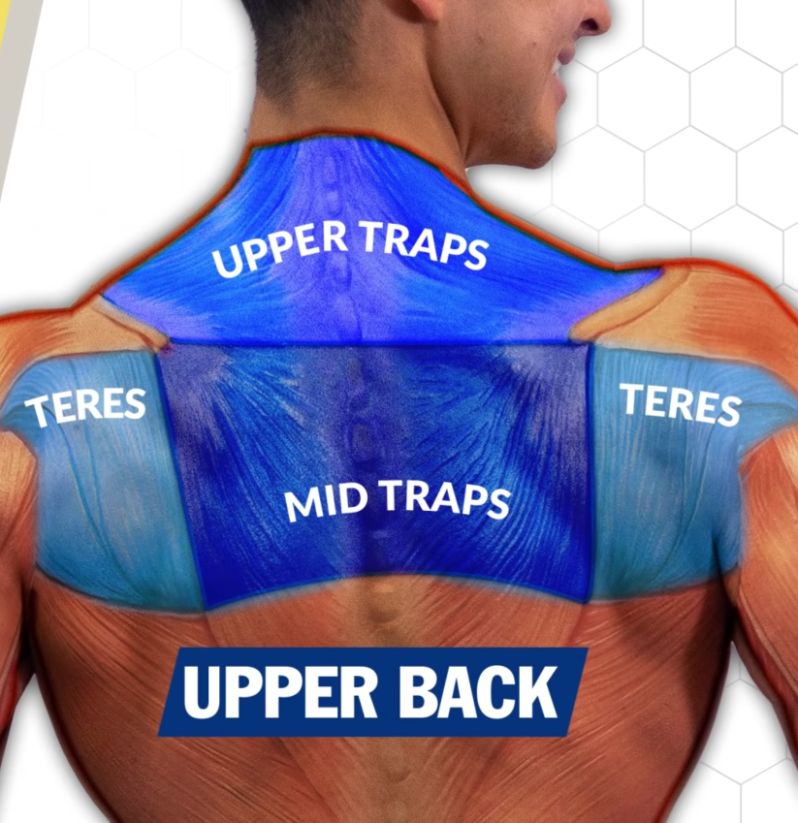
It’s a very common training mistake for people to focus on their upper traps too much during their back workouts. However, it is still valuable to train them with an appropriate volume given that increasing their size will increase the thickness of the topmost part of your upper back.
Due to their limited function, they are best trained by performing scapular elevation — which has a very small range of motion.
It involves raising up your shoulder blades upward, similar to what you’d do when shrugging your shoulders naturally.
If you appreciate science-based insights like this, you’re going to love the BWS programs. I’ve designed every single one of them to contain valuable knowledge on why (exactly) you’re using a specific exercise and/or doing it a certain way. This way, you’ll gain a deeper understanding of your training – while experiencing the quickest gains possible. If you’re interested:
Click the button below to take my analysis quiz to discover the best program for you:
↓
#1: Dumbbell Shrugs
Dumbbell Shrugs are effective at training the upper traps, which will help make the top-most part of your upper back thicker.
Despite only developing muscle thickness in a small area of the upper back, they are an isolation exercise that meets a need that most other back exercises do not, so they serve an important role.
How To Perform The Dumbbell Shrugs
- Standing upright, grab one dumbbell in either hand and hold them by your sides with your arms fully extended.
- Exhale and shrug your shoulders upwards while keeping your arms fully extended and pulling your shoulder blades back.
- Once your shoulders are shrugged as much as possible, inhale and lower the weight to the starting position.
- Maintain tension in your upper traps at the bottom of the range of motion, do not fully relax them.
- Repeat for as many reps as your workout requires.
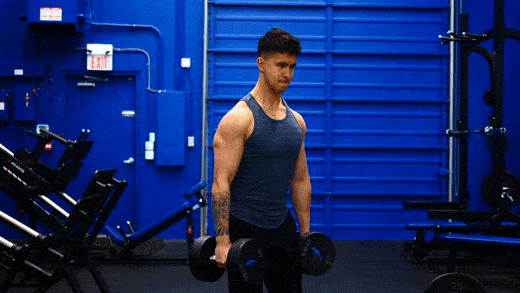
Back Workout Placement: This exercise should be performed at the end of your back workouts. Given it acts as an isolation exercise, performing it earlier would inhibit your performance during other exercises in your workout that focus on more than one back muscle. It also focuses on a relatively small area of your upper back, so it is less important to prioritize than other exercises you’ll do in your program.
#2: Barbell Shrugs
Barbell Shrugs can be used to train the upper traps in isolation.
When performing this exercise, make sure to use a load that allows you to go through the full range of motion. Meaning, a weight that allows you to fully shrug your shoulders upwards on every rep.
It’s easy to accidentally use too much weight and reduce your range of motion with this exercise, so pay close attention to your form.
How To Perform The Barbell Shrugs
- Standing upright, grab a barbell and hold it in front of you with your arms fully extended using a wide grip.
- Similar to a Dumbbell Shrug: exhale and shrug your shoulders upwards while keeping your arms fully extended.
- Once your shoulders are shrugged as much as possible, inhale and lower the weight to the starting position.
- Do not fully relax your upper traps at the bottom of the range of motion, continue to maintain tension.
- Repeat for as many reps as your workout requires.
Back Workout Placement: Perform this exercise towards the end of your back workouts alongside any other isolation exercises that you have planned for your workout.
Building Your Lower Back
The erector spinae is an often overlooked back muscle that covers the lower portion of the back and is almost entirely responsible for increasing thickness in this area.

It is involved in trunk extension, which is basically any movement where you raise your back upwards towards it being in an upright position. Because of this, it’s an important muscle to strengthen to increase spinal stability and how effectively you can stabilize other movements.
It’s also important to note that the erector spinae is an extremely taxed stabilizer muscle during most lower body exercises. Because of this, it should not be trained directly before a leg day — as it will greatly compromise the effectiveness of that leg workout due to the muscle being pre-fatigued.
#1: Barbell Conventional Deadlifts
Barbell Conventional Deadlifts are incredibly productive for building muscle throughout the entire body.
Research conducted by Edington et al. investigated muscle recruitment during the deadlift and observed meaningful recruitment of muscles across various regions of the body: the butt, thighs, lower back, and middle back.
Their findings support that the erector spinae muscle of the lower back and the lats muscle of the middle back are both heavily recruited. This indicates that deadlifts increase lower back thickness, middle back thickness, and back width.
Despite this, deadlifting will focus on improving your lower back more than any other area of your back.
This is because the role of the lats in this movement is primarily to stabilize the bar, preventing motion rather than generating motion. The erector spinae, however, has an active role in the exercise — straightening and raising your back as you perform the deadlift.
Muscles grow more when trained through a full range of motion.
Keep in mind that the deadlift will heavily tax and stimulate growth in many of your leg muscles. Because of this, it should not be performed directly before or directly after a leg day.
How To Perform The Conventional Deadlifts
- Begin the movement by standing directly in front of a barbell so that the bar is directly over your mid-foot.
- Bend down by both squatting and hinging at your hips while focusing on keeping your torso relatively upright and entirely straight.
- With your arms fully extended in front of you, grab the barbell tightly.
- Exhale and begin squatting upwards while slightly hinging at your hip to move your torso more upright.
- After the bar passes your knees, drive your hips forward and stand upright while continuing to maintain a flat back.
- Continue until you are standing fully upright, do not lean back at the top.
- Then, inhale and begin lowering the bar by beginning to bend at both your hips and your knees.
- Once the bar passes your knees, squat down the rest of the way while continuing to maintain a flat back.
- Place the bar on the floor and allow it to rest on the ground fully before beginning another rep.
- Continue for as many reps as necessary.
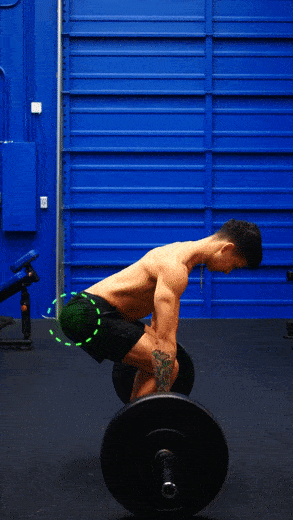
Back Workout Placement: Given the immense strain this exercise places on your body, it should be performed at the start of any back workout that it is involved in.
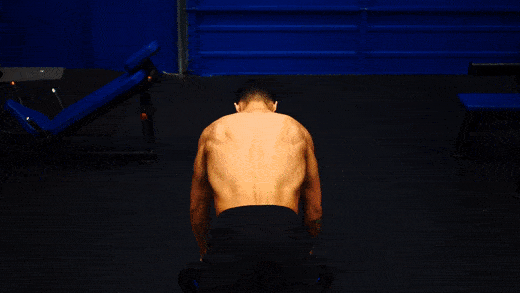
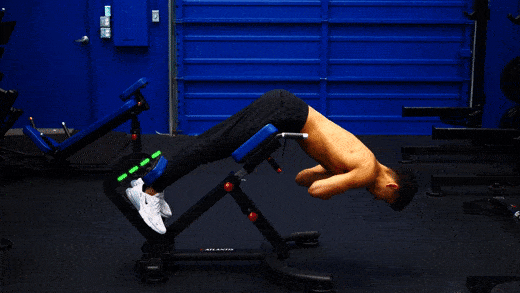
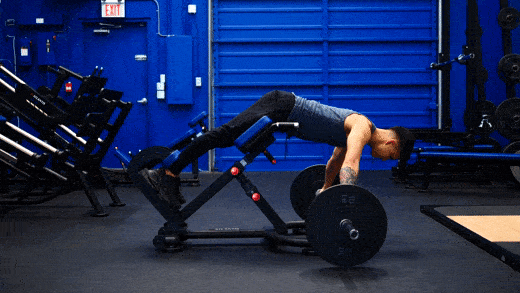
#2: Hyperextensions
Hyperextensions require the use of a special hyperextension bench, but they are effective at isolating the Erector Spinae. This is difficult to do given most movements that train the Erector Spinae also heavily tax the glutes and hamstrings. I’d strongly advise adding this to your back workouts if you’re aiming to develop a balanced back that appears thick in all areas, including the bottom. Hyperextensions are also amazing because they can be performed with just your bodyweight, a dumbbell, or a barbell. Whatever equipment you have access to, you can make hyperextensions work for you.
How To Perform Hyperextensions
- Position yourself on a hyperextension bench so that the top of the pad is just below your hips.
- Allow your torso to bend forward, rotating around the pad.
- Continue until your torso is fully curled forward.
- Then, exhale and begin straightening your torso while simultaneously raising it upwards.
- Continue until your torso is in line with your lower body, creating a straight line.
- Inhale and lower yourself back down to the starting position.
- Repeat for as many reps as needed.
This exercise can also be performed with added weight if you are strong enough to do so.
If you perform it with a barbell, maintain a bar on your upper back throughout the range of motion.
And here's how to perform it with dumbbells.
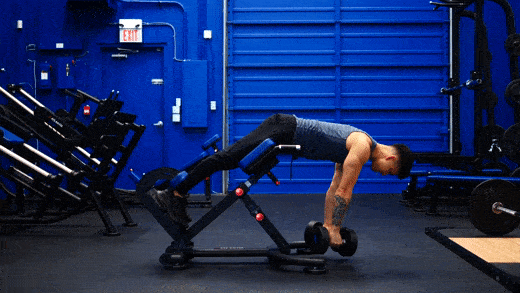
Back Workout Placement: This should be positioned towards the end of your workout. Given the lower back can sometimes help stabilize other exercises, it’s best to save this until a point where fatiguing your Erector Spinae won’t interfere with the rest of your back workout.
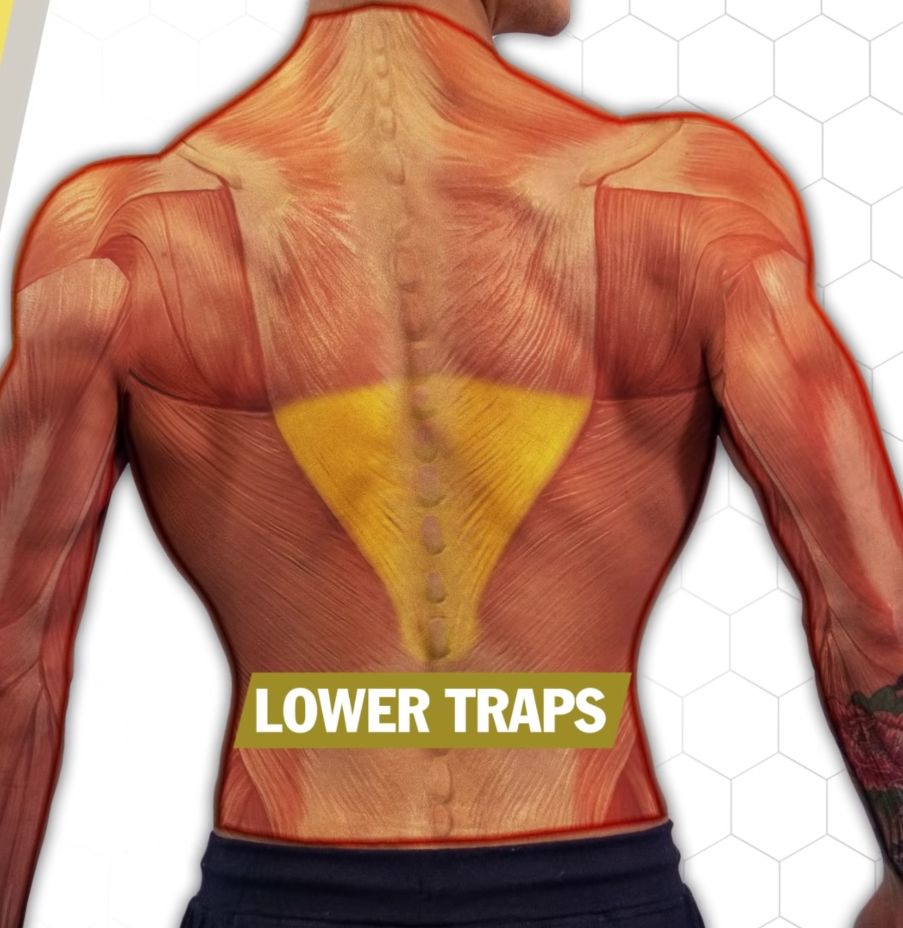
Building Your Lower Traps (Gives You Stability And Better Posture)
Developing an attractive back is not just about building a ton of muscle through highly efficient back workouts.
It’s also about being able to present the back that you build in an aesthetically appealing way, and gradually improving your performance over time with the exercises that will significantly improve your back size. Fortunately, you can do both of these things by training your lower traps.
Although training them will give you a little bit of a boost to back size, they’re really good ‘support muscles’ to train.
Developing your lower traps will significantly improve your back thickness. Fortunately, they are responsible for the muscle actions of scapular depression, scapular retraction, and scapular upward rotation. Scapular depression pulls your shoulder blades down, scapular retraction pulls your shoulder blades back, and scapular upward rotation rotates your shoulder blades upwards.
All 3 of these actions are involved in exercises I’ve already covered, meaning the lower traps will be trained. However, performing a small amount of extra isolation work can help your lower traps grow faster and significantly improve your middle back thickness.
The lower traps are also a common weak point for many people, and doing some extra work focused on them can help overcome that weak point. This will help you cultivate a more balanced back.
The best way to isolate the lower traps is to focus on performing exercises that emphasize scapular depression given that other major muscles don’t share this function with the lower traps. It’s not possible to effectively isolate the lower traps using barbells or dumbbells due to the orientation of gravity, so all exercises that significantly train the lower traps must be done with bodyweight, cables, machines, or bands.
#1: Scapular Pull-Ups
Similar to Scapular Dips, Scapular Pull-Ups involve a very short range of motion and focus on isolating the lower traps.
They are easier to perform than pull-ups, so may be accessible to you even if you are unable to perform bodyweight pull-ups at the moment.
As an added bonus, performing these regularly in your back workouts will make it easier for you to develop the strength necessary to perform more bodyweight pull-ups than you can currently complete.
How To Perform Scapular Pull-Ups
- Grab a pull-up bar with both hands slightly wider than shoulder-width apart and your palms facing away from you.
- Bracing your abs, look forward, and exhale.
- Begin to raise yourself up solely by shrugging your shoulder blades downwards.
- Do not allow your elbows to bend or arms to move at any point.
- Continue until you can no longer push your shoulder blades down any further.
- Inhale, and then begin to lower yourself down to the starting position by allowing your shoulder blades to rise back up.
- Repeat for as many reps as necessary.
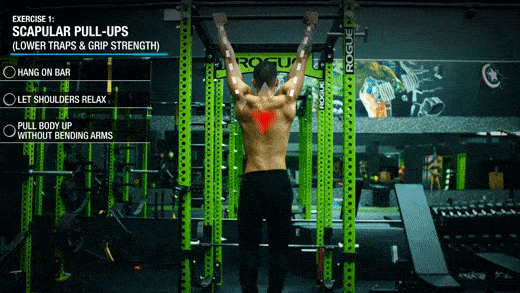
Back workout Placement: These should be performed at the end of your workout as one of the last isolation exercises in your back workouts.
#2: Face Pulls
Face Pulls are excellent tools for developing upper back thickness.
However, they require that you have both a cable machine and a rope attachment available — so they’re only feasible if your equipment setup allows for you to execute cable back workouts.
If you have access to both, you can set up for the exercise by attaching the rope and moving it to a height that is slightly above head level.
How To Perform Face Pulls
- Grab the rope with the palm of each hand facing away from each other.
- Leaning back slightly, exhale and pull the rope down and back towards the level of your mid-chest.
- As you pull, focus on bringing your shoulder blades inward and together.
- Continue to pull until your hands each pass the outside of your chest at the level of your mid-chest and your shoulder blades are fully squeezed.
- Inhale and allow the rope to return to its starting position.
- Repeat for as many reps as you’d like to complete.

Back Workout Placement: This should be performed towards the end of your back workouts. However, it should still be performed before any exercises that isolate one muscle or a small group of muscles- such as those that isolate the upper traps.
Frequency And Volume Of Your Back Workouts
How frequently you train your back will directly influence how much progress you end up experiencing.
If you want to develop a solid and attractive back quickly, it’s important that your body spends a majority of each and every week building back muscle.
If you train your back too infrequently, you’ll only build muscle for a small portion of the week. If you train your back too often, you’ll end up spinning your wheels and will over-fatigue its muscles. Ultimately, you just need to aim for the sweet spot and perform back workouts two times per week, ideally 3-4 days apart from one another.
But, how much should you train your back on each of those days? Aim to perform around 18-24 total sets during each back workout. Your training will have adequate volume to support back development without being ‘too much’ and forcing you to perform sets that won’t translate to more muscle growth.
3 Sample Back Workouts
Time to bring it all together. I’m going to provide you with 3 sample back workouts that you can just copy and use in your training if you like. Since you’ll be performing back workouts twice per week, some workouts will emphasize certain muscles more than others. This is okay. The below 3 back workouts are designed specifically to be mixed and matched with each other.
Back Workout 1
Deadlifts: 4 sets of 6-8 reps
Wide Grip Overhand Pull Ups: 4 sets of 6-8 reps
Chest Supported Row (Lat Focused: 4 sets of 8-10 reps
Dumbbell Shrugs: 3 sets of 10-12 reps
Scapular Pull Ups: 3 sets of 10-12 reps
Back Workout 2
Wide Overhand Grip Pull Up: 4 sets of 6-8 reps
Underhand Narrow Grip Barbell Row: 4 sets of 8-10 reps
Single Arm Lat Cable Pulldown: 4 sets of 10-12 reps
Face Pulls: 3 sets of 10-12 reps
Hyperextensions: 3 sets of 10-12 reps
Back Workout 3
Wide Grip Overhand Pull Ups: 4 sets of 6-8 reps
Chest Supported Row (Upper Back Focused): 4 sets of 8-10 reps
Seated Cable Row (Lat Focused) 4 sets of 8-10 reps
Wide Grip Seated Cable Row: 3 sets of 10-12 reps
Barbell Shrugs: 3 sets of 10-12 reps
Hyperextensions: 3 sets of 10-12 reps
"What If I Don't Have All The Equipment Needed Here?"
The workouts listed above are just samples, but there are dozens of ways that you can build effective back workouts.
You don’t have to use all of the exercises I provided above in future back workouts that you create unless you want to. It’s possible to perform back workouts using only 1 type of equipment if that’s what you have available, or simply what you prefer.
I’ve gone ahead and written up a few helpful cheat sheets for you, so that you can perform effective back workouts regardless of what equipment you have access to. Just reference the appropriate cheat sheet whenever you need a hand, and I’ll have your back.
Click here to access our cheat sheet on back workouts with barbells.
Click here to access our cheat sheet on back workouts with dumbbells.
Click here to access our cheat sheet on back workouts with cables.
Takeaway
Feel that something's lacking in your back development? Carefully analyze what, exactly, you're lacking: is it back width, thickness, or balance? Then incorporate the various exercises shown in this article as necessary — and you'll start to see a massive difference in the aesthetics of your back. That’s the power of smart, science-based training.
And if you’re looking for customized help to apply this science-based approach to your training to make faster gains and build a body you’re proud of:
Click the button below to take my analysis quiz to discover the best program for you:
↓